Best Methods to Create Windows 10 Recovery USB

“I still remember the day my Windows 10 PC suddenly wouldn’t boot after a routine update. Panic set in as I realized I hadn’t prepared any recovery options. Luckily, I had created a Windows 10 recovery USB a few weeks earlier, which saved me hours of frustration and potential data loss. From that experience, I learned how essential it is—especially for beginners—to have a reliable recovery USB ready before disaster strikes.“
This article will guide you through the best and easiest methods to create a Windows 10 recovery USB, using built-in tools and official Microsoft software. Whether you want to fix boot problems or reinstall your system safely, these step-by-step instructions will make the process straightforward. Plus, I’ll introduce WinfrGUI, a powerful yet user-friendly tool to help recover lost files alongside your recovery efforts. By the end, you’ll be prepared to handle Windows issues confidently and protect your valuable data.
What Is a Windows 10 Recovery USB?
A Windows 10 recovery USB is a bootable USB drive that contains a recovery environment to help fix problems with your PC. It allows you to access troubleshooting tools like Startup Repair, System Restore, Command Prompt, and even reinstall Windows if needed. Unlike a full Windows installation USB, which is designed for installing or reinstalling the operating system, a recovery USB focuses on repairing existing installations without affecting your personal files.
This USB drive can be a critical resource when your computer won’t boot normally, when system files get corrupted, or when malware has damaged your system. Creating this tool ahead of time ensures you have a reliable way to get your PC back up and running quickly.
Preparing to Create Your Recovery USB
Before you start, there are a few things to keep in mind:
- USB Drive Size: Use a USB flash drive with at least 16 GB of storage. Smaller drives may not have enough space to store all the recovery files.
- Backup Your Data: Creating a recovery drive will format the USB, erasing all existing data. Make sure to back up any important files from the USB beforehand.
- Stable Power & Internet: Ensure your PC is plugged in and connected to the internet during the process to avoid interruptions.
Having these preparations done will make the creation process smooth and hassle-free.
Method 1: Using Windows 10 Built-in Recovery Drive Tool
Windows 10 includes a built-in Recovery Drive tool that makes it easy to create a Windows 10 recovery USB for system repair and reinstallation. Follow these steps:
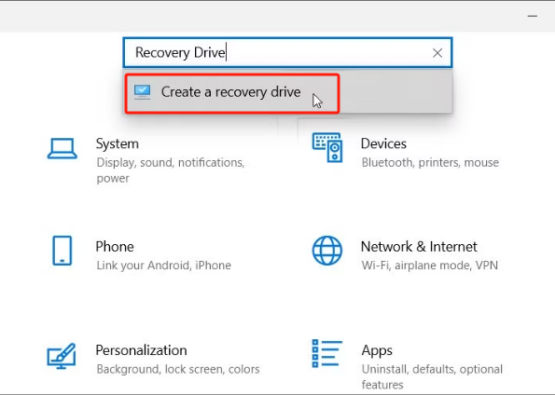
Step 1: Open the Recovery Drive tool by typing “Create a recovery drive” into the Windows search bar and selecting the apps from the results.
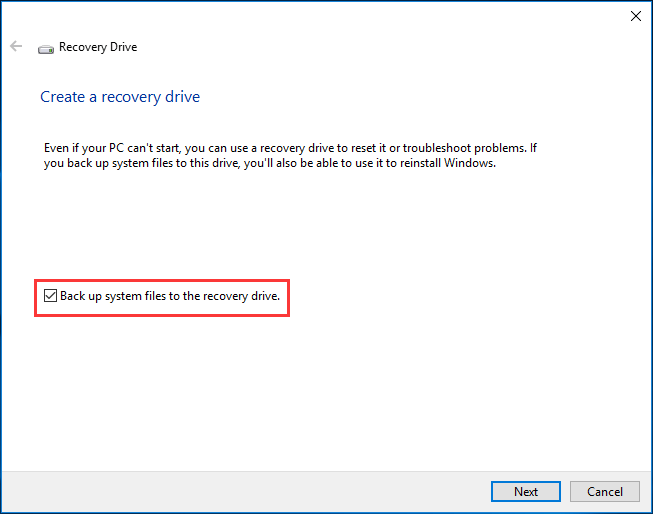
Step 2: In the tool window, check the box labeled “Back up system files to the recovery drive” to enable reinstalling Windows if needed, then click Next.
Step 3: Select your USB flash drive from the list—make sure it’s the correct one, as the process will erase all data on it.
Step 4: Click Create to begin copying the necessary files; this may take several minutes depending on your system and USB speed.
Step 5: Once the process completes, safely eject the USB drive. Your recovery USB is now ready to use.
Make sure your USB is formatted as FAT32 or NTFS, and it’s empty or contains no important data. If the tool says the USB drive is too small, try using a larger one.
Method 2: Using Windows Media Creation Tool (Official Microsoft Tool)
The Windows Media Creation Tool is an official and reliable way to create windows 10 recovery usb that contains the latest Windows 10 installation files. This USB can be used for both installing Windows and accessing recovery options when your system encounters problems.
How to Create Your Recovery USB Using the Media Creation Tool:
Step 1: Download the Media Creation Tool from Microsoft’s official website—it’s free and safe to use.
Step 2: Run the downloaded file and accept the license terms to launch the tool.
Step 3: Choose “Create installation media (USB flash drive, DVD, or ISO file) for another PC” when prompted.

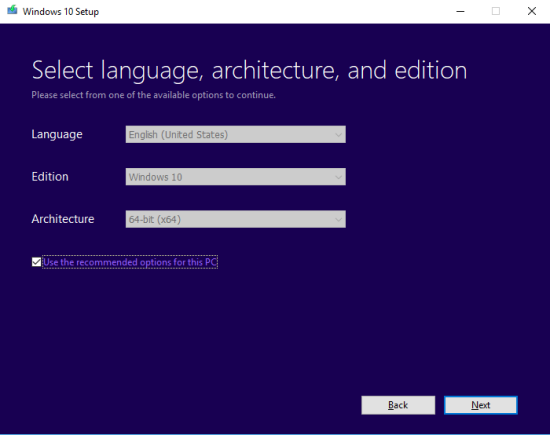
Step 4: Select your preferred language, Windows edition, and architecture; the recommended options are usually fine.
Step 5: Insert your USB flash drive and select it when the tool asks for the destination drive.
Step 6: The tool will download Windows 10 and create a bootable USB; this process typically takes 15–30 minutes depending on your internet speed.
Once completed, you can use this USB to boot your PC and access Windows recovery or perform a clean installation if needed.tions or reinstall Windows.
How WinfrGUI Can Help You Recover Lost Files
While your Windows 10 recovery USB is great for fixing system issues, it doesn’t always recover deleted or lost files. Sometimes, before or after repairing your system, you might need to recover important documents, photos, or other files that were accidentally deleted, lost due to formatting, or damaged by crashes. This is where WinfrGUI comes in handy.
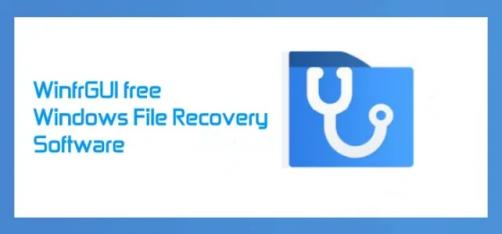
WinfrGUI is a free, beginner-friendly Windows file recovery tool that makes recovering files simple—no complex command-line skills needed. It complements your recovery USB perfectly by helping you get back lost files easily.
Why Use WinfrGUI?
- It can recover files from formatted drives and deleted partitions.
- Its graphical interface is intuitive for users at any skill level.
- It’s completely free and compatible with Windows 10 and later.
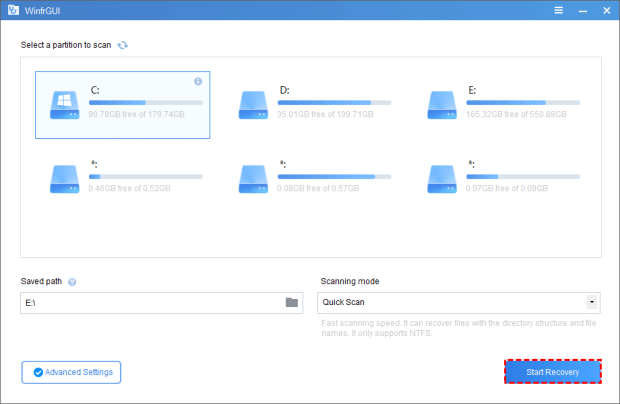
How to Recover Files with WinfrGUI:
Step 1: Download and install WinfrGUI on a different drive than the one you want to recover files from to avoid overwriting any data.
Step 2: Open WinfrGUI, select the drive you want to scan, and start the scan to locate recoverable files.
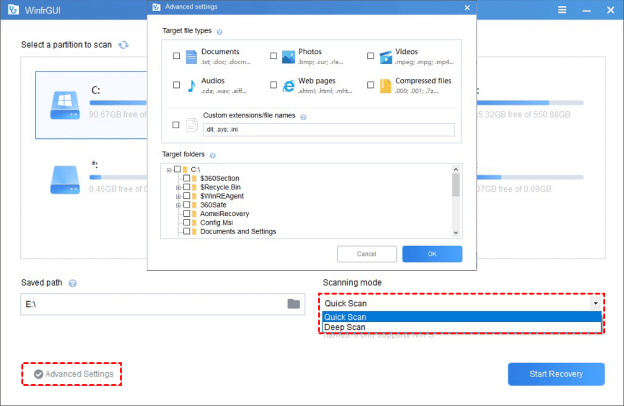
Step 3: Preview the found files, select the ones you want to recover, choose a safe location on a different drive, and click Start Recovery to restore your files.
Using WinfrGUI before performing system recovery can help ensure you don’t lose important files during the repair process.
How to Use Your Windows 10 Recovery USB
Creating the recovery USB is just the first step. Knowing how to use it effectively when problems arise is crucial. Follow these steps:
Step 1: Insert and Boot from the USB
- Plug your recovery USB into the PC.
- Restart your computer.
- Immediately press the BIOS/UEFI access key (usually F2, F12, DEL, or ESC—check your PC manual).
- In BIOS/UEFI, change the boot order to prioritize the USB drive.
- Save changes and exit. Your PC will boot from the recovery USB.
Step 2: Access Windows Recovery Environment
- Once booted, you’ll see the recovery options screen.
Step 3: Choose a Recovery Option
- Startup Repair: Automatically fixes common startup problems. Try this first.
- System Restore: Revert your PC to an earlier point if restore points exist.
- Command Prompt: For advanced troubleshooting with commands.
- Reset This PC: Reinstall Windows while choosing to keep or remove your personal files. Use this only if necessary.
Step 4: Follow On-Screen Instructions
- Select the appropriate option and carefully follow the prompts to repair your system.
Avoid Reset This PC unless necessary, as it may erase apps or files. Always try Startup Repair first to fix minor issues. Use System Restore if you have restore points enabled.
Troubleshooting FAQs to Prevent Data Loss on Windows 10
Q1. How can I back up my files automatically on Windows 10?
Use the built-in File History feature or cloud services like OneDrive and Google Drive. These tools regularly save copies of your files, so you can restore them if they get deleted or corrupted.
Q2. Why should I keep Windows updated?
Regular updates fix security vulnerabilities and bugs that malware or hackers might exploit to delete or damage your files. Always install updates promptly to keep your system secure.
Q3. How important is antivirus software for data protection?
Very important! Up-to-date antivirus software helps detect and block malware that could delete or corrupt your files. Make sure your antivirus runs automatic scans regularly.
Q4. How do I know if my recovery USB will work when needed?
Occasionally test your recovery USB by booting your PC from it. This ensures the drive is functional and you’re familiar with the recovery environment.
Q5. What should I do if I accidentally delete important files?
Before restoring your system, try using a file recovery tool like WinfrGUI. It can scan your drives and recover deleted files quickly and safely, increasing your chances of data retrieval.
Conclusion
For Windows 10 beginners, creating a recovery USB is an essential step to stay prepared for unexpected system problems. Whether you use the built-in Recovery Drive tool or Microsoft’s Media Creation Tool, both methods are straightforward and reliable. And don’t forget tools like WinfrGUI that can help you recover deleted or lost files with ease. By taking a little time now to create your recovery USB and learning how to use it, you’ll save yourself from future headaches and potential data loss. So go ahead—grab a USB drive and create your Windows 10 recovery tool today! If you have questions or want to share your experience, feel free to leave a comment below. Your feedback helps others stay safe and prepared!
🔗 Also Read: