How to Install Windows 10 from USB: Step-by-Step Guide
Installing Windows 10 from a USB drive is one of the easiest and most efficient ways to set up a new PC or reinstall the operating system on an existing one. Whether you’re upgrading, performing a clean installation, or troubleshooting system issues, using a bootable USB ensures a smooth and hassle-free process. In this guide, we’ll walk you through each step of how to install Windows 10 from USB, from creating a bootable drive to configuring BIOS settings and completing the installation. By the end of this tutorial, you’ll have Windows 10 up and running on your device without any confusion. Let’s get started!
#1. Requirements for Installing Windows 10 from USB
Before proceeding with the installation, make sure you have the following:
1. USB Flash Drive
A minimum of 8GB is required, but 16GB or more is recommended for a smoother process.
2. Windows 10 ISO File
Download the latest official Windows 10 ISO from the Microsoft website to ensure a secure installation.
3. A Working Computer with Internet Access
This is necessary to download the ISO file and create the bootable USB.
4. Backup Important Files
If you’re performing a clean installation, back up essential files to an external drive or cloud storage to prevent data loss. Once you have these requirements ready, you can proceed with creating a bootable USB to install Windows 10.
#2. Create a Bootable USB Drive Using the Windows 10 ISO
To install Windows 10 from a USB, you’ll first need to download the ISO file and then use a tool to create the bootable drive. Here’s a step-by-step guide:
Step 1: Go to the official Microsoft Windows 10 download page using any modern web browser.
Step 2: If you’re on a Windows PC, click “Download Tool Now” to get the Media Creation Tool, or scroll further down and select “Download ISO” for a direct ISO download if you’re using Rufus or a non-Windows device.
Step 3: Follow the on-screen instructions to download and save the ISO file to your local drive, which will be used later to create the bootable USB.
Step 4: Once you’ve downloaded the ISO file, use one of the following tools to write it to a USB flash drive:
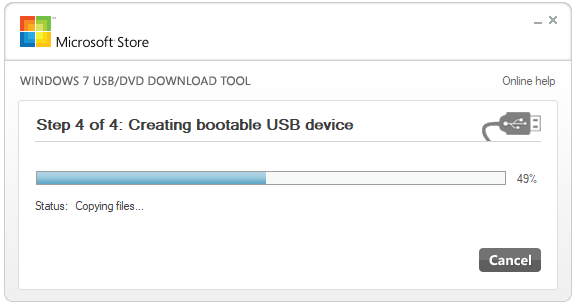
Option A: Windows Media Creation Tool (Recommended for Most Users)
- Launch the Media Creation Tool, then choose “Create installation media (USB flash drive, DVD, or ISO file) for another PC” and click Next.
- Select your preferred language, Windows edition, and system architecture (32-bit, 64-bit, or both), then click Next.
- Choose USB flash drive as the media type, select your connected USB device, and follow the prompts to create the bootable installer.
Option B: Rufus (Recommended for Advanced Users)
- Download and open Rufus from rufus.ie, then insert your USB drive and select it under the Device dropdown.
- Click Select to load the Windows 10 ISO, then choose the correct Partition Scheme — GPT for UEFI or MBR for legacy BIOS systems.
- Keep the default settings for File System (FAT32) and Cluster Size, click Start, confirm any prompts, and wait for Rufus to complete the bootable USB.
#3. Change BIOS/UEFI Settings to Boot from USB
Step 1: Restart your computer and immediately press the required key (such as F2, F12, DEL, or ESC), as indicated on the startup screen, to enter the BIOS or UEFI setup menu.
Step 2: Within the BIOS/UEFI interface, find the Boot or Boot Order section using the keyboard arrows or mouse, depending on your system’s controls.
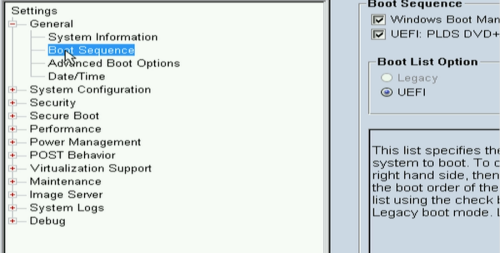
Step 3: Find the Boot Priority or Boot Device Order list and move your USB drive to the top position to ensure the system boots from the USB first.
Step 4: Save your changes—usually by pressing F10 and confirming with Yes—then exit the BIOS/UEFI setup to restart your computer and boot from the USB drive.
#4. Install Windows 10 from the USB Drive
Step 1: Restart your computer with the bootable USB drive inserted, and if necessary, press the designated key (like F12 or ESC) during startup to open the boot menu and select the USB drive as the boot source.
Step 2: When the Windows Setup screen appears, select your preferred language, time zone, and keyboard layout, then click “Next” to proceed to the next screen. On the next screen, click “Install Now” to start the Windows installation process.

Step 3: Choose the installation type: select “Upgrade” to keep your existing files and apps, or “Custom” for a clean install that may require deleting existing partitions before continuing.
Step 4: After selecting the target partition, the system will begin installing Windows 10, during which your computer will restart several times without requiring user input.
Step 5: When the installation is complete, follow the on-screen instructions to configure settings such as region, user accounts, and preferences, and your fresh Windows 10 system will be ready to use. You may also be interested in How to Perform DELL Reinstall Windows 10
#5. Set Up Windows 10 After Installation
Step 1: On first boot, select your region, language, and keyboard layout, then connect to the internet via Wi-Fi or Ethernet to enable Windows activation and access to online features.
Step 2: Choose to sign in with a Microsoft account to sync settings, apps, and OneDrive, or create a local account if you prefer offline use and enhanced privacy.
Step 3: Create a secure password and set up recovery options such as security questions or alternate contact methods to protect and recover your account if needed.

Step 4: Review and customize privacy settings, including location access, diagnostic data sharing, and ad personalization, according to your comfort level with data sharing.
Step 5: After reaching the desktop, let Windows automatically install essential drivers, then check Device Manager for any missing or outdated drivers and update them manually if necessary.
Step 6: Finally, open Windows Update in Settings to download and install all available system updates, including security patches and feature enhancements, ensuring your system runs smoothly and securely.
#6. Troubleshooting Common Windows 10 Installation Issues
Step 1: If your USB drive isn’t recognized in BIOS/UEFI, make sure it’s firmly connected, then check the boot order settings to confirm the USB is set as the primary boot device.
Step 2: If the Windows installation freezes or gets stuck, restart your PC and try the process again, and if the issue continues, recreate the bootable USB to rule out file corruption.
Step 3: When Windows fails to detect your hard drive or shows a missing drivers error, switch to another USB port and preload storage drivers from your motherboard or laptop manufacturer.
Step 4: If the installation loops or restarts unexpectedly, verify that Secure Boot is disabled in BIOS and that your ISO file was downloaded without errors.
Step 5: For persistent issues, try using a different USB drive, re-download the Windows 10 ISO, and confirm your system meets the minimum hardware requirements.
#7. Recover Lost Data After Windows Installation Using WinfrGUI
Although installing Windows 10 from a USB is usually straightforward, accidental data loss can occur—especially during clean installs or partition formatting; if this happens, don’t worry, as WinfrGUI offers a simple and effective way to recover deleted files.WinfrGUI is a user-friendly Windows data recovery tool that can deeply scan your hard drive or USB device to locate and restore lost files, including documents, photos, and more, even after a fresh OS installation.
After completing your Windows 10 installation, run WinfrGUI to quickly recover any important files accidentally erased during setup, giving you peace of mind that your data remains safe and recoverable.
How to Install Windows 10 from USB: FAQs
Q1: What are the advantages of installing Windows 10 from a USB drive?
Installing Windows 10 from a USB drive provides faster installation than optical media such as DVDs. USB drives are also portable and convenient for installing the Windows 10 on multiple devices. It also ensures you have the most up-to-date version of Windows 10.
Q2: Will installing Windows 10 from a USB drive delete existing data?
Yes. When you install Windows 10 from a USB drive, all files on your computer’s hard disk will be deleted. It is important to back up important files before proceeding with installation.
Q3: Can any USB drive be used to create bootable installation media for Windows 10?
Not all USB drives. Ideal for creating bootable installation media for Windows 10. Microsoft recommends using USB drive with at least 8GB of storage space and fast transfer rate for best performance.
Q4: Can I install Windows 10 from a USB drive using a Mac computer?
Yes, you can use your Mac to create a bootable USB drive for Windows 10 installation. For more information, please refer to the manual on how to build a bootable USB drive in Windows 10 on Mac.
Conclusion
In this guide, we’ve covered everything you need to know about how to install Windows 10 from USB, from creating a bootable USB drive to troubleshooting common issues. By following the step-by-step instructions, you can easily set up or reinstall Windows 10 on your PC. Always ensure that your important files are backed up before starting the process, and remember to download the official Windows 10 ISO to avoid any security risks. With a bit of preparation and patience, you’ll have Windows 10 up and running in no time. Whether you’re upgrading, doing a fresh install, or resolving system issues, installing Windows 10 from a USB is a reliable and efficient method. Happy computing!
🔗 Also Read: How to Reinstall Windows 10 After Upgrading?