How to Create a Windows 10 Recovery Disk in 5 Minutes
I’ll never forget the frantic call from a friend whose computer refused to boot. It was stuck in a dreaded startup loop, and they were convinced their entire project, due the next day, was gone forever. That panic is something I’ve seen countless times, and in most cases, the solution is surprisingly simple. That experience solidified my belief that preparedness is key, and it’s why I now make it a habit to help others create a Windows 10 recovery disk to secure their digital lives.
This article is your guide to doing just that. In just a few minutes, you’ll learn how to create an official Windows 10 recovery disk. This powerful, free tool from Microsoft will act as your digital life raft, giving you the power to fix common PC problems and restore your system even when it seems completely broken.
What is a Recovery Disk and Why You Need One
A Windows 10 recovery disk is a bootable USB drive that contains a compressed version of your operating system’s troubleshooting and repair tools. Think of it as your first line of defense against unforeseen problems like boot failures, corrupted system files, or a bad update. While a specialized tool like WinfrGUI is excellent for recovering deleted files from a working drive, a recovery disk is designed for a much more critical purpose: fixing your entire system when it’s completely unresponsive. Having this trustworthy, official Microsoft tool ensures you have a reliable way to access advanced repair options when you need them most.
What You’ll Need: The Essentials
The process of creating a recovery disk is quick and simple, but you’ll need one key piece of hardware to get started:
- A USB flash drive with at least 16 GB of storage. This capacity is essential because the tool needs to back up a significant number of system files and recovery tools. Using a drive smaller than 16 GB will cause the creation process to fail.
- A Critical Warning You Must Read: Before you begin, please understand that creating the recovery disk will permanently erase all data on the USB drive. This is a non-reversible process. Take a moment to check your USB drive and transfer any files you wish to keep to another location. Do not skip this step to avoid losing important personal documents or photos.
Step-by-Step Guide: The 5-Minute Process
Follow these six simple steps, and you’ll have your recovery disk ready. While the total creation time can vary, your hands-on time will be minimal.
Step 1: Plug in the USB Drive
Connect your empty USB drive to an available port on your PC. It’s best to use a port that is easily accessible and a drive you know is working correctly.
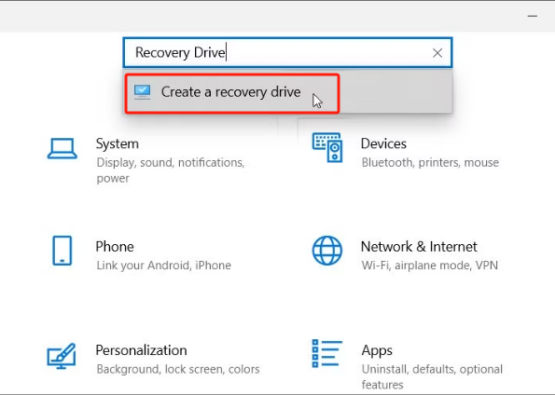
Step 2: Open the Recovery Drive Tool
Click the Start button on your desktop, and in the search bar, type “Create a recovery drive.” Select the matching desktop app that appears at the top of the search results.
Step 3: Acknowledge User Access
A User Account Control (UAC) prompt will appear, asking for permission to run the tool. This is a standard security measure. Click “Yes” to continue.
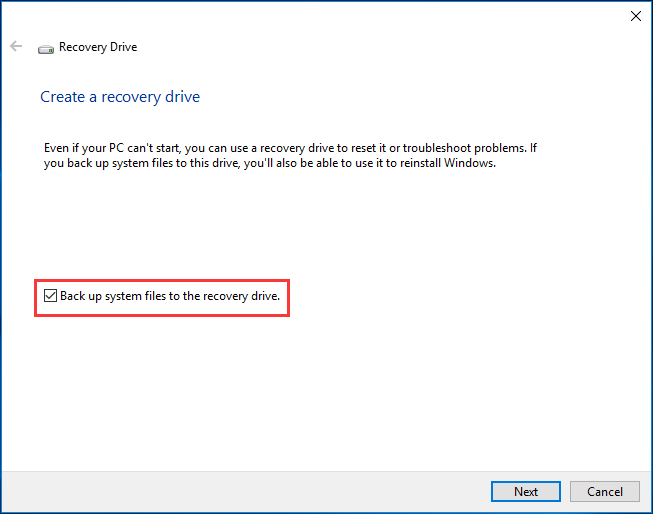
Step 4: Configure the Recovery Options
The Recovery Drive wizard will now open. Make sure the box next to “Back up system files to the recovery drive” is checked. This is a crucial step because it ensures your new recovery disk will have a comprehensive set of files you can use to reinstall Windows if needed. Click Next.
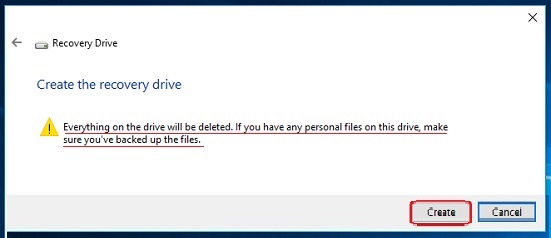
Step 5: Select and Confirm the Drive
The wizard will list all connected USB drives. Carefully select your USB drive from the list. The tool will then display a final, bold warning that all data will be deleted. After you’ve confirmed you’ve backed up any necessary files, click “Create” to begin the process.
Step 6: Patience is Key
Your computer will now start copying the files. You will see a progress bar. The entire process can take anywhere from 15 to 30 minutes, sometimes more, depending on your system’s speed. Do not unplug the USB drive, turn off your computer, or interrupt the process until the confirmation screen appears.
What to Do With Your New Recovery Disk
Once created, store the recovery disk in a safe and easily accessible place. A drawer near your computer is a good idea. But can you use a recovery disk on a different Windows 10 PC? The answer is: sometimes, but with limitations. A recovery disk is generally tied to the version and edition of Windows installed on the original computer, and drivers may differ on another machine. If you try to use it on a different PC, it might still allow access to tools like System Restore or Startup Repair, but a full reinstallation may fail or encounter driver issues.
Should your PC fail, simply plug in the recovery disk and power on the computer. You may need to press a key like F12 or Delete during startup to enter your BIOS/UEFI settings and select the USB drive as the boot device. The drive will then load the Windows Advanced Startup Environment, giving you access to powerful tools like System Restore, Startup Repair, and the option to reinstall Windows entirely—with the caveat that full recovery works best on the original machine.
Troubleshooting: What if Something Goes Wrong?
Q1: “The recovery drive creation failed.”
This can happen if the USB drive is faulty or incorrectly formatted. Try using a different, known-good USB drive.
Q2:”Back up system files is grayed out.”
This typically means your system’s hidden recovery partition is missing or corrupted. You may need to create a bootable Windows installation media instead.
Q3: My PC won’t boot from the USB drive.
You might need to manually set the boot order in your computer’s BIOS/UEFI settings. Restart your PC and look for a message that says which key to press (often F2, F12, or Del) to access the boot menu.
Q4: Can I use a recovery drive from a different PC?
Ideally, no. The recovery disk is specific to your Windows build and version. Using one from a different PC might not work and could even cause driver conflicts.
Q5: Do I need to keep the recovery drive plugged in?
No. Once the drive is created, you should store it safely. Keep it unplugged to prevent accidental data erasure or damage.
Q6: Can I use the recovery drive on Windows 11?
No, a Windows 10 recovery drive is not designed to repair a Windows 11 system. You should create a separate recovery disk specifically for Windows 11.
Summary
In a world where data loss feels like an inevitable disaster, you’ve just equipped yourself with a powerful countermeasure. What took you just a few minutes of your time is a small but crucial step that can save you from a major catastrophe down the road. Remember that frantic feeling of a PC that won’t boot? Thanks to your efforts to create a Windows 10 recovery disk, that panic is now replaced with a plan. This simple USB drive is more than just a backup; it’s a key to unlocking your computer’s recovery tools, allowing you to fix, repair, and restore your system when it matters most. You’ve gone from a potential victim of PC failure to a prepared and confident user. Take a moment to appreciate this peace of mind—it’s well worth the investment.
🔗 More Tutorials: