5 Methods to Create a Windows 11 Recovery USB [2025]
If your PC suddenly won’t boot or you need an emergency repair option, knowing how to create windows 11 recovery usb is essential. As of March 2025, Windows 11 runs on 42.69% of global desktop PCs and has captured 53.72% of the U.S. desktop market. This steady rise—up from roughly 32% a year ago—shows enterprises and consumers moving quickly to the latest OS. In this guide, you’ll learn three fast, reliable methods (plus pro tips) to build your recovery USB in 2025, even if you’ve never done it before. Before diving into the methods, let’s first examine the current Windows 11 adoption and USB market trends to understand why creating a recovery USB is more critical than ever.
2025 Windows 11 Adoption and USB Flash Drive Market Trends
Before we dive into the steps for creating your recovery USB, let’s take a quick look at some key data that highlights why this topic matters in 2025. Windows 11 continues to see strong growth around the world. As of March 2025, Windows 11 accounts for about 42.69% of desktop computers globally and an even higher 53.72% share in the U.S., based on the latest data from StatCounter Global Stats. Compared to the first quarter of 2024, that’s an impressive increase of nearly 10 percentage points in just a year, as more users upgrade their systems. On the hardware side, the USB flash drive market is booming as well. The global market is expected to reach $5.5 billion in 2025, with a 7.49% compound annual growth rate (CAGR) through 2033. This surge is largely driven by the ongoing demand for portable storage and backup solutions. These days, most flash drives offer capacities between 64 GB and 1 TB, though 32 GB remains a common minimum size for creating recovery USB drives. With Windows 11 adoption growing and USB drives more capable and affordable than ever, now is a great time to prepare a reliable recovery USB for your system. Let’s get started with the step-by-step guide.
Method 1: Create a Recovery USB Using the Built‑in Windows Recovery Drive Tool
Windows 11 comes with a built-in tool that lets you easily create a recovery USB drive. This recovery drive can help you troubleshoot, repair, or even reinstall Windows if something goes wrong — much like how you would create an installer for an earlier version (see How to Install Windows 10 from USB: Step-by-Step Guide).
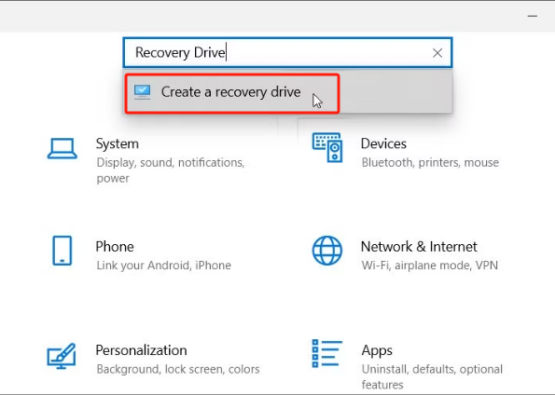
Step 1: Press the Windows key, type Recovery Drive in the search bar, and select Create a recovery drive from the results.
Step 2: When the Recovery Drive tool opens, check the box for Back up system files to the recovery drive — this ensures the USB includes the files needed to fully reinstall or repair Windows if required — then click Next.
Step 3: Insert a USB flash drive with at least 16 GB of space (larger is fine), select your USB drive from the list, and click Next, then Create.

Step 4: Wait while Windows copies files to the USB drive. This may take anywhere from 10 to 60 minutes, depending on your system and the USB drive’s speed.
Step 5: Once the process is finished, click Finish, then safely eject your USB drive.
Make sure to back up any important data from the USB drive before starting, as creating the recovery drive will erase all existing files on it. Choosing the Back up system files option ensures your recovery USB can both repair your system and perform a full reinstall of Windows 11 if needed.
Method 2: Create a Recovery USB with the Microsoft Media Creation Tool
Windows 11 comes with a built-in tool that lets you easily create a recovery USB drive. This recovery drive can help you troubleshoot, repair, or even reinstall Windows if something goes wrong.
Step 1: Press the Windows key, type Recovery Drive in the search bar, and select Create a recovery drive from the results.
Step 2: When the Recovery Drive tool opens, check the box for Back up system files to the recovery drive — this ensures the USB includes the files needed to fully reinstall or repair Windows if required — then click Next.
Step 3: Insert a USB flash drive with at least 16 GB of space (larger is fine), select your USB drive from the list, and click Next, then Create.
Step 4: Wait while Windows copies files to the USB drive. This may take anywhere from 10 to 60 minutes, depending on your system and the USB drive’s speed.
Step 5: Once the process is finished, click Finish, then safely eject your USB drive.
Make sure to back up any important data from the USB drive before starting, as creating the recovery drive will erase all existing files on it. Choosing the Back up system files option ensures your recovery USB can both repair your system and perform a full reinstall of Windows 11 if needed.
Method 3: Create a Recovery USB with Rufus (Open-Source Utility)
If you prefer more control over how your recovery USB is set up — or need compatibility with UEFI or legacy systems — Rufus is a trusted free tool that can help.
Step 1: Download Rufus from the official site at rufus.ie, and run the application (it’s portable — no installation needed).
Step 2: Insert your USB flash drive (at least 8 GB), then under Boot selection, click SELECT and choose your Windows 11 ISO file.
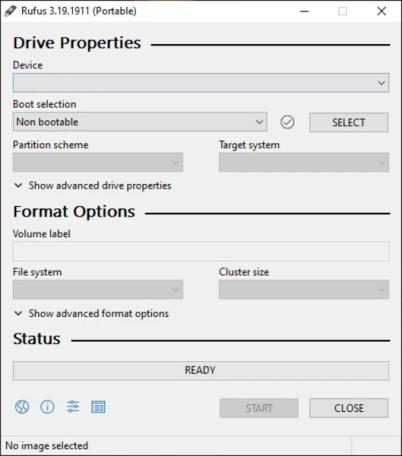
Step 3: In the Partition scheme setting, select GPT (for UEFI) if your system uses UEFI — or MBR (for legacy BIOS) if you’re setting this up for an older machine; leave other options at default unless you have specific needs.
Step 4: Click START and let Rufus format the drive and create your bootable recovery USB — this usually takes less than 10 minutes.
Rufus is especially useful if you want to create a custom Windows 11 recovery USB that works with either UEFI or legacy BIOS systems, or if you want advanced formatting options not available in Microsoft’s built-in tools.
Method 4: Use Windows 11’s New “Cloud Download” Recovery Option
Windows 11 introduces a convenient Cloud Download recovery feature that lets you grab the latest Windows installation files directly from Microsoft’s servers — no need to create a bootable USB manually. This is a great choice if you want an up-to-date, official recovery solution without extra work.
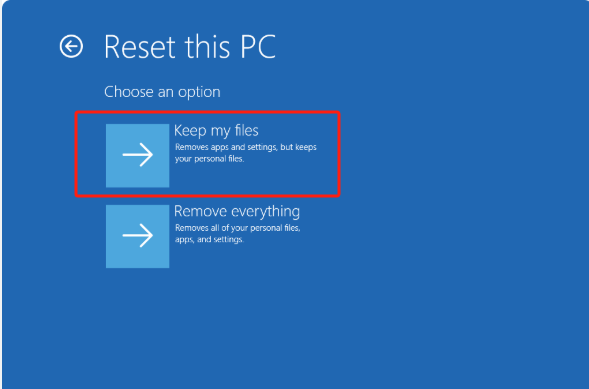
Step 1: Open Settings, go to System > Recovery, and under Recovery options, click Reset PC.
Step 2: When prompted, choose whether to Keep my files (to reinstall Windows while preserving personal files) or Remove everything (for a full reset).
Step 3: Select Cloud download so Windows can automatically fetch the latest recovery files from Microsoft.
Step 4: Follow the on-screen instructions — Windows will handle the download and create a fresh recovery environment; optionally, you can choose to save recovery files to a USB drive during the process.
Pros:
✅ Always downloads the latest official Windows version
✅ No need to manually download ISO files or use third-party tools
✅ Safe, simple, and built right into Windows 11
For more options on recovering files from USB drives, check out our guide on Top 9 USB Stick Recovery Tools of 2025 (Free & Paid).
Method 5: Recover Lost Files with WinfrGUI
If you lose important files during a reset, recovery, or reinstall, WinfrGUI is a free, easy-to-use tool that can help you get your data back — no technical expertise required. Built as a graphical front-end for Microsoft’s Windows File Recovery engine, WinfrGUI makes file recovery simple and fast. Here’s what makes WinfrGUI a powerful solution for recovering lost files:
- Intuitive Graphical Interface & Wizard: WinfrGUI provides a user‑friendly front‑end and step‑by‑step guidance to Microsoft’s Windows File Recovery CLI, eliminating the need for complex command‑line syntax.
- Quick Scan Mode: Instantly recover recently deleted files—preserving original folder structures and filenames—ideal for “Oops, I hit Delete” scenarios under NTFS.
- Deep Scan Mode: Performs a thorough sector‑level search to reconstruct file fragments from formatted or corrupted drives, maximizing recovery success even when directory entries are missing.
With a recovery USB in hand and a reliable data recovery tool like WinfrGUI ready, you’re well-prepared for any Windows 11 emergency.
FAQs to Create a Windows 11 Recovery USB
Q1. What is the minimum USB drive capacity required to create a Windows 11 recovery USB?
If you enable “Back up system files to the recovery drive,” Windows will include WinRE and other system files, requiring at least 16 GB of free space. For creating a simple installer-only USB via the Media Creation Tool, Microsoft recommends 8 GB minimum.
Q2. Can I use a USB 2.0 flash drive for creating the recovery USB?
Yes—USB 2.0 drives are fully compatible with Windows recovery creation and boot. However, USB 3.x drives (16 GB or larger) offer much faster data transfer and shorter creation/boot times, so they’re recommended if your PC supports them.
Q3. Will creating a recovery USB erase all existing data on the drive?
Yes. The creation process formats the USB and deletes any content on it, so always back up important files before starting.
Q4. How often should I update my Windows 11 recovery USB?
Microsoft advises recreating or refreshing your recovery drive annually to capture the latest security patches and feature updates. It’s also wise to update it after any major Windows feature update or significant system change.
Q5. Can I use my recovery USB on a different Windows 11 PC?
Recovery drives include device‑specific files and customizations, so they’re designed to restore the exact PC they were created on. While you might be able to boot another machine, it may lack necessary drivers or factory images—creating a dedicated recovery USB for each PC ensures full compatibility
Final Thoughts
Mastering how to create windows 11 recovery usb means you’ll always have a robust safety net against crashes, boot failures, or corrupted updates. Whether you choose the built‑in Windows tool, Microsoft’s Media Creation Tool, or Rufus, each method in this 2025 guide ensures you can repair or reinstall quickly. And with WinfrGUI on standby, even accidental file loss won’t slow you down. Stay prepared—update your recovery USB after each major Windows update, and keep your data backed up!
🔗 Also Read: how to recover deleted files from windows 10