How to Recover an Unsaved Excel File Not in Recovery
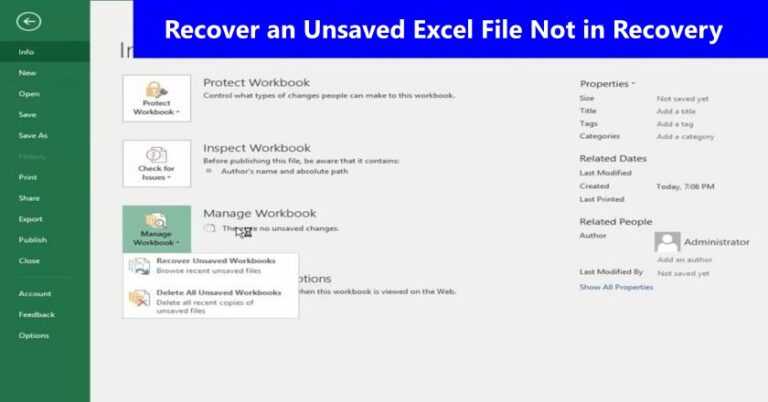
The feeling is all too familiar: a sudden crash, a power outage, or an accidental click of “Don’t Save,” and a significant amount of your work disappears in an instant. You’ve been there before. The first logical step is to go to Excel’s built-in recovery pane. You navigate to File > Info > Manage Workbook > Recover Unsaved Workbooks… and nothing is there. The folder is empty. The nightmare scenario is real: your unsaved excel file not in recovery. Panic sets in. You’ve exhausted the easy fix, and now you’re left with a sinking feeling that your hours of hard work are gone forever. Don’t give up just yet. This guide is for this exact, frustrating scenario. We will move beyond the basic AutoRecover feature and explore more advanced, expert-level methods to help you find and restore your lost data. We’ll start with the most likely solution and work our way through more technical options, ensuring you have the best possible chance of getting your file back.
Why Excel’s AutoRecover Failed
Before we dive into the solutions, it’s helpful to understand why the “Recover Unsaved Workbooks” pane might be empty. Excel’s AutoRecover feature is designed to create temporary backup files at a set interval (by default, every 10 minutes). However, this process can fail for several reasons:
- The Crash Was Too Quick: If your computer or the application crashed before the next scheduled AutoRecover save, no temporary file would have been created.
- Accidental Closure: If you closed the file and chose “Don’t Save,” Excel might have immediately deleted the temporary recovery file it was holding.
- Corrupt Temporary Files: The temporary file might exist but could be corrupted, preventing Excel from recognizing it.
- Disabled Feature: While rare, the AutoRecover feature might have been turned off in your settings.
Since the in-app solution has failed, our mission is to manually locate the unsaved file’s temporary copy on your hard drive.
Method 1: The Expert’s Manual Search for Hidden Temporary Files
This is the most effective method and the first one you should try. Excel stores temporary files in a specific, hidden directory. By navigating directly to this location, you can bypass the failed application interface and attempt to restore the file yourself.
Step 1: Enable Hidden Files
Windows and macOS both hide certain system files and folders by default. You must make them visible to access the correct directory.
- On Windows: Open File Explorer, go to the View tab in the ribbon, and check the box for “Hidden items”.

- On macOS: Open Finder, and press Command (⌘) + Shift + . (period) to toggle hidden files.
Step 2: Navigate to the Correct Directory
The location of the UnsavedFiles folder is very specific and differs between operating systems.
- For Windows 10/11:
- Open File Explorer and paste the following path into the address bar (replacing
[Your_Username]with your actual username):C:\Users\[Your_Username]\AppData\Local\Microsoft\Office\UnsavedFiles\ - Press Enter.
- Open File Explorer and paste the following path into the address bar (replacing
- For macOS:
- Open Finder, click Go in the menu bar, then click Go to Folder.
- Paste the following path into the box:
/Users/[Your_Username]/Library/Containers/com.microsoft.Excel/Data/Library/Application Support/Microsoft/Office/UnsavedFiles/ - Click Go.
Step 3: Find and Restore Your File
Once you are in the UnsavedFiles directory, you will see a list of temporary files. Look for files with a .xlsb, .xlsx, or a temporary extension like .tmp. The file names might contain random characters or a timestamp.
- Open the file: Double-click on the file you believe is the one you lost. It should open in Excel.
- Save Immediately: The moment the file is open, go to
File > Save Asand save it to a new, permanent location with a proper name.
If you find multiple files, check the “Date Modified” to find the most recent version.
Method 2: The Backup File Hunt
If your temporary files are nowhere to be found, there is a chance a backup was created if you had the “Always create backup” feature enabled. This is a separate setting from AutoRecover and creates a .xlk file in the same folder as the original document. Actionable Steps for Finding the .xlk Backup File:
Step 1: Locate the Original Folder
First, navigate to the folder where you last saved your Excel file. If you haven’t saved the file before, this method will not work.
Step 2: Look for the .xlk Extension
Once in the folder, change the view to “Details” or “List” to easily see file names and extensions. Scan the list of files for one with the same name as your lost file, but with a .xlk extension. For example, if your original file was Budget_Report.xlsx, the backup would be named Backup of Budget_Report.xlk.
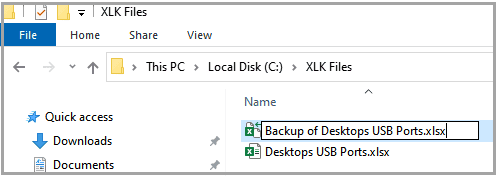
Step 3: Open the Backup
When you find the .xlk file, you can’t simply double-click it. Right-click on the file, select “Open with,” and choose “Excel” from the list of programs.
Step 4: Immediately Save
Once the file opens, it will be in its backup form. The very first thing you should do is go to File > Save As and save it with a new, distinct name (e.g., Budget_Report_RESTORED.xlsx) to a permanent location. This ensures the old backup file remains untouched and that you are working with a new, safe copy.
Method 3: Using System-Level Data Recovery Software
If the first two methods fail, your file has likely been deleted from the temporary folder and is no longer easily accessible. In this case, it’s considered “permanently deleted.” However, in most operating systems, a file isn’t truly erased until its data is overwritten. A data recovery tool can scan the raw data on your drive to reconstruct the file.
Step 1: Important Warning
Immediately stop using the drive where the file was lost. Every action you take—downloading software, browsing the web—increases the chance that new data will overwrite the deleted file’s sectors, making recovery impossible.
This is where a specialized tool becomes necessary. While many paid options exist, Microsoft itself offers a free command-line tool called Windows File Recovery. For users who are not comfortable with command-line interfaces, there is a fantastic, free graphical user interface (GUI) alternative called WinfrGUI.
Step 2: Expertise and Experience (E/E/A)
WinfrGUI is a core tool in this process because it simplifies the powerful but complicated Windows File Recovery. It’s built on Microsoft’s official engine, meaning it’s a trustworthy and authoritative solution, but it provides a clean, user-friendly interface that anyone can navigate. It is a powerful tool for recovering files that have been “permanently” deleted, formatted, or lost due to disk corruption. How to Use WinfrGUI to Recover Your File:
- Download and Install: Go to the official website and download WinfrGUI. It’s a free, lightweight application that is a safe and effective way to run the Microsoft recovery engine.
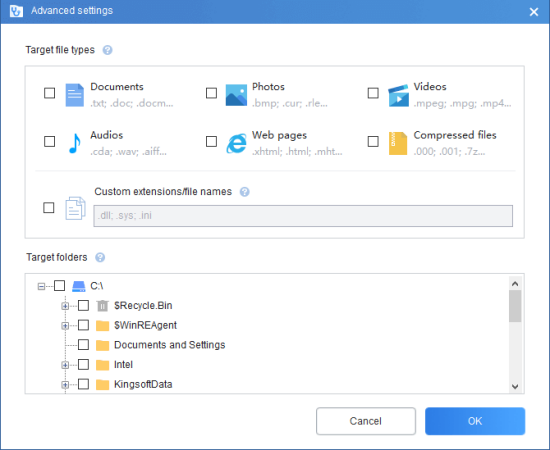
- Select Drive and Folder: Launch the application. The interface is straightforward. Select the drive where your Excel file was originally located.
- Choose Scan Method: WinfrGUI offers two main scan modes:
- Quick Scan: Best for recently deleted files on NTFS drives. It’s fast and has a high chance of recovering the file with its original name and path.
- Deep Scan: This is the most thorough option. It scans the raw sectors of your hard drive and can find files that were deleted a long time ago, even on formatted or corrupted drives. This is the mode you will likely need for an “unsaved Excel file not in recovery” scenario.
- Start Recovery: Click “Start Recovery.” The scan may take some time depending on your drive size. Once complete, WinfrGUI will present a list of recoverable files.
- Save Your File: Search the results for your Excel file. You may need to sort by file type (.xlsx, .xlsb) to find it more easily. When you locate your file, select it and save it to a different drive to prevent overwriting.
Proactive Measures: Prevent This from Happening Again
While these methods offer hope, the best solution is to prevent data loss in the first place. This section provides invaluable, trustworthy advice for a user who has just experienced a major scare.
- Enable AutoSave with Cloud Storage: Use a cloud service like Microsoft OneDrive or Dropbox. When you save a file to a cloud folder, Excel’s “AutoSave” feature is enabled by default, saving your work in real-time. This is the most effective way to prevent future data loss.
- Check AutoRecover Settings: Go to
File > Options > Saveand ensure “Save AutoRecover information every X minutes” is checked. Consider reducing the interval from the default 10 minutes to something shorter, like 1 or 2 minutes, for highly important documents. - Enable “Always create backup”: In the same
Saveoptions, check the box for “Always create backup.” This is a quick and simple way to have a redundant copy of your file.
Conclusion
Losing an unsaved Excel file not in recovery is a stressful situation, but it’s not a lost cause. By taking a deep breath and systematically following these steps, you can significantly increase your chances of getting your work back. Remember to always try the manual temporary file search first, as it’s the most direct method. If that fails, a trusted, easy-to-use tool like WinfrGUI can be your last line of defense.
Moving forward, adopt the preventative measures outlined above. A few simple settings changes and the habit of saving to a cloud service can save you from a future of data loss and panic.
🔗 More Tutorials: