How to Scan for Corrupted Files in Windows 10/11
Is your computer running slower than usual? Are you experiencing unexpected crashes, frustrating error messages, or finding that some of your applications refuse to open? There’s a high probability that corrupted files are the culprit. Over time, critical system files can become damaged or go missing due to improper shutdowns, malware, hard drive failures, or software glitches. This can lead to a host of performance and stability issues. This guide will provide you with a comprehensive look at how to scan for corrupted files and resolve them using built-in Windows tools.
Fortunately, you don’t need to be a tech expert to fix these problems. Windows 10 and 11 come equipped with powerful, built-in tools designed specifically to identify and repair corrupted files. This comprehensive guide will walk you through a proven, step-by-step process using these official tools, saving you time and preventing the need for third-party software. By the end of this article, you’ll have the knowledge and confidence to diagnose and resolve file corruption on your own.
Method 1: The First Line of Defense: Using System File Checker (SFC)
The System File Checker (SFC) is the primary utility for a reason: it’s designed to automatically scan and repair missing or corrupted protected system files. When you run this tool, it compares the files on your system with the originals stored in a special, safe location. If any discrepancies are found, it replaces the damaged files with clean, healthy copies. It’s the simplest and most direct method for tackling a wide range of corruption issues. When learning how to scan for corrupted files, SFC is always the first tool you should turn to. Step-by-Step Instructions are as followed:
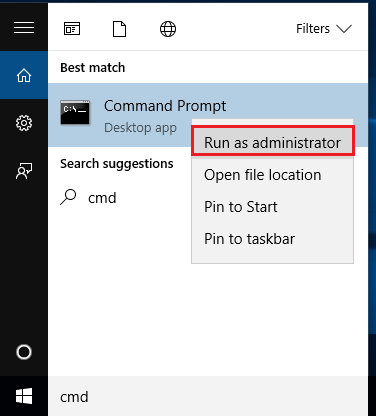
Step 1: Open Command Prompt as an Administrator.
This is a critical first step. The SFC tool requires elevated permissions to access and modify core system files. To do this, click the Start button, type cmd or Command Prompt, and then right-click on the search result. From the context menu, select “Run as administrator.” A User Account Control (UAC) prompt may appear asking for permission; click “Yes” to continue.
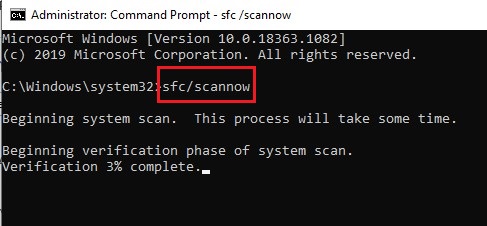
Step 2: Run the SFC command.
In the Command Prompt window, type the following command exactly as it appears and then press Enter: sfc /scannow The sfc part calls the System File Checker utility, and the /scannow parameter tells it to scan all protected system files and repair any that it finds to be corrupt.
Step 3: Wait for the scan to complete.
The SFC scan can take some time, typically anywhere from a few minutes to half an hour, depending on the speed of your computer. Do not close the Command Prompt window until the verification is 100% complete. You will see a progress bar indicating the percentage of completion.
Step 4: Analyze the results.
Once the scan finishes, you will see one of a few possible messages:
- “Windows Resource Protection did not find any integrity violations.” This is good news. It means your system files are in perfect condition, and the issue you’re experiencing is likely caused by something else.
- “Windows Resource Protection found corrupted files and successfully repaired them.” This is the best-case scenario. SFC found the problems and fixed them automatically. You can now restart your computer to see if the issues are resolved.
- “Windows Resource Protection found corrupted files but was unable to fix some of them.” This indicates a more serious problem. It means SFC couldn’t repair all the files because the source files it needed were themselves corrupted. This is when you’ll need to move on to the next method.
What If The Files Are Gone?
While SFC is an excellent tool for repairing system files, it cannot recover files that have been completely deleted or damaged beyond repair. If a file is permanently lost, you need a different solution. In such cases, a free and powerful tool like WinfrGUI comes in handy. It’s a user-friendly graphical interface for the official Windows File Recovery (Winfr) command-line utility. It can help you recover accidentally deleted or severely corrupted files from your drives, acting as a crucial last resort when the repair methods are not enough. It’s important to understand this is for file recovery, not repair, but it’s an essential part of a complete strategy for dealing with file issues.
Method 2: The Next Step: When SFC Needs Help from DISM
If the SFC scan reported that it couldn’t repair all the corrupted files, it’s time to bring in the big gun: the Deployment Image Servicing and Management (DISM) tool. This is a crucial next step in how to scan for corrupted files. Think of SFC as a carpenter who repairs individual pieces of furniture, but if the lumber mill that provides the wood is faulty, the carpenter can’t do their job. In this analogy, DISM is the tool that repairs the “lumber mill,” or in this case, the Windows component store itself. By fixing the core image, DISM provides a healthy source for SFC to pull from. Step-by-Step Instructions are as follows:
Step 1: Open Command Prompt as an Administrator (the same way you did for SFC).
Step 2: Check for corruption.
Before trying to repair the image, it’s good practice to run a diagnostic scan. Type the following command and press Enter: DISM /Online /Cleanup-Image /ScanHealth This command checks the health of the component store. The process may take a while, and the progress bar can appear to be stuck at certain percentages, but be patient.
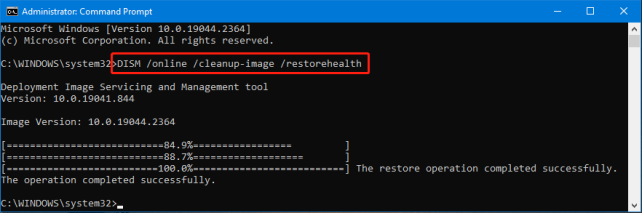
Step 3: Repair the image.
If the previous command finds issues, you can proceed with the repair. Type the following command and press Enter: DISM /Online /Cleanup-Image /RestoreHealth This is the most crucial command. It instructs DISM to automatically download and replace any corrupted files in the component store from Microsoft’s Windows Update servers. This process can take a significant amount of time, so ensure your internet connection is stable.
Step 4: Rerun SFC.
Once the DISM scan and repair are complete, it is essential to run the sfc /scannow command again. Now that the component store is healthy, SFC should be able to successfully repair any remaining corrupted system files.
Method 3: Proactive Measures: Checking Your Hard Drive with CHKDSK
Sometimes, file corruption isn’t just a random error; it can be a symptom of a deeper problem with your hard drive or SSD. The Check Disk (CHKDSK) utility is designed to scan for and fix logical and physical errors on the drive itself. Step-by-Step Instructions are as follows:
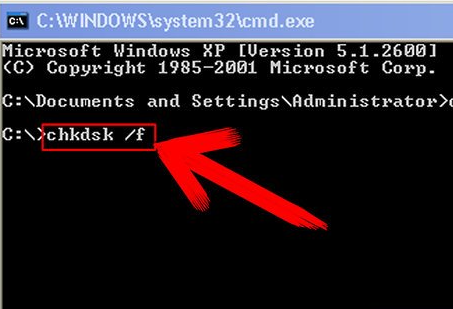
Step 1: Open Command Prompt as an Administrator.
Step 2: Run the CHKDSK command.
Type the following command and press Enter: chkdsk /f The /f parameter tells the tool to fix any errors it finds. If you’re running this on your main system drive (C:), you’ll see a message saying that the utility cannot run while the volume is in use. It will then ask you if you want to run the scan the next time you restart your computer. Press Y and then Enter.
Step 3: Restart your computer.
The CHKDSK scan will begin as soon as your computer reboots. It may take some time, depending on the size of your drive, so do not interrupt the process.
Troubleshooting Common Issues
Even with the powerful tools we’ve covered, some issues can be tricky. This section addresses common problems and provides an option for file recovery when all else fails.
Problem: “SFC says ‘Windows Resource Protection could not perform the requested operation.'”
This error often occurs when a corrupted file is locked by a process, preventing SFC from accessing it.
- Solution: The best way to resolve this is by running the SFC scan in Safe Mode. When in Safe Mode, only the bare minimum of system processes are running, making it far more likely that SFC can get the job done. To enter Safe Mode, hold down the Shift key while clicking Restart from the Start menu. In the advanced startup options that follow, navigate to Troubleshoot > Advanced options > Startup Settings, then click Restart. Finally, press
4orF4on your keyboard to enter Safe Mode. Once inside, open Command Prompt as an administrator and runsfc /scannowagain.
Problem: “My DISM command fails to complete.”
This can be caused by a few issues, including a poor internet connection or a corrupted Windows Update cache.
- Solution: First, ensure you have a stable internet connection. If the issue persists, you may need to clear the Windows Update cache. This can be a more advanced step, but it often resolves DISM-related problems.
Conclusion
File corruption can be a frustrating problem, but with the right knowledge, it doesn’t have to be a major headache. By starting with the SFC and DISM tools, you can resolve the vast majority of system file issues. For deeper hardware problems, CHKDSK is the perfect solution. Now you know how to scan for corrupted files and can confidently maintain the health and stability of your Windows 10 or 11 system, ensuring it runs smoothly for years to come.
🔗 More Tutorials: