Find Your Microsoft Word Autosave Location in 2 Minutes

I’ll never forget the cold sweat I felt last Tuesday. I was finishing a 20-page report when my laptop suddenly forced a Windows update. When it restarted, the file I’d spent all night on was nowhere to be found. I realized then that knowing the Microsoft Word autosave location isn’t just a technical detail—it’s the only thing standing between hours of hard work and total data loss. If you’re staring at a blank screen right now, take a deep breath. Your work is likely still hidden in a temporary folder on your PC. In this guide, I’ll show you exactly how I tracked down my lost files by navigating the default file paths in Windows 10 and 11. I’ve narrowed it down to the 7 most effective options to recover your unsaved documents fast, so you can stop panicking and get your progress back.
Key Takeaways
- Microsoft Word automatically saves backup files in hidden system folders on Windows 10 and 11, even if you never clicked “Save.”
- The main AutoSave location is:
C:\Users\YourUsername\AppData\Local\Microsoft\Office\UnsavedFiles - You can enable and customize AutoSave in Word via File > Options > Save to prevent future data loss.
- Unsaved Word files may also appear in AppData, Temp folders, or your original document directory.
- Look for backup file extensions like .asd, .wbk, or .tmp when searching manually.
- The Recover Unsaved Documents feature in Word is one of the fastest built-in recovery methods.
- If files are deleted, formatted, or missing from all folders, a recovery tool like WinfrGUI can help retrieve them.
- Checking the Recycle Bin and using Windows search are simple first steps before deeper recovery.
- Regular backups and enabling AutoSave dramatically reduce the risk of permanent document loss.
Default Autosave Location in Windows 10/11
Microsoft Word stores Autosave files in specific locations on Windows 10/11.
The default directory for AutoRecover files is:
C:\Users\YourUsername\AppData\Local\Microsoft\Office\UnsavedFiles
For locally saved documents
Word creates temporary backup files in the same directory as the original file or in:
C:\Users\YourUsername\AppData\Roaming\Microsoft\Word
Option 1. Enable the Auto-save Feature in Microsoft Word through the Settings.
Activate Word’s auto-save feature before learning how to enable it on Windows 10. Please follow these guidelines:
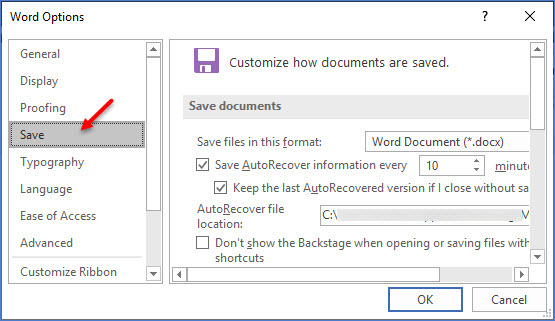
Step 1: Access Options Open Word, click File > Options.
Step 2: Copy Path Click Save in the sidebar, then find and copy the AutoRecover file location path to open it in File Explorer.
Step 4: Check the box for Save AutoRecover information every X minutes and set the time interval (5 or 10 minutes is recommended). Also check Keep the last AutoRecovered version if I close without saving to protect your work from accidental closures.
Step 5: Note that Word saves these backups in a hidden folder at C:\Users\Your_Username\AppData\Roaming\Microsoft\Word
(replace “Your_Username” with your actual Windows username).
Step 6: To access this folder, open File Explorer and either paste the path into the address bar or manually navigate there after enabling hidden files under the View tab.
Step 7: Find files starting with “AutoRecovery save of” followed by your document’s name, then double-click to open and recover your work.
The steps to activate the auto-save feature in Word on Windows 11 remain the same as in Windows 10.
Option 2. Check the AppData Folder.
Microsoft Word stores autosaved and temporary files in several default folders on Windows 10 and 11. Here are the main locations to check:
- Primary Autosave Folders:
C:\Users\Your_Username\AppData\Local\Microsoft\WordC:\Users\Your_Username\AppData\Local\Temp - Unsaved Files Storage (for newer Word versions):
C:\Users\Your_Username\AppData\Local\Microsoft\Office\UnsavedFiles - Microsoft 365 Backup Locations:
C:\Users\Your_Username\AppData\Roaming\Microsoft\WordC:\Users\Your_Username\AppData\Local\Microsoft\Office\UnsavedFiles
Replace “Your_Username” with your actual Windows user name. Autosaved files often have a .tmp extension with a four-digit number, and filenames usually start with a tilde (~), like ~wrdxxxx.tmp.
Option 3: Use WinfrGUI to Recover Unsaved Documents.
No worries if Word crashes or you accidentally close it without saving—here’s how to quickly find and recover your unsaved documents: First, open Microsoft Word and go to the File tab. From there, click on Recent, then look for the option Recover Unsaved Documents at the bottom of the screen. Clicking this will open a folder where Word stores temporary auto-saved files. Browse through and select the document(s) you want to recover. Alternatively, you can navigate to File > Info > Manage Document (or Manage Versions) > Recover Unsaved Documents to access the same auto-save folder. If you’ve accidentally deleted files or can’t find them in these locations, consider using WinfrGUI, a user-friendly tool designed to help recover lost or deleted documents easily.

How to Recover Unsaved Documents with WinfrGUI?
If your unsaved documents were emptied from the Recycle Bin or lost due to a drive format, follow these steps to get them back:
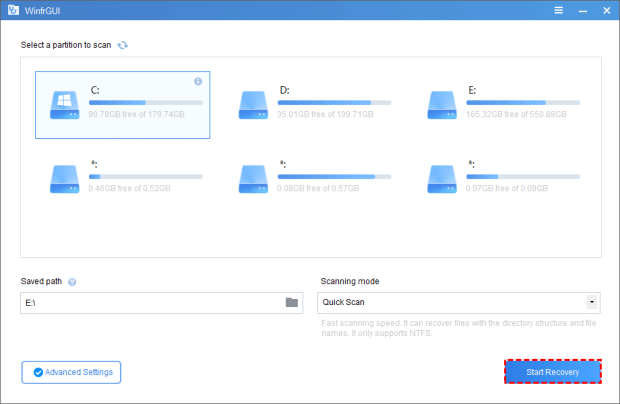
Step 1: Launch WinfrGUI and select the partition where your files were originally stored (e.g., C: or an external USB drive).
Step 2: Choose Your Scan Mode: * Select Quick Scan for recently deleted files.
Step 3: Select Deep Scan to recover data from formatted, corrupted, or damaged drives.
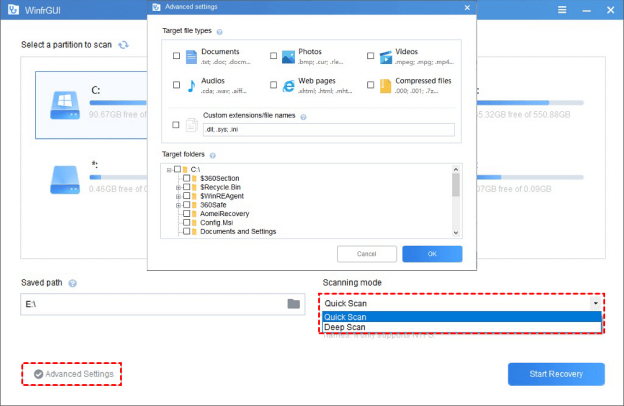
Step 4: Use the intuitive interface to target specific formats. You can recover Word documents (.doc, .docx), PDFs, Excel sheets, or even message log files.
Step 5: Browse the scan results via the graphical interface. Select the files you need and click Recover—no complex command-line or technical experience required.
Option 4. Check the Trash Can.
Check the Windows 11 Recycle Bin for unsaved files. Word’s automated saves can be lost if not retrieved. Documents removed before are still here:
Step 1: Look for the Recycle Bin icon on your desktop and double-click it to open the folder where deleted files are temporarily stored.
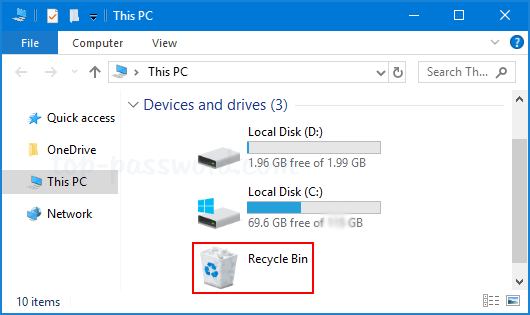
Step 2: Once inside the Recycle Bin, carefully scroll through the list of deleted items to find files that could be your missing Word documents.
Step 3: Focus on files with extensions like .doc, .docx, or .dot, which are commonly used by Microsoft Word.
Step 4: When you spot the file you want to recover, right-click on it to open a context menu with several options.
Step 5: Click on Restore from the menu, and Windows will move the file back to its original folder, making it easy for you to locate and open again.
Checking the Recycle Bin is one of the fastest and simplest ways to recover your lost Word files, and it doesn’t require any technical tools—just a few clicks and your file could be back where it belongs.
Option 5. Search for .asd or .wbk Files on Your Computer.
Searching for a file extension may help you identify automated recovery. Word files that auto-save have.asd or.wbk extensions. Please follow these guidelines:
Step 1: Press Windows + E on your keyboard to open File Explorer.
Step 2: Click on the search bar in the top-right corner of the File Explorer window.
Step 3: Type .asd or .wbk and press Enter to search your entire computer for Word’s auto-saved backup files.
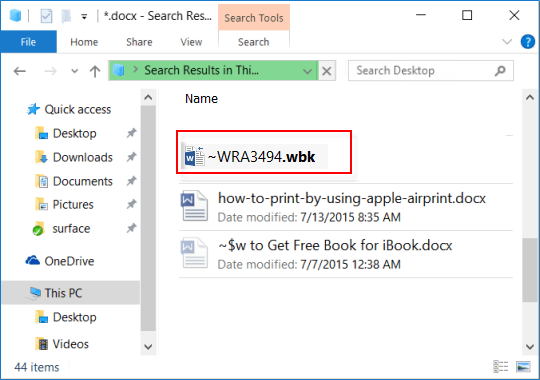
Step 4: When the search results appear, look through the list for relevant files related to your document.
Step 5: Right-click on any file you want to check and select Open file location to open the folder where Word’s auto-save files are stored.
If the.asd or.wbk files are missing, try the.tmp files. .tmp files are not connected to all Word files. Visit one of the alternatives to identify Word temporary files.
Option 6. Check the Document Directory.
Some auto-saved files are in the same directory as your saved files. However, these files are usually buried. To disclose them, follow these steps:
Step 1: Open Microsoft Word to start the recovery process by accessing your recent or saved files.
Step 2: Find the file and then select Open to bring up the file browsing options.
Step 3: Click on Browse to open the folder where your original document is usually saved or where you suspect the backup files might be located.
Step 4: Change the file type filter from Word documents to All Files (.) so that any hidden or non-standard Word files, including backups, become visible.
Step 5: Look carefully for files with names beginning with “Backup of” or similar phrases, as these are automatically created backup copies that Word saves to prevent data loss.
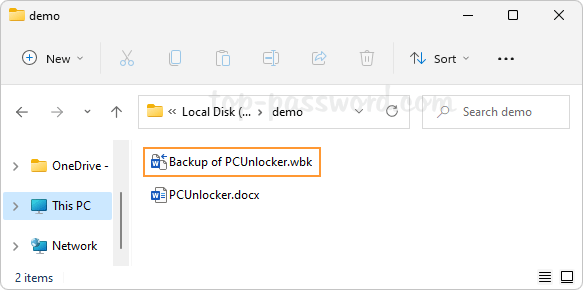
Step 6: Open the backup file you find and then save it under a new name to ensure that your recovered work is preserved safely without overwriting existing files.
Option 7. Search for Documents through Search.
Try looking for a stored document on Windows 11 if you can’t recall where it is:
Step 1: Click on the search bar located on the taskbar at the bottom of your Windows 11 screen.
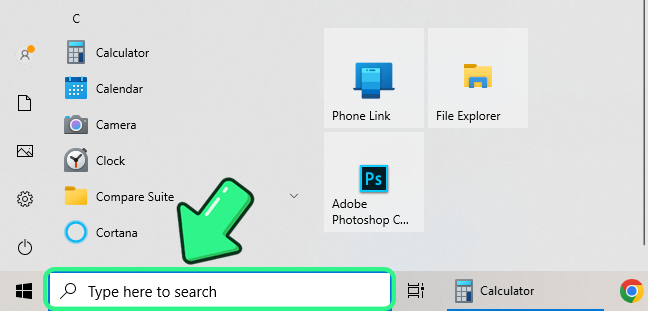
Step 2: Type the name of your document or some keywords you remember from the file to help narrow down the search. Wait a moment as Windows shows a list of search results that match your query.
Step 3: Scroll through the results carefully to find the Word document you’re looking for—it might appear under Documents, Recent files, or even in email attachments.
Step 4: When you spot the correct file, simply click on it to open it immediately.
Step 5: If you want to know where the document is saved on your computer, right-click the file in the search results and select Open file location—this will open the folder containing the file so you can easily manage it.
Step 6: Following these steps makes it quick and easy to locate misplaced Word documents without digging through folders manually. And remember, enabling Word’s AutoSave feature can help avoid this situation altogether by keeping your files saved automatically as you work.
Microsoft Word Autosave Location: FAQs
Q1: Can I search certain article words?
Use the search tool or locate words in most text editors and web browsers to find certain terms in an article. Press Ctrl + F and put the term you want to find in the search window to highlight it across the page.
Q2: Can I discover a Word document’s prior version?
Yes. If Windows File History is enabled, you can use Word’s version history or check backup copies. Open Word, go to File > Open > Recent Documents to find recent saves. You can also right-click the file in File Explorer, select Properties > Previous Versions to restore earlier versions.
Q3: Can Word auto-save location be changed?
Yes, Word allows auto-save location changes. Click “File,” “Options,” and “Save.” Enter the new “AutoRecover file location” for auto-saved files.
Q4: How can I recover unsaved documents using the Microsoft Word Autosave location?
If a document closes unexpectedly, open Word and navigate to File > Info > Manage Document > Recover Unsaved Documents. This will display files stored in the default autosave location, allowing you to restore your work from:C:\Users\[YourUsername]\AppData\Local\Microsoft\Office\UnsavedFiles
Summary
Knowing where Microsoft Word saves its AutoSave files on Windows 10 and 11 can be a real lifesaver when you need to recover unsaved documents quickly. Word temporarily stores these backup files in specific folders, typically within the hidden AppData directory on your computer, or in OneDrive if you use cloud syncing. By understanding how to access these locations, you can easily find and restore lost or unsaved work without stress. This guide walks you through simple methods to locate those AutoSave files step-by-step, helping you get your documents back fast. Additionally, for more thorough recovery—especially if files have been accidentally deleted—using a reliable tool like WinfrGUI can help you access these hidden files and recover your important documents with ease. Taking these precautions ensures your work stays safe and you avoid unnecessary downtime caused by lost files.
🔗 Also Read: 5 Methods to Restore Previous Versions of Word Documents