Why Does Instagram Make My Picture Blurry? Causes and Fixes

If you’ve ever wondered, “Why does Instagram make my picture blurry?” you’re definitely not alone. It’s a frustrating experience when you post a perfectly clear photo, only for it to appear fuzzy once uploaded. Whether you’re a casual user, influencer, or business trying to create a professional image, blurry photos can mess with your Instagram game. The truth is, Instagram’s image quality isn’t always as straightforward as it seems, and there are a few common causes behind this issue. In this article, we’ll explore exactly why Instagram makes your picture blurry and how you can fix and prevent it from happening in the future.
Key Takeaways
- Instagram automatically compresses photos, which can reduce quality—especially if your original image isn’t properly sized or is already low resolution.
- Enabling High-Quality Uploads and turning off Data Saver Mode helps preserve photo clarity during uploads.
- Using your phone’s native camera app (instead of Instagram’s in-app camera) results in sharper, higher-quality images.
- Uploading photos that match Instagram’s recommended aspect ratios (1.91:1 to 4:5) prevents stretching, cropping, and blur.
- A stable Wi-Fi connection and an updated Instagram app reduce extra compression and prevent blurry uploads.
Common Causes of Blurry Photos on Instagram
If your Instagram photos look sharp before uploading but turn out blurry once posted, you’re not alone. Several factors can contribute to this issue, from how Instagram handles uploads to settings on your phone or app. Here’s a breakdown of the most common causes—and how to fix them:
1.Instagram’s Built-In Compression
When you upload a photo, Instagram automatically compresses it to reduce file size and speed up load times. This often leads to noticeable drops in quality, especially if the image wasn’t sized properly to begin with.
2. Low-Resolution Images
Uploading photos that are already low-resolution or have been compressed (e.g., from screenshots or downloads) can result in pixelation and loss of detail after Instagram’s own compression kicks in.
3. Data Saver Mode
If Instagram’s data saver is turned on—or if your phone has data-saving settings enabled—the app may intentionally reduce the quality of uploaded content to save mobile data, resulting in blurry images.
4. Unstable or Weak Internet Connection
A slow or fluctuating connection during upload can cause incomplete data transfers, leading to reduced quality or even corrupt image posts.
5. Incorrect Aspect Ratios
Photos that don’t follow Instagram’s recommended aspect ratios (1.91:1 to 4:5) may be automatically cropped, resized, or stretched—distorting the image and making it look blurry.
6. Outdated Instagram App
Using an outdated version of the Instagram app can result in bugs or incompatibility with newer image-processing standards, affecting how your photos appear after upload.
7. Device or Camera Quality Limitations
Lower-end phones or older devices might not capture high-quality images, and in some cases, even high-end phones may apply aggressive processing (like smoothing or noise reduction), which can degrade image clarity when posted.
How to Fix and Prevent Blurry Pictures on Instagram
Blurry Instagram photos can be incredibly frustrating—especially when you’ve taken the time to shoot and edit great content. The good news is, there are simple steps you can take to prevent quality loss and ensure your photos look as sharp as possible.
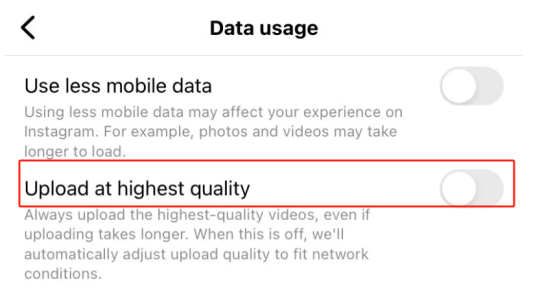
Step1. Enable High-Quality Uploads
Instagram automatically compresses images to reduce file size, but you can enable a setting to allow better upload quality.
How to Enable High-Quality Uploads:
- Open the Instagram app and tap your profile icon.
- Tap the menu (three lines) in the top right corner, then go to Settings and Privacy.
- Scroll to “Data Usage and Media Quality”, then toggle on “Upload at highest quality.”
This ensures Instagram prioritizes photo clarity, especially when you’re on Wi-Fi. While you’re improving your Instagram experience, don’t forget to check if your account is secure. A strong password is just as important as strong content. Not sure if yours is up to par? Read our guide: Instagram Password Checking: Is Your Password Strong Enough 2025? to make sure your account stays safe from prying eyes.
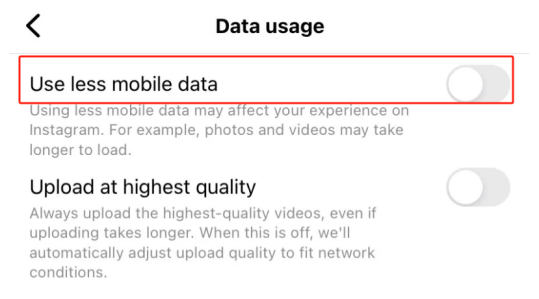
Step 2. Turn Off Data Saver Mode
The Data Saver feature reduces data usage by lowering media quality, resulting in blurry images. Disabling it ensures better photo clarity.
How to Disable Data Saver:
- Open the Instagram app and tap your profile icon in the bottom right.
- Tap the three-line menu (☰) in the top right corner and go to Settings and Privacy.
- Scroll down and tap “Data Usage and Media Quality.”
- Toggle off the option that says “Use less mobile data.”
Even with this setting off, you’ll still want to upload over Wi-Fi for the best quality and fastest speeds.
Step 3. Use the Built-in Camera App
Instagram’s in-app camera may be convenient, but it often captures lower-resolution photos with less control over lighting, focus, and quality. Your phone’s built-in camera app, on the other hand, is designed to take full advantage of your device’s hardware—resulting in sharper, higher-quality images.
What to do:
- Open your phone’s default camera app (not Instagram) to take photos.
- Adjust focus, exposure, or resolution settings if needed for the best shot.
- After capturing your photo, open Instagram and upload it from your gallery or camera roll.
Avoid heavy zooming or filters that degrade image quality—edit photos using high-quality apps like Snapseed or Lightroom before uploading.
Step 4. Edit Photos Before Uploading
Enhance image sharpness and clarity using photo editing apps before posting.
Recommended Editing Apps:
- VSCO: Combines powerful filters with manual editing tools, great for maintaining a consistent aesthetic and professional look.Recommended Editing Apps:
- Adobe Lightroom: Ideal for precise adjustments like sharpness, contrast, and color balance—perfect if you want full control.
- Snapseed: A free, beginner-friendly app from Google that lets you quickly enhance images with tools like Details, Tune Image, and Healing.
Export your edited photo at the highest resolution available and in JPEG format to preserve quality during upload. If you ever find that your photos have mysteriously disappeared from Instagram, don’t panic. There’s a helpful guide on How to Recover Disappearing Photos on Instagram on a Computer? that walks you through the steps to get them back quickly and safely.
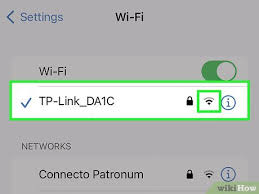
5. Check Your Internet Connection
A weak or unstable internet connection can interfere with how Instagram uploads your photos—sometimes causing them to appear blurry or only partially loaded. This happens when the app compresses your content more aggressively to compensate for the poor connection.
What to do:
- Make sure you’re connected to a strong and stable Wi-Fi network, especially when uploading high-resolution images.
- Avoid uploading over spotty mobile data or in areas with poor signal, as this can lead to reduced quality.
Try toggling Airplane Mode on and off or restarting your Wi-Fi if uploads are lagging or your photos appear fuzzy after posting.
6. Clear Instagram’s Cache (Android Only)
Over time, Instagram stores temporary data (cache) that can sometimes interfere with how images load or upload—leading to glitches like blurry photos. Clearing the cache gives the app a fresh start without deleting your account or posts.
How to clear Instagram’s cache on Android:
- Open your phone’s Settings.
- Go to Apps > Instagram > Storage.
- Tap Clear Cache (avoid “Clear Data” unless you want to reset the app entirely).

Doing this regularly can help fix random quality issues and improve overall app performance.
7. Recover Corrupted Photos Using WinfrGUI
If your images appear corrupted or are missing, you can attempt to recover them using WinfrGUI, a free Windows-based tool that provides a graphical interface for Microsoft’s Windows File Recovery.
How to Use WinfrGUI:
- Download WinfrGUI from the official website and install according to the instructions .
- Launch the application and select the drive where your photos were previously stored.
- Choose the recovery mode (Quick Scan or Deep Scan) based on your needs.
- Start the scan and follow the on-screen instructions to recover your photos.
By implementing these methods, you can significantly improve the clarity of your Instagram photos and prevent them from appearing blurry after upload.
Troubleshooting FAQs for Blurry Instagram Photos
Q1. Why are my photos blurry after uploading to Instagram?
Instagram compresses images to reduce file size, which can lower quality—especially if your original photo is low-resolution or if data saver mode is enabled.
Q2. How can I prevent Instagram from reducing my photo quality?
Enable Instagram’s “High-Quality Uploads” setting in your account’s Data Usage settings, and upload photos taken with your phone’s native camera app rather than Instagram’s built-in camera.
Q3. What should I do if my Instagram photos look fine on my phone but blurry to others?
Check your internet connection, as unstable or slow networks can cause Instagram to display lower-quality images. Also, make sure you’re not using any data saver modes.
Q4. Can clearing the Instagram app cache improve photo quality?
Yes, especially on Android devices—clearing the app cache removes temporary files that may interfere with loading or uploading images properly.
Q5. Why does Instagram crop or stretch my photos, causing them to look blurry?
Uploading images that don’t match Instagram’s recommended aspect ratios (between 1.91:1 and 4:5) can cause automatic resizing, cropping, or stretching, which degrades image clarity.
Conclusion
So, now you know the answer to “Why does Instagram make my picture blurry?” It comes down to a mix of factors, like Instagram’s compression algorithm, low-resolution uploads, and even your internet connection. But the good news is, there are plenty of ways to fix and prevent this issue. By following some simple steps like enabling high-quality uploads, editing your photos before posting, and ensuring you have a stable connection, you can significantly improve the clarity of your Instagram pictures. Keep these tips in mind, and you’ll be posting crystal-clear photos in no time!
🔗 Also Read: Where Are My Pictures Stored?