How to Recover Unsaved Word Document: 5 Proven Ways
We’ve all been there—hours of work on a Word document, only for it to disappear due to a crash or accidental closure. The frustration and panic are real, but don’t worry! If you’re wondering how to recover unsaved word document there are several ways to get it back. Microsoft Word has built-in recovery features like AutoRecover and temporary files, while Windows and cloud storage services offer additional options. Whether your document was lost due to a system failure or human error, you still have a chance to restore it. In this guide, we’ll explore five proven methods to help you retrieve your unsaved Word document quickly and easily. Follow these steps to recover your lost file and prevent future mishaps. Let’s get started!
Way 1.Recover Unsaved Word Documents with AutoRecover
AutoRecover is a built-in Microsoft Word feature designed to automatically save temporary versions of your document at regular intervals. If Word crashes or your computer shuts down unexpectedly, AutoRecover can help restore your unsaved work. However, it only works if the feature is enabled before the document is lost.
How to Use AutoRecover (Windows & Mac)
Step 1: Start by launching Microsoft Word on your computer.
Step 2: Click the File tab, select Info, then choose Manage Document.
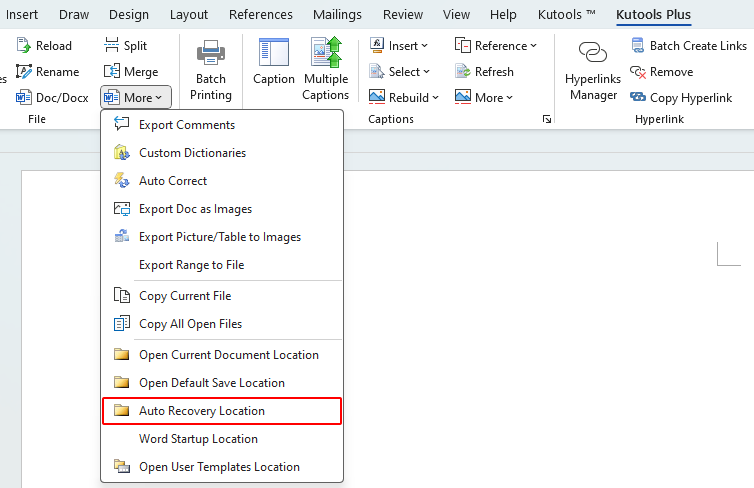
Step 3: From the dropdown menu, click Recover Unsaved Documents. This opens the folder where Word stores temporary backups.
Step 4: Look for your lost document in the list, then click Open.
Step 5: Once the file opens, click Save As to store it in a safe location.
Note: AutoRecover files are only available if Word was closed unexpectedly.
To avoid losing work in the future, ensure AutoRecover is enabled:
Step 1: Go to File → Options → Save and check “Save AutoRecover information every X minutes.”
Step 2: Adjust the time interval for more frequent backups.
By keeping AutoRecover active, you minimize the risk of losing important documents and can quickly recover unsaved documents when needed.
Way 2. Retrieve Documents from Temporary Files
When a Word document is unsaved due to a crash or unexpected shutdown, Windows often stores a temporary version of the file.
These temporary files act as backups and can sometimes help recover lost documents.
If you’re searching for how to recover a lost word document, checking temporary files is one of the most effective methods.
How to Check Temp Files (Windows)
Step 1: Press Win + R, type %temp%, and hit Enter.
Step 2: Look for files starting with ~WRL or ending with .tmp.
Step 3: Open these in Word to see if it’s your lost file.
On Mac: Look in /private/var/folders or use Terminal to search for temporary files.
Prevent Future Data Loss
- To avoid losing important work, always rename and save recovered documents promptly.
- Additionally, enable AutoSave and back up your files to OneDrive or an external drive for added security.
- Regularly saving your work ensures minimal disruption in case of unexpected shutdowns.
Way 3. Restore Previous Versions via File History (Windows)
Windows’ File History and Previous Versions features provide robust solutions for recovering lost or modified Word documents.
File History automatically backs up files and folders, allowing users to restore previous versions when necessary.
How File History and Previous Versions Assist in Recovery
- File History continuously monitors and saves copies of files in user libraries, such as Documents, Pictures, and Videos.
- It updates these backups whenever changes are made, enabling users to revert to earlier versions if needed.
- Similarly, the Previous Versions feature allows restoration of files or folders to their previous states without additional software.
How to Use File History
Step 1: Find the folder that used to contain your document, then right-click it.
Step 2: From the menu that appears, choose Restore previous versions.
Step 3: You’ll see a list of saved versions. Pick the one that looks right.
Step 4: Click Restore, and Windows will recover that version of the folder — along with your file.
Important Notes:
- This method only works if File History was enabled beforehand.
- To enable File History, go to Settings > Update & Security > Backup and activate it with an external or network drive.
Way 4. Recover from OneDrive If Synced
Windows’ File History and Previous Versions can help by automatically saving earlier copies of your files, offering a backup when your document is unsaved.
How to Restore from OneDrive
Step 1: Open your browser and sign in to your Microsoft account at onedrive.live.com.
Step 2: On the left-hand side, click Recycle Bin to see recently deleted files.
Step 3: Scroll through the list and find the file you want to recover.
Step 4: Select the file, then click Restore to send it back to its original folder.
Important notes:
- This method is particularly useful if you’re wondering how to recover unsaved document when no immediate save was made.
- However, note that this recovery technique only works if File History was enabled beforehand.
- Setting up File History ensures that you have a reliable safety net, protecting your work against unexpected data loss in the future.
Way 5. Use Data Recovery Software -Last Resort Option
For unsaved or deleted files not recoverable through the above methods, use a reliable tool like WinfrGUI.
How to Use WinfrGUI
Step 1: Download and install WinfrGUI.
Step 2: Choose the drive where your document was stored.
Step 3: Select the file type (e.g., .docx) and scan method.
Step 4: Click Start Recovery. Preview and save recovered documents.
Remember to use caution when employing third-party software.
- Ensure you download recovery tools from reputable sources to avoid malware, and note that recovery success isn’t guaranteed if new data has overwritten the lost files.
- Stay vigilant.
Word Document Recovery Method Comparison
| Method | Works for Unsaved | Works for Deleted | Requires Backup | Difficulty | Platform |
|---|---|---|---|---|---|
| AutoRecover | ✅ | ❌ | ❌ | Easy | Windows, Mac |
| Temporary Files | ✅ | ❌ | ❌ | Moderate | Windows |
| File History / Previous Versions | ✅ | ✅ | ✅ | Moderate | Windows |
| OneDrive Recovery | ✅ | ✅ | ✅ | Easy | Windows, Mac |
| WinfrGUI Data Recovery Software | ✅ | ✅ | ❌ | Easy | Windows |
Lost a Word Document?
➜ Was it saved?
- Yes → Check File History / Recycle Bin.
- No → Check AutoRecover / Temp Files.
➜ Is it on OneDrive?
- Yes → Recover from OneDrive Recycle Bin.
- No → Use WinfrGUI Data Recovery Software.
Bonus: How to Prevent Data Loss in Word
- Turn on AutoSave in Microsoft Word.
- Regularly back up documents using File History or Time Machine (Mac).
- Sync important files to OneDrive or other cloud services.
- Keep a data recovery tool like WinfrGUI installed.
Preventive Tips for the Future
1. Prevent data loss by taking proactive steps.
2. Enable AutoSave and AutoRecover in Microsoft Word settings to automatically store versions of your documents as you work.
3. Regularly back up your files to reliable cloud services like OneDrive, Google Drive, or an external drive, ensuring you have access to previous versions and reducing the reliance on methods of how to recover deleted files.
3. Additionally, cultivate the habit of saving your work frequently while editing to minimize accidental loss. Ensure lasting protection.
Final Thoughts
In conclusion, understanding how to recover lost word document is crucial for anyone working extensively with Microsoft Word. The five proven methods we’ve discussed—utilizing AutoRecover, searching for temporary files, restoring from backups, checking the Recycle Bin, and employing data recovery software WinfrGUI—provide comprehensive strategies to retrieve your valuable work.
Implementing preventive measures, such as enabling AutoSave and AutoRecover, regularly backing up documents to cloud services like OneDrive or Google Drive, and developing the habit of frequent manual saves, can significantly reduce the risk of future data loss. By combining these recovery techniques with proactive habits, you can ensure that your important documents remain secure and accessible, minimizing disruptions to your workflow.