How to Recover Word Document That Was Not Saved [2026]
Learning how to recover Word document that was not saved is essential in 2026. Crashes, freezes, or accidental closures can cause hours of work to disappear. Microsoft Word includes built-in recovery features and modern tools to make file restoration easier. This guide provides clear, step-by-step methods to restore unsaved documents quickly and safely.
Key Takeaways
- Knowing how to recover a Word document that was not saved can save you a lot of stress.
- AutoRecover saves your work automatically. Check it first if Word crashes.
- Temporary files may hold your lost document. Look in the
%temp%folder. - Your file might be in the Recycle Bin. Don’t forget to check there.
- Previous Versions in Windows can restore older copies if File History was on.
- Word can make backup copies (
.wbk). Enable this to protect your files. - If all else fails, data recovery tools like WinfrGUI or Recuva can help restore lost or deleted Word files.
- Turn on AutoSave and keep regular backups to avoid future problems.
Why Word Documents Get Lost
There are a few common reasons Word documents disappear. Knowing them can help you avoid the same problem later.
- Power failure or system crash: If your computer shuts down suddenly, any unsaved changes will be lost unless AutoRecover has saved a backup.
- Accidental closure: Sometimes we close Word without saving. The latest edits can vanish.
- Word freezing or crashing: If Word stops responding, your file may become corrupted or disappear.
- File corruption: Improper shutdowns, malware, or storage issues can make documents inaccessible.
Microsoft’s AutoSave and AutoRecover are lifesavers. They save backup copies of your document automatically while you work. Learning how to use them can save you a lot of stress. If you’re wondering how to recover unsaved word document, check out our guide: “10 Solutions to Microsoft Word Not Responding or Not Saved.” It walks you through easy steps to get your files back and keep Word running smoothly.of effort.
How to Recover Word Document That Was Not Saved
Method 1. Check Word’s AutoRecover Feature
AutoRecover is a built-in feature in Microsoft Word. It automatically saves a temporary backup of your document at regular intervals. If Word crashes, freezes, or you accidentally close a file without saving, AutoRecover can help you recover an unsaved Word document and get back the latest version of your work.
How to Access and Customize AutoRecover Settings:
Step 1: Open Microsoft Word, then click the File tab (or Office Button in older versions) and select Options.
Step 2: In the Word Options menu, click Save on the left-hand panel.
Step 3: Look for the AutoRecover file location—this is the folder where Word saves your automatic backups. Make a note of it in case you need to browse manually later.
Step 4: Check that “Save AutoRecover information every X minutes” is enabled. To minimize data loss, consider setting it to every 5 minutes.
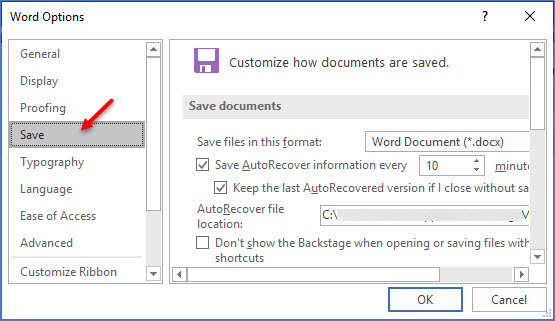
Also ensure “Keep the last AutoRecovered version if I close without saving” is turned on.
How to Recover Unsaved Word Documents via AutoRecover:
Step 1: Reopen Word after a crash or unexpected shutdown.
Step 2: Click File → Open → scroll down and click Recover Unsaved Documents (located at the bottom).
Step 3: A window will open showing recent unsaved drafts. Browse through the list.
Step 4: Select the desired file and click Open.
Step 5: Once the file opens, immediately save it using File > Save As to avoid losing it again.
If AutoRecover doesn’t display your file, you can manually go to the backup folder noted in Step 3 and look for files ending in .asd.
Method 2. Recover Word Documents from Temporary Files
If your Word document wasn’t saved, it might still exist as a temporary file. Word often creates these backup files automatically. Here’s how to recover an unsaved Word document by checking these temporary files—you might be able to get your lost work back quickly.
How to Find Temporary Files on Your PC:
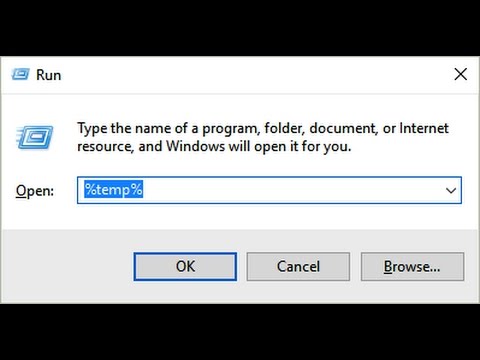
Step 1: Open File Explorer.
Step 2: In the address bar, type %temp% and press Enter. This takes you to the folder where Windows stores temporary files.
Step 3: Scan through the list and look for files that:
- Have names similar to your missing document.
- Use extensions like
.asd,.tmp, or.wbk.
You can also sort by “Date Modified” to find files recently created during your editing session.
How to Open and Recover the File:
Step 1: Open Microsoft Word.
Step 2: Go to File → Open → Browse.
Step 3: In the file browser window, set the file type dropdown to All Files (.) to view non-standard Word files.
Step 4: Find the folder where you found your temp file, select it, and click Open.
Step 5: If the file opens successfully, save it immediately using File > Save As.
Not all temporary files are recoverable, but checking this location often yields surprisingly effective results—especially right after a crash or unexpected shutdown.
Method 3. Check the Recycle Bin
Sometimes your Word document isn’t gone. It may have been deleted by accident or moved to the Recycle Bin during a crash or sudden shutdown. Checking there is often the fastest way to recover it.
- You may have accidentally hit Delete instead of Save.
- Word or Windows may have dumped temporary files into the Recycle Bin after a crash.
- Cleaning tools or updates might have moved unsaved or auto-generated files there.
How to Restore from the Recycle Bin:
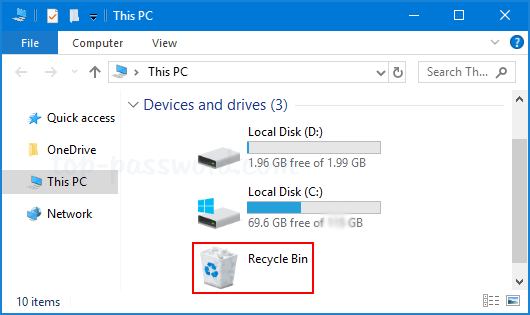
Step 1: Double-click the Recycle Bin icon on your desktop to open it.
Step 2: Use the search bar to type part of your document’s name or look for files with extensions like .doc or .docx.
Step 3: Once you locate the file, right-click on it and choose Restore—this will return the file to its original location.
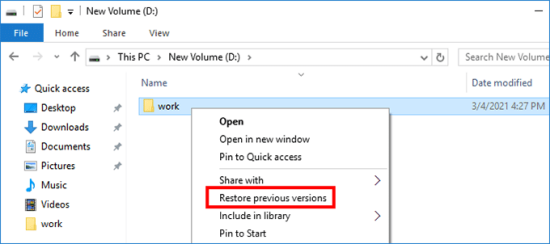
Method 4. Restore from Previous Versions (Windows)
Windows can save earlier copies of your files using a feature called Previous Versions. If it was turned on before your Word document went missing, you can restore an older version—even if the current file is gone or overwritten. It’s like going back in time to recover your work.
How to Restore a Previous Version:
Step 1: Find the folder where your Word document was originally saved.
Step 2: Right-click on the folder and choose Properties.
Step 3: Go to the Previous Versions tab.
Step 4: Select a listed version from a date before the file went missing.
Step 5: Click Restore to revert the entire folder and its contents to that earlier state.
Limitations to Keep in Mind:
- This method only works if File History or System Protection was turned on before the document was lost.
- If no previous versions are listed, the feature wasn’t active—or there were no restore points created.
To avoid future issues, go to Settings > Update & Security > Backup and enable File History using an external drive. It’s a simple step that could save your work down the line.
Method 5. Use Backup Copies
Word can make backup copies of your documents if the feature is turned on. These backups can save you when the original file is lost, corrupted, or overwritten. The backup file uses a .wbk extension and is stored in the same folder as your document. It usually shows the version from before your last save.
How to Locate and Open Backup Files:
Step 1: Open File Explorer and find the folder where your original Word document was saved.
Step 2: Look for files ending in .wbk—the name usually matches your original file.
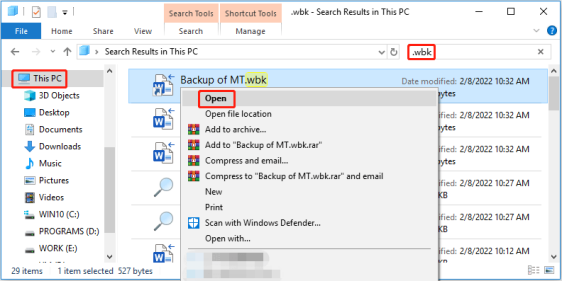
Step 3: Open Microsoft Word.
Step 4: Click File > Open, then browse to the folder and select All Files as the file type.
Step 5: Choose the .wbk file to open and review its contents.
To enable this feature for future protection:
Go to File > Options > Advanced > Save and check the box next to “Always create backup copy.” This ensures Word automatically creates a fallback version every time you save your document.
When and How to Use Data Recovery Software for Word Files
If Word’s built-in recovery tools—like AutoRecover, temporary files, or the Recycle Bin—don’t work, don’t worry. Data recovery software can help you restore unsaved or permanently deleted Word files. In 2026, these tools are more reliable and easier to use than ever, even if you’re not a tech expert.
When Should You Use Data Recovery Tools?
- You’ve already checked AutoRecover, temp files, and the Recycle Bin with no luck.
- The file was permanently deleted, corrupted, or overwritten.
- You need to recover a document from a USB stick, external drive, or formatted partition.
- You’re dealing with file system issues or drive errors preventing normal access.
Top Data Recovery Tools for Word Documents in 2026
Tool 1. WinfrGUI – Best Free Option for Windows Users
- ✔️A 100% free, user-friendly GUI for Microsoft’s official Windows File Recovery utility.
- ✔️Supports NTFS, FAT, exFAT, and ReFS file systems—ideal for USB drives and hard disks.
- ✔️Offers a simple visual interface, so no command-line skills are needed.
- ✔️Can recover
.doc,.docx,.asd, and even lost.tmpfiles with just a few clicks.
Tool 2. Recuva – Reliable & Lightweight File Recovery
- ✔️One of the most trusted free recovery tools for Windows.
- ✔️Scans for deleted or unsaved Word files and allows targeted recovery by file type or location.
- ✔️Supports deep scan mode to uncover long-lost or fragmented files.
- ✔️Great for casual users who need quick results without paying a cent.
Tool 3. Disk Drill – Premium Deep Recovery Tool
- ✔️Offers deep scanning capabilities and a sleek, intuitive interface.
- ✔️Recovers documents from internal drives, USB sticks, SD cards, and even damaged or reformatted partitions.
- ✔️Includes a file preview feature, so you can see what you’re recovering before committing.
- ✔️Best suited for users who want extra features like disk health monitoring and advanced filtering.
Troubleshooting FAQ: Word Document Recovery
Q1. Why can’t I find my Word document in the AutoRecover folder?
AutoRecover only saves documents that have been edited for more than a minute and periodically autosaved.
Tip: Check if AutoRecover was enabled under File > Options > Save. If not, you won’t see recovery files. Also, browse the AutoRecover file location manually using File Explorer if the file doesn’t appear in the in-app menu.
Q2. I recovered the file, but it’s blank or missing content—what happened?
This can occur if the AutoRecover file was interrupted during saving (e.g., during a crash or power outage).
Try this: Look for older versions of the file in Previous Versions (right-click folder > Properties > Previous Versions) or check for backup files (.wbk) in the original folder.
Q3. I can’t open the recovered .tmp or .asd file in Word — what do I do?
Sometimes Word won’t automatically recognize recovered file types.
Solution: Open Word > File > Open > Browse > set file type to All Files (.*), then manually select the file. If that doesn’t work, try opening it in Notepad to retrieve plain text or use a third-party tool like Recuva or Disk Drill.
Q4. Is it safe to use third-party recovery tools for unsaved Word files?
Yes — as long as you use trusted and reputable tools like WinfrGUI, Recuva, or Disk Drill.
Best Practice: Always install the recovery software on a drive different from where the lost file was located to avoid overwriting recoverable data.
Conclusion
If your Word document wasn’t saved, you can try the methods above to get it back. AutoRecover, temporary files, the Recycle Bin, and backup copies are usually enough to restore your work. If none of these work, using a reliable recovery tool can help you recover unsaved or deleted files quickly. And if you want to avoid losing work in the future, consider enabling AutoSave and regular backups. That way, Word crashes or accidental closures won’t be such a headache anymore.
🔗 Also Read: 6 Ways to Recover Word Document Not Saved 2007