How to Restore Files Using CMD When Windows Fails to Boot
If you’re reading this, you’re probably there right now. You press the power button, expecting your usual wallpaper and icons, but instead, you’re greeted by that cold, unblinking “Automatic Repair” screen or, worse, a black screen with a lonely white cursor. That pit in your stomach? That’s the realization that your wedding photos, your unfinished thesis, or three years of tax returns are currently trapped behind a glass wall that won’t open. In my years of troubleshooting systems, I’ve learned that the “Desktop” is just a polite mask. When that mask breaks, it doesn’t mean your files are gone; it just means you have to stop being a “user” and start being an “operator.” You have to go under the hood. The most reliable “backdoor” into a broken computer is the Command Prompt. It’s intimidating, it’s ugly, and it doesn’t use a mouse—but it’s often the only thing still working when the rest of Windows has given up. In this guide, I’m going to walk you through exactly how to restore files using cmd, sharing the shortcuts and safety precautions I’ve picked up from countless late-night data recovery sessions. We’ll skip the fluff and get straight to the commands that actually work when your back is against the wall.
Key Takeaways
- Access the “Lifeline”: When Windows won’t boot, use the Three-Fail Rule (interrupting boot 3 times) or a Bootable USB to enter the Windows Recovery Environment (WinRE) and open the Command Prompt.
- Identify Drive Letters: Use the
diskpartutility followed bylist volumeto find your data. In recovery mode, your main drive is often assigned a letter like D: or E: rather than C:. - Use Robust Copy Commands:
- Xcopy: Best for simple, directory-wide backups (use
/E /H /C /Iswitches). - Robocopy: The professional choice for failing drives; it includes “retry logic” to bypass disk errors.
- Xcopy: Best for simple, directory-wide backups (use
- Recover Deleted Data: Utilize Windows File Recovery (WinFR). Use
/regularmode for recent deletions on NTFS drives and/extensivemode for corrupted or formatted partitions. - Watch for Roadblocks: Be aware that SSD TRIM, BitLocker encryption, and physical hardware failure (clicking sounds) can prevent successful software-based recovery.
- Simplify with WinfrGUI: For a safer, error-free experience, WinfrGUI provides a graphical interface for Microsoft’s recovery engine, preventing syntax errors and accidental data overwriting.
Entering the Command-Line “Lifeline”
The first challenge is simply getting to a prompt. Since you cannot click “Start,” you must rely on the Windows Recovery Environment (WinRE).
Method 1: The Three-Fail Rule
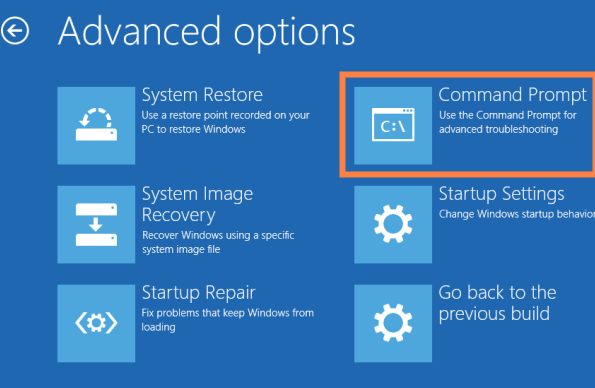
Windows is designed to protect itself. If you interrupt the boot process three times in a row (by holding the power button as soon as the logo appears), the system will automatically enter WinRE. From the “Automatic Repair” screen, navigate to: Troubleshoot > Advanced Options > Command Prompt.
Method 2: Bootable Media
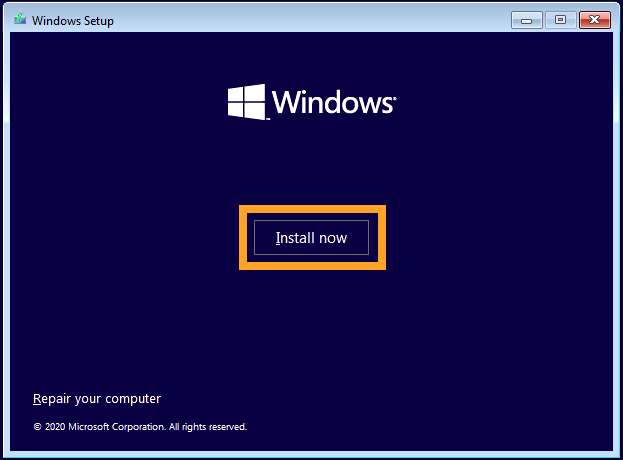
If your recovery partition is damaged, you will need a Windows Installation USB. Boot from this USB, select your language, and instead of clicking “Install Now,” click “Repair your computer” in the bottom-left corner. This gives you authoritative system-level access, which is the foundation of learning how to restore files using cmd.
Mapping Your Drives
One of the most common reasons people fail when trying to learn recovering deleted files using cmd is a misunderstanding of drive letters. In a recovery environment, “Drive C:” is often not your Windows partition. The system creates a virtual “X:” drive for recovery tools, shifting your actual hard drive to D:, E:, or F:.
Using Diskpart to Find Your Data
Type diskpart and then list volume.
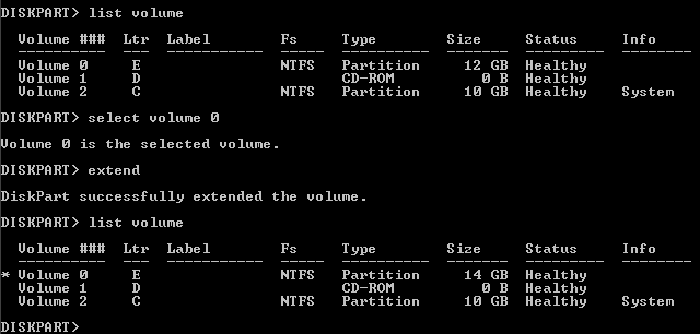
- Look for the volume labeled “Windows” or the one that matches your drive’s storage capacity.
- Note the drive letter (e.g.,
D:). - Identify your external backup USB (e.g.,
F:). - Type
exitto return to the main prompt.
Technical Deep-Dive – Xcopy vs. Robocopy
When you need to move thousands of files (like an entire User profile), manual copying via Notepad is too slow. You need robust commands that can handle bulk data.
The Xcopy Method
Xcopy is excellent for simple, directory-wide backups. Command:
xcopy D:\Users\Name\Documents F:\Backup /E /H /C /I
- /E: Copies all subdirectories, even empty ones.
- /H: Includes hidden and system files.
- /C: Continues copying even if an error occurs (essential for failing drives).
The Robocopy Method (Robust File Copy)
For high-risk scenarios involving system instability, Robocopy is superior. It includes “retry logic” that will attempt to read a file multiple times if the disk is struggling. Command:
robocopy D:\Users\Name\Pictures F:\Recovery\Pictures /MIR /ZB /R:5 /W:5
This command will mirror your pictures, use “Restartable” mode to handle power cuts, and retry failed files 5 times. Mastering these switches is the “Pro” level of knowing how to restore files using cmd.
Recovering Deleted Files with WinFR
If your files weren’t just trapped but were actually deleted before the system crashed, simple copying won’t find them. You must use Windows File Recovery (WinFR). This is a Microsoft-built utility specifically for deep-sector scanning.
The Success Scenario: Regular Mode
If your file system is NTFS and the deletion was recent, use:
winfr D: F:\RestoredFiles /regular /n \Users\Name\Documents\Tax2025.pdf
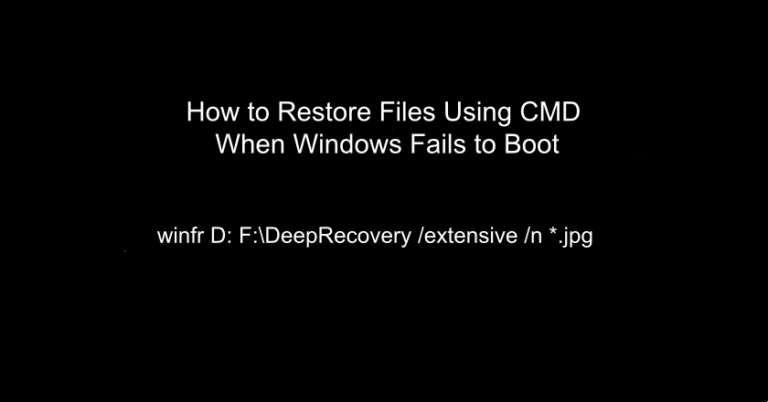
The Failure Scenario: Extensive Mode
If the drive was formatted or the system crash corrupted the Master File Table (MFT), you must use Extensive mode. This ignores the file table and looks for “signatures” (unique headers of JPGs, PDFs, etc.) directly on the disk. For many, this is the final hope in learning how to restore files using cmd via WinFR.
winfr D: F:\DeepRecovery /extensive /n *.jpg
Why WinFR Commands Fail (The “Wall of Error”)
Even when you know the theory of how to restore files using cmd, you will likely encounter these major roadblocks:
- SSD TRIM Interference: If your system is on an SSD, the “TRIM” command often wipes deleted data immediately. In this scenario, even the most perfect CMD syntax will return 0 files found.
- BitLocker Encryption: If your drive is encrypted, CMD will see it as “RAW.” You must use the
manage-bde -unlockcommand with your 48-digit recovery key before any other commands will work. - The “Same Drive” Mistake: Never set your destination for recovered files to the same drive they are being recovered from. This will overwrite the very data you are trying to save.
A system that won’t boot is often a symptom of hardware reaching its end of life. Continuous attempts to “repair” the system or run intensive CMD scans can generate heat and stress that push a dying HDD over the edge. When you are researching how to restore files using cmd, it is tempting to run chkdsk /r alongside recovery commands. However, if the drive is physically failing, a deep scan can cause a “head crash,” where the read-arm gouges the disk platter. Rule of Thumb: If you hear clicking or grinding, stop all CMD operations immediately. Physical failure requires professional lab intervention.
The Modern Solution – WinfrGUI
The command line is a vestige of an older era. While powerful, its lack of visual feedback and unforgiving syntax makes it a high-risk tool for the average person. A single missing backslash or a confused drive letter can result in accidentally formatting the wrong drive. This is why WinfrGUI was developed. It acts as a bridge, utilizing the exact same powerful Microsoft recovery engine used in WinFR but presenting it in a safe, intuitive graphical interface.
Instead of battling with the “Wall of Error” in a cold terminal, WinfrGUI utilizes the exact same professional-grade Microsoft recovery engine used in WinFR but wraps it in a safe, intuitive graphical interface.
- Automated Logic: It automatically handles the complex
/extensiveand/nswitches based on your drive type, ensuring you get the best results without needing a computer science degree. - Built-in Safety Guardrails: The software intelligently prevents you from choosing the source drive as your destination, effectively eliminating the risk of accidental overwriting.
- Visual Drive Mapping: No more guessing drive letters via
diskpart. You can see your partitions clearly, making it the fastest way to achieve the results of how to restore files using cmd without the high-stakes stress of manual typing.
By using WinfrGUI, you get the same professional-grade results as if you had mastered how to restore files using cmd, but with the safety and ease of a modern application.
Conclusion
Knowing how to restore files using cmd is an essential skill. It allows you to operate in the “shadows” of a broken operating system, rescuing data that would otherwise be lost to a “Reset This PC” command. By mastering Xcopy, understanding the Diskpart environment, and utilizing the Notepad trick, you can save your digital life in a crisis. However, remember that the goal is data safety, not technical bravado. If the commands feel overwhelming or the risk of a typo is too high, utilize free tools like WinfrGUI. It provides the power of the command line with the safety of a modern application—giving you the best chance to get your files back without the headache of syntax errors.
🔗 More Tutorials: