Restore Encrypted Files via Command Prompt Recovery Key
I’ve spent years in the trenches of data recovery, and I’ve seen a recurring nightmare: A user successfully learns the basics of data recovery, only to hit a brick wall labeled BitLocker. You have the tools, you have the motivation, but your files are trapped inside an encrypted vault that the system refuses to open. When Windows fails to boot, the friendly blue pop-up box asking for your password often disappears. You are left with a black screen and a command line. In this state, your only “key” to the kingdom is a 48-digit string of numbers. This guide is a deep dive into how to use the command prompt recovery key to bridge the gap between a locked drive and a successful recovery using WinfrGUI. We aren’t just looking for “automated” fixes here; we are looking for a manual, reliable path to getting your life’s work back.
Key Takeaways
- Check Local Corruption: Many “failed” reset attempts are caused by corrupted browser cookies or Passkey tokens on your Windows PC. Always try a “Clean” environment (Incognito mode) first.
- Network Identification: Instagram security filters may block reset requests from flagged Wi-Fi IPs. Switch to a mobile hotspot and use
ipconfig /flushdnsto clear outdated connection data. - Sync Your System Clock: An out-of-sync Windows clock (even by 1 minute) will cause SSL certificate failures, making your password reset link appear “expired” the moment it arrives.
- Biometric Verification: The “Video Selfie” submission is the most effective way to bypass broken email loops, as it uses AI to verify your live identity against your profile photos.
- Recover Lost Security Codes: If your local backup text files or 2FA codes disappeared after a Windows crash, WinfrGUI is a free, essential tool to scan your drive and restore those lost access files.
- Email Visibility: Verification links often bypass the “Spam” folder and land in hidden Outlook folders like “Clutter” or “Other.” Search your entire mailbox for
[email protected].
The Double-Locked Door Dilemma
Data recovery is usually a one-step process: find the deleted file and pull it back. But BitLocker adds a layer of “pre-recovery” complexity. If your drive is encrypted, Windows sees the data as “white noise” or a “RAW” partition. Even powerful tools like Microsoft’s WinFR engine cannot distinguish a wedding photo from a system file if the encryption hasn’t been peeled back first. This is why understanding the command prompt recovery key protocol is vital. You cannot “skip” this step. If you try to run recovery software on a locked BitLocker drive, you will likely get an “I/O Device Error” or a “Drive is not accessible” message. We need to open the door before we can start the search.
Step 1. Unlocking the Vault via CMD
Before any recovery software can find your photos and documents, you must “unlock the front door” of your hard drive. Since your Windows won’t start normally, you must use the Command Prompt—a text-only way to talk directly to your computer. Follow these steps meticulously:
1. Find Your 48-Digit Key
You cannot guess this code, and it is not your normal login password. It is a unique 48-digit string generated when your computer was first encrypted.
- Where to look: On a phone or another working computer, go to account.microsoft.com/devices/recoverykey.
- Sign in: Use the Microsoft account (email) that was originally used to set up your PC.
- Write it down: It is much easier to read the numbers from a piece of paper than a small phone screen while you are typing into the black command window.
2. Open the Command Prompt (Recovery Mode)
- When your PC fails to boot, it should eventually reach a blue screen titled Choose an option.
- Click Troubleshoot > Advanced options > Command Prompt.
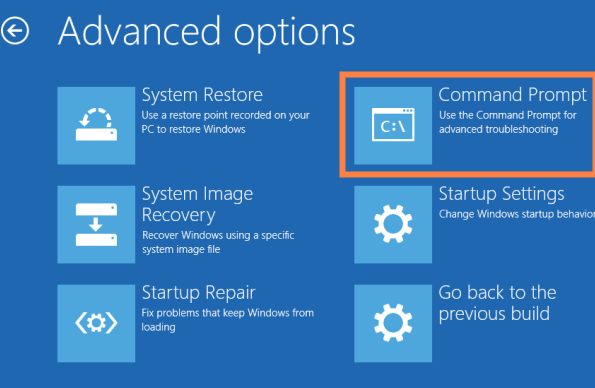
- A black window will appear. If it asks you to choose an account, select yours and enter your password.
3. Find Out Which Drive Letter is “Locked”
In this emergency mode, your main drive might not be called “C:”. We need to check its “Identity” first.
- Type
diskpartand press Enter. Wait a few seconds for it to load.
diskpart
- Type
list volumeand press Enter.
list volume
- Look at the list: You are searching for a row where the “FS” column says “RAW” or the “Size” matches your hard drive (e.g., 476 GB).
- Note the Letter: Under the “Ltr” column, see which letter is assigned to that drive (for this example, let’s assume it is D).
- Type
exitand press Enter.
exit
4. Type the Unlock Command
Now, you will tell the computer to use your key to open that drive. Precision is key here; every space and dash matters.
- Type:
manage-bde -unlock D: -recoverypassword
(Make sure there is a space after the “D:” and another space after the word “recoverypassword”)
- Next, type your 48-digit key. You can type the dashes or just the numbers; the computer understands both.
- Example:
manage-bde -unlock D: -recoverypassword 123456-234567-345678…
- Press Enter.
5. Confirming Success
If you typed the numbers correctly, the screen will display: “The password successfully unlocked volume D:.” * If it says “Failed”: Don’t panic. It is almost always a typo. Press the Up Arrow on your keyboard to bring the line of text back, use the backspace to fix the numbers, and try again.
Once Unlocked: Your drive is now “exposed” and readable. You can now proceed with your data recovery steps, as the encryption barrier has been removed for this session.
Step 2. Running WinfrGUI for Deep Recovery
Now that you have used the command prompt recovery key to unlock the partition, you can move away from the risky terminal and into the safety of WinfrGUI. If your system won’t boot, you can run WinfrGUI by connecting your hard drive to another PC or by using a WinPE bootable environment where WinfrGUI is installed.
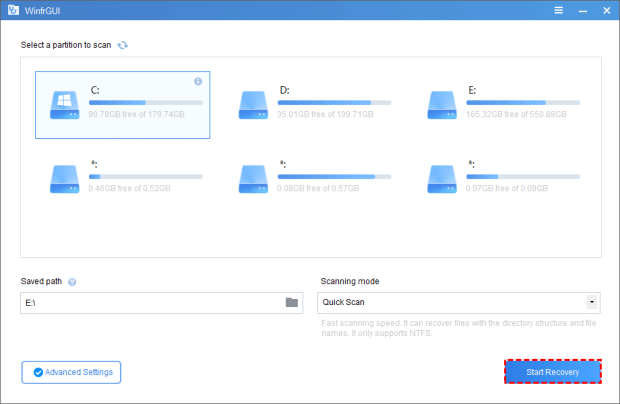
1. Select the Unlocked Partition
Launch WinfrGUI. In the drive list, you will now see your drive listed as an NTFS or FAT32 partition (instead of RAW). Select the specific partition you just unlocked via CMD.
2. Choose Your Scanning Mode
- Quick Scan: Best for files that were recently deleted on an NTFS drive. It scans the Master File Table (MFT) and is incredibly fast.
- Deep Scan: Use this if the system crash corrupted your file structure or if the drive was formatted. It scans every sector for file “signatures.”
3. Set a Safe Destination
One of the most critical safety features of WinfrGUI is the destination selection. Never save recovered files to the same drive you are scanning. Select an external USB or a different internal drive to house the recovered data.
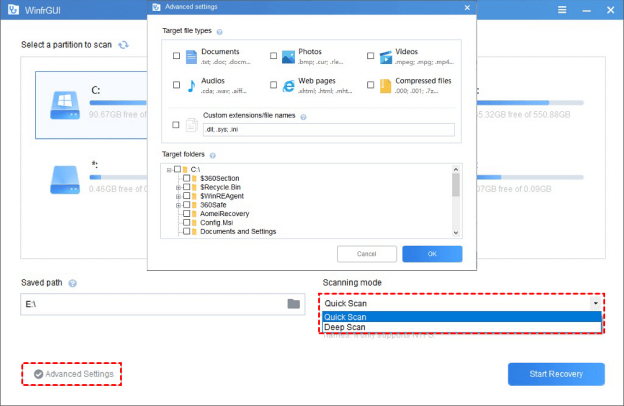
4. Advanced Settings (Optional)
If you are looking for specific file types (like just .docx or .jpg), click Advanced Settings to filter the scan. This saves time and prevents you from sifting through thousands of irrelevant system fragments.
5. Start Recovery
Click “Start Recovery.” WinfrGUI will now execute the complex WinFR logic in the background, providing you with a real-time progress bar. Once finished, click to view the recovered files in your destination folder.
Related Commands
| Command Category | Command Syntax | Purpose |
| BitLocker | manage-bde -status | Checks if the drive is “Locked” or “Unlocked.” |
| BitLocker | manage-bde -unlock D: -rp [Key] | Uses the command prompt recovery key to open the drive. |
| BitLocker | manage-bde -off D: | Permanently decrypts the drive (only after unlocking). |
| File Recovery | winfr C: E: /regular /n \Users\Documents\ | WinFR Basic: Recovers the Documents folder to drive E:. |
| File Recovery | winfr C: E: /extensive /n *.pdf | WinFR Deep: Scans for all PDF files on a corrupted drive. |
| System Info | diskpart > list volume | Identifies drive letters and “RAW” encrypted partitions. |
Conclusion
To restore files from encrypted drives via command prompt recovery key, you must respect the hierarchy of recovery. You cannot recover what you cannot see. By mastering the manage-bde command, you handle the most difficult part of modern Windows troubleshooting. Unlocking the drive is the “manual” labor; recovering the files is the “smart” labor. By combining the raw power of the command prompt recovery key with the user-friendly efficiency of WinfrGUI, you create a recovery workflow that is both professional and safe.
Next Steps:
- Go to WinfrGUI.org and download the latest free version.
- Ensure your 48-digit key is written down (not just stored on the computer that is broken!).
- Unlock your drive today and get back what belongs to you.
🔗 More Tutorials: