CMD Recover Deleted Files: 3 Effective Commands
The moment a crucial folder vanishes—whether through a frantic “Shift + Delete” or a mysterious system glitch—a specific digital vertigo sets in. While many users rush to purchase expensive third-party software, the most robust tools for data rescue are already integrated into your operating system. Learning how to cmd recover deleted files is an essential survival tactic; it provides surgical precision that graphical interfaces lack by allowing direct interaction with the file system’s logical layers. However, the Command Prompt is a double-edged sword that demands exact syntax and an understanding of the “First Rule of Data Recovery”: cease all activity on the affected drive immediately. When Windows deletes a file, it simply removes the “pointer” in the directory, marking that space as “available” for new data. By using CMD, you bypass the heavy overhead of GUI applications, significantly reducing the risk of background processes overwriting your lost data blocks. This professional approach transforms a high-stress emergency into a manageable, technical procedure.
Key Takeaways
- Stop Immediately: Cease all drive activity to prevent overwriting deleted data.
- Three Main Tools:
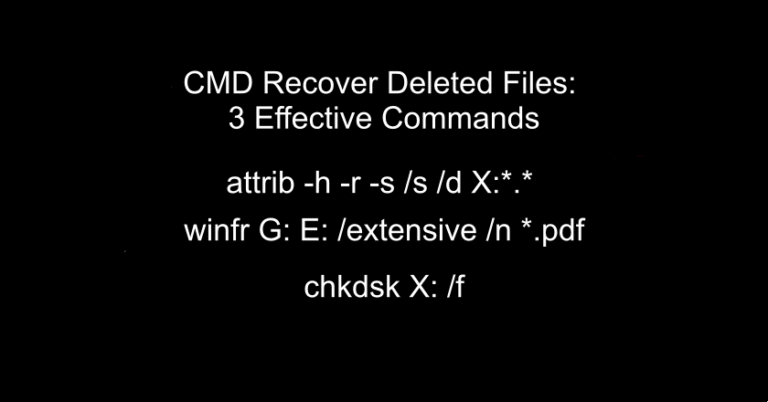
- Attrib: Use
attrib -h -r -s /s /d X:*.*to reveal files hidden by malware. - WinFR: Use
winfr G: E: /extensive /n *.pdffor deep recovery of deleted files. - CHKDSK: Use
chkdsk X: /fto repair unreadable or RAW drives.
- Attrib: Use
- SSD Alert: Recovery is often impossible on SSDs due to the TRIM command.
- Safer Option: Use WinfrGUI to avoid complex syntax and prevent manual errors.
- Prevention: Follow the 3-2-1 Backup Rule for future data safety.
The Decision Matrix: Which Command Should You Use?
Before typing a single character into the terminal, you must diagnose the “symptoms” of your data loss. Generic AI summaries often suggest a one-size-fits-all approach, but in real-world data recovery, the wrong command can actually make things worse. Use the following diagnostic table to choose your path:
| Symptom | Probable Cause | Recommended Command |
| Drive shows as full, but no files are visible | Malware or Attribute “Cloaking” | attrib |
| Files were emptied from Recycle Bin or Shift-Deleted | Permanent Logic Deletion | winfr |
| Drive is unreadable, RAW, or showing “Parameter Incorrect” | Directory Corruption | chkdsk |
1. The attrib Command: Rescuing “Ghost” Files
The first step when you need to cmd recover deleted files is to verify if they are actually deleted. Often, especially on USB flash drives and external hard disks, malware will change the file attributes to “System” and “Hidden,” making them invisible to Windows Explorer even if “Show Hidden Files” is turned on.
The Technical Mechanics
The attrib command allows you to manually override these file headers. The specific string used for recovery is:
attrib -h -r -s /s /d X:*.*
(Replace X with your drive letter).
- -h: Clears the Hidden attribute.
- -r: Clears the Read-only attribute (allowing you to move the files once found).
- -s: Clears the System attribute.
- /s: Processes matching files in the current folder and all subfolders.
- /d: Processes folders as well.
If this command works, a folder (often unnamed or labeled with a . or _) will appear on your drive containing your “lost” data. This is the safest command to run because it does not move or modify the actual data blocks; it only changes the metadata “flags” that tell Windows how to display the file.
2. The winfr Command: Official Microsoft Powerhouse
If the attrib command reveals nothing, the files are likely truly deleted at the logic level. This is where you must employ Windows File Recovery (winfr.exe). While it is a command-line tool, it is the only native utility capable of “data carving”—scanning the free space of a drive to find file signatures.
Mastering the Winfr Syntax
When you use cmd recover deleted files through this utility, success depends entirely on your choice of “Mode.”
- Regular Mode: This mode uses the Master File Table (MFT). It is ideal for NTFS drives where the deletion happened recently.
- Extensive Mode: This performs a deep signature scan. It is mandatory for FAT32, exFAT (SD cards), or drives that have been formatted or corrupted.
Example Case Study: Imagine you need to recover a PDF document from an exFAT-formatted 128GB SD card (Drive G:) and save it to your local drive (Drive E:). Your command would be:
winfr G: E: /extensive /n *.pdf
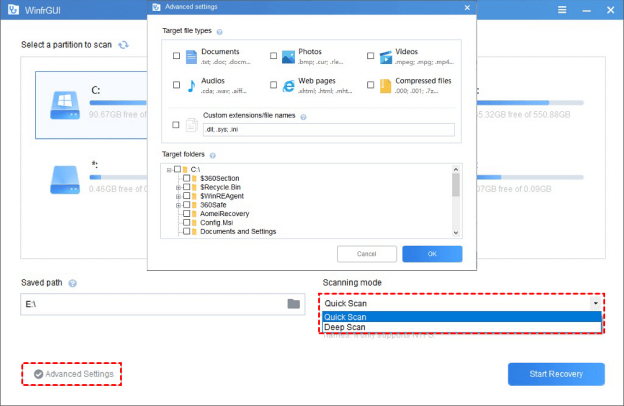
This level of specificity prevents the tool from wasting time on junk files. However, if you find the complex winfr syntax too taxing during a high-stress recovery event, WinfrGUI is the superior alternative. This free, semi-official graphical wrapper simplifies the process by translating mouse clicks into high-level recovery commands, offering a safer “entry point” for those uncomfortable with raw terminal input.
Advantages of WinfrGUI
- Error Prevention: It eliminates “Parsing Error” messages by automatically formatting drive letters and paths.
- Visual Selectivity: You can choose specific partitions or folders via a familiar folder-tree interface.
- Deep Scan Efficiency: It streamlines the choice between “Quick” and “Deep” scan modes without needing to memorize the
/extensiveor/regularswitches.
Recovery Steps via WinfrGUI
- Launch & Select: Open the app and select the source partition you wish to scan.
- Set Destination: Choose a recovery path on a different drive to avoid overwriting your data.
- Choose Mode: Select “Quick Scan” for recently deleted NTFS files or “Deep Scan” for formatted drives.
- Filter & Start: Click “Advanced Settings” to target specific extensions (like .pdf or .png), then hit “Start Recovery.”
3. The chkdsk Command: Foundation Repair
The third pillar of using cmd recover deleted files is the Check Disk utility. Unlike the previous two, chkdsk is not a “retrieval” tool. Instead, it is a “repair” tool. It is used when a drive becomes “RAW” or unreadable due to a corrupted file system directory.
The Risk Factor
You must be extremely cautious here. Running chkdsk /f (Fix) or chkdsk /r (Recover sectors) involves moving data around. If your hard drive is physically failing (making clicking or grinding noises), running this command can cause the read/write heads to crash, resulting in permanent data destruction.
However, if the drive is physically healthy but the “map” of the files is broken, chkdsk can rebuild the directory structure. Once the structure is repaired, files that appeared “deleted” may suddenly reappear in their original folders.
Syntax:
chkdsk X: /f
(The /f switch is generally safer for a first attempt than /r, which attempts to locate bad sectors and is much more stressful on the hardware).
Technical Limitations: SSDs and TRIM
Even the most advanced knowledge of how to cmd recover deleted files has one insurmountable enemy: the SSD TRIM command. On traditional Hard Disk Drives (HDDs), data lingers until it is overwritten. On modern Solid State Drives (SSDs), the TRIM command proactively erases deleted data blocks to maintain high write speeds.
If you delete a file on an SSD, the operating system sends a “wipe” signal to the drive controller. Within minutes (or even seconds), the drive physically clears the electrons from the flash cells. If you run a recovery scan on an SSD and find that every recovered file is 0KB or filled with zeros, TRIM has already done its job. In this scenario, no software—CMD or otherwise—can bring that data back.
Conclusion
Mastering the ability to cmd recover deleted files is a vital part of modern digital literacy. By moving away from the “black box” of automated software and into the transparent environment of the Command Prompt, you gain a deeper understanding of how your data is stored and protected. We have seen that the attrib command can reveal hidden threats, the winfr utility can carve out lost fragments using official Microsoft logic, and chkdsk can repair the very foundations of a corrupted drive.
However, the ultimate lesson of data recovery is that it is a “fail-safe,” not a permanent “strategy.” The only 100% successful recovery is the one that never has to happen because a redundant backup was already in place. Moving forward, apply the 3-2-1 backup rule: three copies of your data, on two different media types, with one copy off-site. Whether you choose manual terminal entry or use the WinfrGUI helper, you now possess the surgical knowledge to pull your most valuable files back from the brink of digital oblivion.
🔗 More Tutorials: