Digital Image Recovery: How to Get Your Lost Photos Back

The moment you realize your most precious memories—photos of weddings, holidays, or milestones—are gone, whether deleted, formatted, or vanished due to a device failure, is intensely stressful and often triggers panic. In this high-stakes scenario, your next immediate reaction matters more than any software you might hurriedly download. Before you risk permanent data loss with random, potentially harmful fixes, you must adhere to one simple, critical rule to protect your chances. The Golden Rule of Recovery (Crucial First Step): Immediately cease all activity on the device or memory card where the photos were lost. Do not take new pictures, install software, or save new files to the drive. This action prevents new data from physically overwriting the invisible remnants of your photos. The core principle of successful Digital Image Recovery is simple: safeguard the raw data. This comprehensive guide offers a fast, practical, and phased approach to retrieving your memories, starting with simple checks and escalating to professional solutions, ensuring you know exactly how to get your lost files back—fast.
The Quick Checks
Before resorting to specialized utilities or professional services, you must exhaust the simplest and fastest recovery methods. Data loss isn’t always permanent; sometimes, it’s just a clerical error by your operating system. What looks like total loss may be a file stored elsewhere or residing in a temporary holding state. These initial checks are the simplest forms of Digital Image Recovery and carry zero risk to your data. Understanding the path your deleted file took is crucial. When you initiate a “delete” command, the operating system typically doesn’t erase the file’s data from the physical storage sectors; it simply removes the file’s entry from the drive’s master index (like tearing a page out of a library catalog). The file is still there, waiting to be overwritten by new data. Checking these temporary holding locations saves time and often resolves the problem instantly.
Check the Obvious Spots:
- Recycle Bin / Trash: This is the equivalent of checking your wastepaper basket. Always look here first, as files deleted from local hard drives or computers often reside here for a default period (usually 30 days) before final purging. Simply right-click and restore.
- Cloud Storage & Sync: Many users forget that their phone’s camera roll or computer folders automatically upload to services like Google Photos, iCloud, Dropbox, or OneDrive. Always check the main cloud folder and the dedicated Trash/Recently Deleted folders within the cloud service interface. Log in to the web app, not just the local sync folder, to ensure you see everything.
- Camera/Phone Internal Folders: Modern smartphones and some cameras are designed to protect users from accidental deletion. Look for a “Recently Deleted” or “Hidden Items” album within your native photo gallery app. Items here can be restored instantly, often bypassing more complex recovery processes entirely. Check the status of your DCIM folder as well.
Check Backups & Shadow Copies:
- Did a scheduled local or cloud backup run recently? Check external drives, network-attached storage (NAS), or time-based services like Apple’s Time Machine or Windows File History. These automated systems can be lifesavers, offering file versions from just a few hours or days ago. Even if the backup is days old, it’s a much safer starting point than attempting a risky deep scan.
The DIY Solution (Recovery Software)
When the quick checks fail, it’s time to move to specialized recovery software. These programs are designed to perform a deeper, systematic examination of the raw data on your storage medium. This phase relies heavily on file carving techniques—where the software reads the disk sector by sector, hunting for the unique “file signatures” (header and footer data blocks) that define file types like JPEG, PNG, or proprietary RAW formats (CR2, NEF, ARW). Even if the file system (FAT, exFAT, NTFS) no longer contains the “map” to the file, the data itself can often be reconstructed.
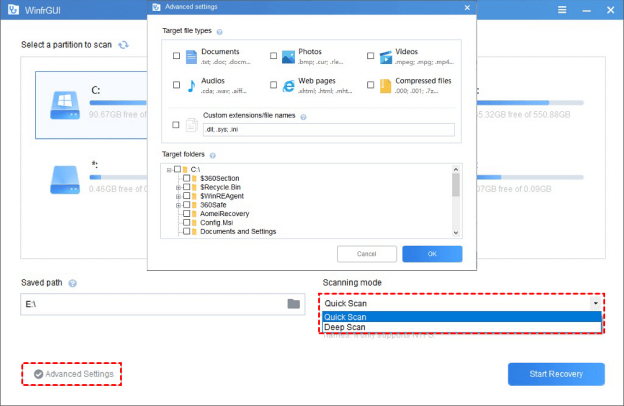
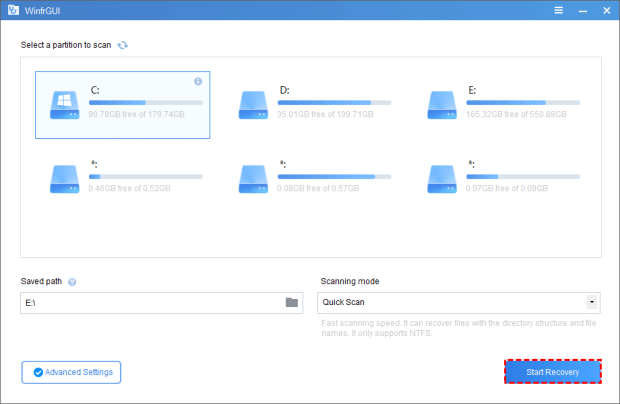
Tool Highlight: For Windows users, software like WinfrGUI offers an excellent, beginner-friendly starting point. It functions as a free, user-friendly graphical interface for Microsoft’s powerful command-line Windows File Recovery tool, simplifying the process by replacing complex command-line prompts with a few intuitive clicks.
Scan Modes: Understanding Quick vs. Deep:
- Quick Scan (or Regular Mode): Ideal for files that were recently deleted from a healthy, non-formatted NTFS drive. This is fast and attempts to restore the original file name and folder structure by looking at the remaining index entries.
- Deep Scan (or Extensive Scan): Essential for formatted drives, corrupted partitions, or older deletions where the file entry has been wiped from the index. This mode ignores the file system map and scans the entire drive, relying purely on file signatures to reconstruct the images. This provides the highest chance for effective Digital Image Recovery. Be prepared for this process to take a long time, especially on large drives.
The Process: 3 Simple Steps for Software Use:
- Install Safely: Crucially, install the recovery software on a different physical drive/computer than the one you are recovering from. Never install it on the source drive. Installing software writes data, and writing data guarantees the overwriting of the very photos you are trying to retrieve. This is the single biggest mistake people make.
- Scan Deeply: Connect the affected drive (SD card, USB, etc.) and run the appropriate scan. For photo recovery, the Deep Scan mode is almost always recommended to maximize results. The process requires patience and can take minutes to hours, depending on the drive size and connection speed.
- Preview & Restore: Once the scan is complete, the software will generate a list of recoverable files. Always utilize the preview function to check the image integrity before committing to recovery. Select the files you want to retrieve and restore them to a new, safe location (such as your computer’s desktop or an external drive). Never save recovered files back to the damaged source drive, as this risks corrupting the very files you just recovered.
Supported Image Formats:
- Successful image recovery requires software with broad format support.
- Ensure the program can handle standard formats like JPEG, PNG, and GIF, but also proprietary camera formats like Canon’s CR2/CR3, Nikon’s NEF, Sony’s ARW, and Adobe’s DNG.
- If you shoot in RAW, make sure the software explicitly supports your specific camera model’s format.
Hardware Failure & Corruption (When DIY Fails)
The limits of DIY recovery are reached when the drive itself fails mechanically or electronically. At this point, no amount of software can help you. Continuing to run recovery attempts on a damaged drive can lead to total, irreversible data loss by causing the read/write heads to scratch the platters.
Differentiating Failure Types
- Logical Failure: The file system is corrupted, or files are deleted. This is fixable with software (Phase 2).
- Physical Failure: The hardware is damaged (motor failure, read/write head crash, circuit board failure, or internal component seizing). This requires specialized cleanroom intervention.
Warning Signs of Physical Failure
Look out for strange, repetitive mechanical sounds (clicking, grinding, high-pitched whining) or the drive completely failing to initialize or show up in your operating system’s device manager. If you hear clicking, unplug the device immediately. Do not power it back on, as this risks further damage.
The Need for Professional Digital Image Recovery
The need for professional Digital Image Recovery services becomes critical when physical failure occurs. These specialized services work in certified Class 100 cleanrooms—sterile environments that prevent even microscopic dust particles from damaging the internal components of an open hard drive. Experts can perform physical repairs (such as replacing a faulty read/write head or PCB board) and then clone the damaged drive’s data onto a stable medium for recovery. This process is complex and often expensive, but it is the only recourse for truly irreplaceable data. Do not attempt these physical repairs yourself; doing so voids professional recovery options and often destroys the data.
Preparing for Professional Service
Before sending your drive, record every symptom you observed. Note any attempts you made to recover the data (e.g., “Tried running WinfrGUI for 4 hours, then unplugged”). This detailed information helps the technician quickly diagnose the problem and determine the best course of action. Be sure to ask for an upfront estimate based on the damage type.
Conclusion
Ultimately, successful photo retrieval hinges on fast action and the right tools. Losing photos is devastating, but with a calm, methodical approach, you can dramatically improve your chances of success. Your immediate action plan is simple: STOP all activity on the source device, check your easy-to-find digital trash, run trusted DIY software like WinfrGUI for logical problems, or seek professional help if the drive exhibits physical failure. By following these phased steps, you maximize your chance for successful Digital Image Recovery. The emotional and financial cost of lost photos makes a robust backup strategy non-negotiable. The best form of Digital Image Recovery is the one you never need to use. Implement the “3-2-1 Rule” starting today: keep 3 copies of your data, on 2 different types of media (e.g., internal hard drive and external drive or USB stick), with 1 copy stored safely offsite (a secure cloud service). Proactive preparation eliminates panic and guarantees peace of mind against inevitable hardware failures and human error, making data loss a minor inconvenience instead of a tragedy.
🔗 More Tutorials: