How to Successfully Recover Data After Factory Reset Windows 10
The anxiety when important files and photos disappear after a Windows 10 factory reset is universal. Fortunately, your files are often not permanently destroyed, and there is a high chance they can still be retrieved if you take the correct steps immediately. The most crucial first step is: Immediately stop using your Windows 10 PC. Any operation writes new data and risks permanently overwriting old files. Shut down immediately to maximize your recovery success. Success rates are higher on HDDs, but modern SSDs pose a greater challenge due to the TRIM command. This guide will walk you through checking native backups, utilizing the highly recommended WinfrGUI software, and finally, resorting to the official command-line tool to help you recover data after factory reset windows 10. (1st mention)
| Factor | Hard Disk Drive (HDD) | Solid State Drive (SSD) |
|---|---|---|
| Chance of Success | Higher | Lower |
| Reason | Data remains until physically overwritten. | The TRIM Command actively wipes deleted blocks to maintain performance, often making recovery impossible shortly after deletion. |
Why Recovery is Possible
Understanding why recovery is possible is vital for anyone trying to recover data after factory reset windows 10 using deep-scan methods. (2nd mention)
The Deletion Myth
When a file is “deleted,” Windows doesn’t destroy the data. It performs two actions: 1. Removes the index entry from the file system. 2. Marks the storage space as available. The actual data remains in a “ghost-like” state until overwritten, allowing specialized software to scan raw sectors and retrieve it, bypassing the file system index.
HDD vs. SSD Differences
This distinction is critical for success:
- HDD (Hard Disk Drive) Recovery: Data remains recoverable as long as new data hasn’t reused the space. HDDs are relatively forgiving.
- SSD (Solid State Drive) Recovery (The TRIM Command): SSDs use the TRIM command to wipe blocks quickly in the background for performance. This action makes data recovery after a factory reset significantly more challenging and requires the user to act within minutes or hours.
Method 1: Check Backups First
Always check the three main places Windows 10 might have automatically preserved your files first.
Check the Windows.old Folder
The factory reset process often creates a Windows.old folder on your C: drive containing files from the previous installation. Steps are as follows:
Step1: Open File Explorer and navigate to your main drive (C:).
Step2: Look for the folder named Windows.old.
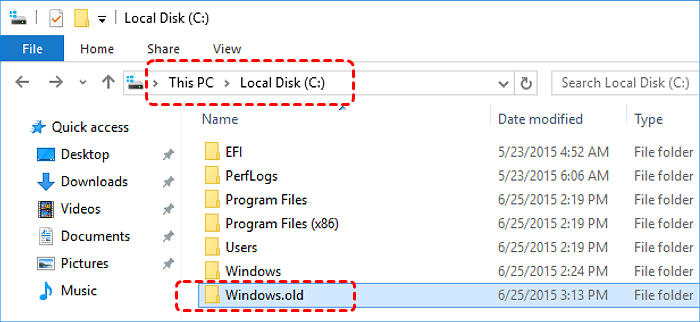
Step3: Navigate to C:\Windows.old\Users\YourName to check for your documents, pictures, and desktop files. If found, immediately copy them to an external USB drive or different storage device.
Restore from Cloud Services
If you use services like OneDrive, Google Drive, or Dropbox, your files may be synchronized to the cloud.
Crucial Advice: Access your cloud service using a separate device or a web browser. Do not re-enable the desktop sync client on the reset PC yet, as this risks file deletion.
Restore via Windows File History or System Image
- File History: Connect the external drive used for File History. Use the “Restore your files with File History” tool to select and restore files.
- System Image: Use the Windows Recovery Environment to apply a full system image, restoring all data to the point the image was created.
The Safety Rules for Software Recovery
Before attempting any software-based recovery (Method 2 or Method 3), you must follow these safety rules to maximize success:
- Rule 1: Separate Installation. Never install the recovery software on the drive (C: drive) where data was lost. Use an external drive.
- Rule 2: Separate Recovery Destination. Always save recovered files to a different destination drive (e.g., a USB stick) to prevent overwriting other lost files.
Method 2: Recommended Tool – WinfrGUI
If backups fail, the easiest and most reliable software option for non-technical users to recover data after factory reset windows 10 (3rd mention) is by using WinfrGUI. This free, third-party software provides a simple graphical interface (GUI) for the powerful official Microsoft recovery engine (WinFR).
WinfrGUI Functionality and Advantage
WinfrGUI eliminates the complex command-line syntax required by Microsoft’s original tool:
- Visual Drive Selection: Easily select the source drive (e.g., C:) and the recovery destination drive from simple dropdown menus.
- Simplified Mode Selection: The complex modes (
/extensive,/regular) are translated into clear options like Deep Scan (Recommended for Factory Reset) and Quick Scan. - File Type Filtering: Users can effortlessly specify file types (e.g., .jpg, .docx) using checkboxes or simple text fields, focusing the recovery process.
The 3-Step WinfrGUI Process
Step 1: Download WinfrGUI, select the Source Drive (C:) and the Destination Drive (External Drive). Choose the Deep Scan mode, which is necessary after a factory reset.
Step 2: Initiate the scan. The software will scan the raw sectors of the drive. Use the filter options to narrow the results to specific file extensions if your search is targeted.
Step 3: You can now preview found files for quality, select exactly what you need, and begin recovery to an external destination.
Method 3: Advanced Native Tool – Windows File Recovery CMD
For technical users, or if WinfrGUI fails to find a specific file, Microsoft’s official Windows File Recovery (WinFR) is a powerful command-line utility available on the Microsoft Store. WinFR offers two main modes (Regular and Extensive). It is best suited for experienced users who are comfortable using the Command Prompt directly. Use Winfr directly if you are: 1. Comfortable using the Command Prompt. 2. Seeking the official Microsoft solution without any third-party layer.
Basic Commands Explained
The core command structure is:
winfr source-drive: destination-drive: [/mode] [/switches].
- Regular Mode: For non-corrupted NTFS drives.
- Extensive Mode (Recommended after Factory Reset): Uses file signature matching to reconstruct files when the file system structure is damaged.
Example Command (Extensive Mode): To recover all JPEG and DOCX files from C: drive to E: drive:
winfr C: E: /extensive /n *.jpeg /n *.docx
Conclusion & Prevention
Successfully attempting to recover data after factory reset windows 10 (4th mention) depends highly on speed and method. The files are only unindexed and vulnerable to overwriting. By prioritizing immediate shutdown, checking backups, and utilizing professional deep scanning (especially the user-friendly WinfrGUI), you maximize your positive outcome and success in efforts to recover data after factory reset windows 10. (5th mention) Once data is recovered, remember this: Never rely on the system drive for saving important data. Maintain a rigorous separation between your operating system and critical personal files. The best solution is prevention through consistent backups:
- Enable File History: Set up automatic backups of essential folders to an external drive.
- Regular Cloud Sync: Use OneDrive or Dropbox for real-time, off-device copies of files.
- System Images: Periodically create a full system image to restore the entire computer in case of failure.
Protecting your data today is far easier than trying to recover it tomorrow.
🔗 More Tutorials: