How to Fix Corrupted Files in Windows 10: Simple Ways
There’s nothing more frustrating than a computer that suddenly stops working as it should. A common culprit behind mysterious crashes, freezing, and strange error messages is file corruption. This happens when the digital bits and bytes that make up a file become scrambled, making the file unusable and, in some cases, causing your entire Windows system to become unstable. This guide will provide a comprehensive solution for how to fix corrupted files windows 10, using built-in, trusted Microsoft tools. The process we’ll walk through is methodical and designed to be accessible to anyone, regardless of technical expertise. From unexpected shutdowns to malware, many factors can cause this issue, but with the right approach, you can restore your system’s integrity and protect your valuable data. Before you begin, a crucial first step is to back up your important files. This is the only true guarantee against data loss.
Method 1: The First Line of Defense – System File Checker (sfc)
The System File Checker, or sfc, is your first and most accessible tool for repairing corrupted system files. Think of it as a quality control check for your operating system. The sfc /scannow command examines all protected system files on your computer. If it finds a corrupted file, it automatically replaces it with a clean, cached version stored in a special backup folder on your hard drive. This process is designed to be straightforward and non-destructive. Follow these simple, step-by-step instructions to run the scan:
Step 1: Open Command Prompt as an administrator. This is a crucial first step, as the tool requires elevated permissions to make changes to your system files. You can do this by clicking the Start menu, typing “Command Prompt,” right-clicking the result, and selecting “Run as administrator.” A User Account Control (UAC) pop-up will appear; click “Yes” to proceed.
Step 2: Run the command. In the Command Prompt window, type the following command exactly as it’s written and press Enter: sfc /scannow
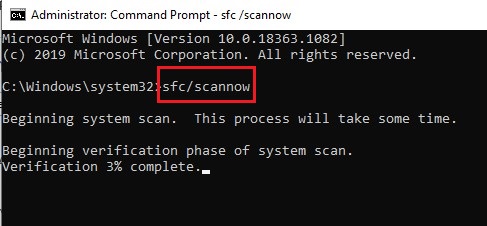
Step 3: Wait for the scan to complete. The scan will begin and show you a percentage of its progress. It’s essential that you do not close the window or interrupt the process, as this could lead to further instability. The scan can take anywhere from a few minutes to half an hour, depending on the speed of your computer.
Step 4: Review the results. Once the scan is finished, you will receive one of three possible messages:
- “Windows Resource Protection did not find any integrity violations.” This is the best-case scenario. It means your system files are healthy, and the corruption is likely a sign of a different problem, such as a third-party application or a failing hard drive.
- “Windows Resource Protection found corrupt files and successfully repaired them.” Congratulations! This means SFC found and fixed the problem. You can now restart your computer to apply the changes and see if the issue is resolved.
- “Windows Resource Protection found corrupt files but was unable to fix some of them.” This indicates that SFC was unable to access a healthy version of the file it needed to make the repair. This leads us to our next method.
Method 2: The Deeper Fix – Deployment Image Servicing and Management (dism)
If the System File Checker reports that it cannot repair the corrupted files, it’s often because the local source files it uses for repairs are themselves corrupted. This is where the Deployment Image Servicing and Management (dism) tool comes in. It’s a more powerful utility that repairs the entire Windows system image by connecting to Windows Update and downloading the necessary files. This provides SFC with a clean slate to work from, allowing it to complete its task successfully. This is an important step in how to fix corrupted files windows 10 if the initial SFC scan wasn’t enough.
Here is the recommended sequence of DISM commands to run, as they build upon each other:
Step 1: Open Command Prompt as an administrator. Use the same method as with SFC.
Step 2: Run a health check. This command quickly checks for any potential issues with the Windows image. It’s a good starting point to see if a more extensive scan is necessary. DISM /Online /Cleanup-Image /CheckHealth
Step 3: Run a comprehensive scan. This command performs a more thorough scan of the Windows image, checking for any inconsistencies or damage. This can take longer than the health check, but it provides a more detailed diagnosis. DISM /Online /Cleanup-Image /ScanHealth
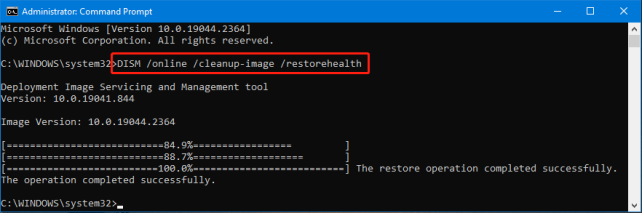
Step 4: Run the restore command. This is the main event. The RestoreHealth command automatically repairs any corrupted files it finds in the system image by downloading healthy versions from Microsoft’s servers. DISM /Online /Cleanup-Image /RestoreHealth
After DISM /Online /Cleanup-Image /RestoreHealth finishes, you should re-run sfc /scannow. With a fresh, clean source, SFC should now be able to successfully repair any remaining corrupted system files.
Method 3: Checking the Drive – Check Disk (chkdsk)
Sometimes, file corruption is not a problem with the file itself, but with the hard drive where the file is stored. A failing drive can develop bad sectors, which are essentially small areas of the disk that can no longer hold data, leading to corrupted files. The chkdsk command is a vital tool for this situation. It scans the drive for logical and physical errors and attempts to fix them. This is another crucial step in how to fix corrupted files windows 10 when the issue may be hardware-related. Here is how to run it:
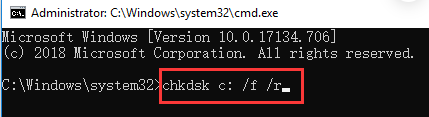
Step 1: Open Command Prompt as an administrator.
Step 2: Run the check disk command. The most common and effective switches for this command are /f (for fix) and /r (for recover). The /f switch tells the command to fix any errors it finds, while the /r switch locates bad sectors and recovers readable information. Since the drive is currently in use, you will be prompted to schedule the check for the next time you restart your computer. Type Y and press Enter. chkdsk C: /f /r
Step 3: Restart your computer. The chkdsk process will begin automatically as your computer boots up. The process can take a significant amount of time, especially on large hard drives or those with many errors. Do not interrupt it. Your computer will restart automatically once the process is complete.
What to Do If the Corrupted Files Are Now Missing
The tools we have discussed—SFC, DISM, and CHKDSK—are powerful solutions for repairing your operating system. However, they are not designed to recover personal files (photos, documents, videos) that have been deleted or made inaccessible by a corrupted file system. If a chkdsk repair successfully “fixes” a bad sector, it may also make a personal file stored in that sector unusable. In this scenario, the file might seem to have disappeared completely.
This is a perfect scenario for specialized data recovery software. While Microsoft provides its own command-line tool (winfr), a more user-friendly option is a free, graphical interface like WinfrGUI. It is built on the same powerful engine as Microsoft’s official tool but replaces the complex commands with a simple, click-based interface. It makes the process of recovering your personal files easy and accessible to anyone, regardless of their technical expertise. The key takeaway is to understand that file repair (fixing Windows) and file recovery (getting your personal files back) are two different, but often related, tasks. If your files go missing after running the troubleshooting tools, a reliable recovery program is your best bet to get them back.
The Complete Troubleshooting Flow: A Quick Reference
For your convenience, here is a simple troubleshooting sequence to follow if you suspect you have corrupted files.
Step 1: Back up your data. This is your primary safety net. Don’t skip this step.
Step 2: Run sfc /scannow. It’s the fastest and most efficient way to start.
Step 3: If SFC fails, run the dism commands. This repairs the core Windows image, providing SFC with what it needs to succeed on the next attempt.
Step 4: If problems persist, run chkdsk on restart. This will check the health of your hard drive, which could be the underlying cause.
Step 5: If personal files are missing, use a recovery tool like WinfrGUI. The final step is to retrieve any lost documents or media.
Conclusion
File corruption can be a daunting problem for any Windows user. But as this guide has shown, with the right knowledge and a methodical approach, it’s a problem that you can confidently address and resolve. By using these trusted, official methods, you can restore your system’s integrity and protect your valuable data. This guide on how to fix corrupted files windows 10 has provided a complete flow, from diagnostics to recovery. Remember to act quickly and always back up your files, and you’ll be well-equipped to handle any file corruption issues that come your way.
🔗 More Tutorials: