Ultmate Guide for Recover PowerPoint Presentation
The sudden disappearance of a critical PowerPoint presentation is a major disruption. Whether it’s due to a system crash, an accidental deletion, or file corruption, the good news is that built-in Microsoft features and advanced third-party tools can often save the day. This expert-compiled guide details five major data loss scenarios and provides the specific, authoritative steps needed to successfully recover PowerPoint presentation files. Always begin your recovery process by checking PowerPoint’s built-in feature: File > Open > Recent > Recover Unsaved Presentations. This is the fastest method for recovering work lost during a crash.
Key Takeaways
- The Unsaved Lifeline: If your app crashed, go to File > Open > Recent > Recover Unsaved Presentations. PowerPoint keeps a hidden “AutoRecover” folder with temporary drafts.
- The Manual Temp Search: If the built-in tool fails, press
Win + R, type%temp%, and search for files starting with PPT. Rename these fragments to.pptxto try and restore them. - Version History: For overwritten slides, right-click the file in your folder and select Properties > Previous Versions. If you use OneDrive, use the online Version History to roll back to any previous minute.
- The Recycle Bin & Beyond: Always check the Bin first. If you permanently deleted the file, use WinfrGUI. It targets specific
.pptxsignatures to pull data from your hard drive’s raw sectors. - Fixing Corrupted Files: If a file won’t open, create a New Presentation, go to Home > New Slide > Reuse Slides, and “Browse” for the damaged file. You can often import the slides even if the original file is broken.
- Prevention Strategy: Change your settings now: File > Options > Save. Set the AutoRecover interval to 2 minutes and always enable the “Keep last autosaved version” checkbox.
Scenario One: Recovering an Unsaved PowerPoint File
This method relies on PowerPoint’s AutoRecover function, which periodically saves temporary backups.
Method 1: Using the PowerPoint Built-in Feature
- Open PowerPoint: Launch the application.
- Access Recent Files: Go to the File tab in the ribbon, select Open, and then choose Recent.
- Recover Unsaved Presentations: Click the button at the bottom labeled “Recover Unsaved Presentations.”
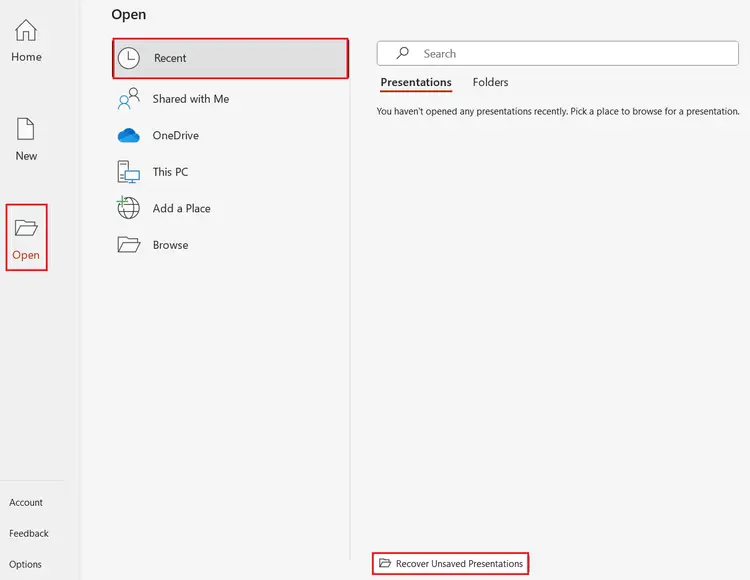
- Open and Save: A folder containing temporary draft files (often with
.asdor temporary names) will open. Select your file, open it, and immediately use File > Save As to store it in a permanent, new location.
Method 2: Manually Searching the Temp Folder (Expertise)
If the built-in feature fails, you can dig into Windows’ temporary file directory. This approach may help you recover PowerPoint presentation drafts that were not logged by the standard feature.
- Open the Run Dialog: Press the [Win] + [R] keys simultaneously.
- Go to Temp Folder: Type
%temp%and press Enter.

- Search: Use the File Explorer search bar to look for terms like
PPT*.tmpor filter by extensions like*.pptx,*.ppt, andppt*.tmp. - Rename and Save: If a file is found, rename it by changing its extension to
.pptx. Open it to confirm the content, then save it properly.
Scenario Two: Restoring an Older Version of a Saved File
If you accidentally overwrote a file or deleted major sections before saving, you need to access version history.
Method 1: Restoring Previous Versions (Windows Feature)
This Windows function (reliant on System Protection being active) can help you recover unsaved PowerPoint presentation content from an earlier point in time.
- Locate and Right-Click: Find the current PowerPoint file, right-click it, and select Properties.
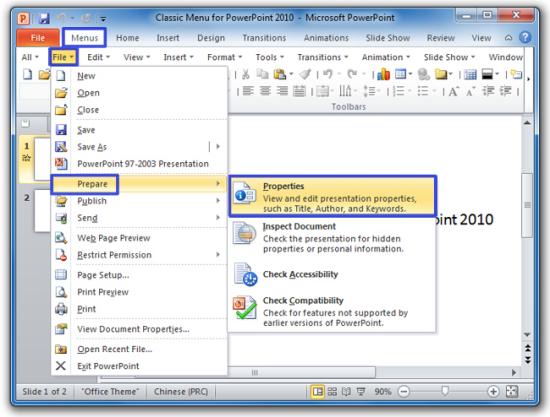
- View History: Navigate to the “Previous Versions” tab.
- Restore: Select the desired version based on its timestamp and click Restore or Copy.
Method 2: Cloud Storage Version History
Cloud services provide the most reliable version control.
- Access Cloud: Log into your OneDrive, Google Drive, or Dropbox account, or navigate to the local synchronized folder.
- View Version History: Right-click the file and select the “Version History” option.

- Select and Restore: Review the list of saved versions. Select the old version you need and click Restore to revert the file or Download a copy.
Scenario Three: Recovering a Deleted PowerPoint File
This scenario addresses files moved to the Recycle Bin and those permanently deleted.
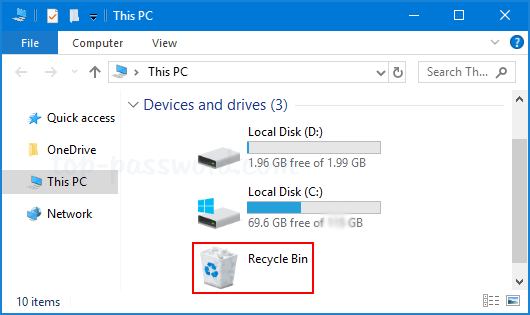
Method 1: Restoring from the Recycle Bin
- Open Recycle Bin: Double-click the desktop icon.
- Search and Restore: Search for the file by name. Right-click the file and choose “Restore.” The file will return to its original folder.
Method 2: Using WinfrGUI for Permanent Deletion (Expertise & Trustworthiness)
If the Recycle Bin has been emptied, the file is only recoverable using specialized software. We recommend WinfrGUI—a free, user-friendly Graphic User Interface (GUI) for the official Microsoft Windows File Recovery (WinFR) tool. This tool offers the best chance to recover PowerPoint presentation files that have been permanently removed from your system.
WinfrGUI Recovery Steps:
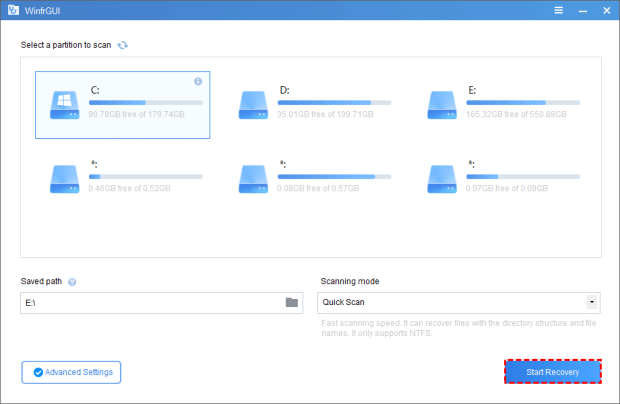
- Install WinfrGUI: Download and install the application.
- Select Drives: In the WinfrGUI interface, choose the Source Drive (where the file was deleted from) and a separate Destination Drive (where the recovered file will be saved).
- Choose Recovery Mode: Select the recovery mode (e.g., Extensive mode for thorough scanning of permanently deleted files).
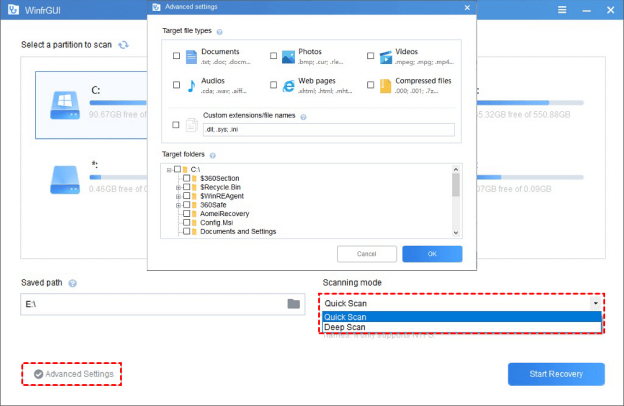
- Specify File Types: Go to “Advanced Settings” and specifically target PowerPoint files by adding file extensions:
.pptxand.ppt.
- Start Recovery: Click the Start Recovery button. Once finished, check the designated destination folder for your recovered presentation.
Scenario Four: Recovering a Corrupted PowerPoint File
A file that won’t open or shows errors suggests corruption. Knowing how to recover PowerPoint presentation content from a corrupted file is vital. (Keyword 5/5)
Method 1: Moving the Presentation to a New Location
This test determines if the file’s location (storage sector) is corrupted, not the file itself.
- Copy and Paste: Copy the damaged file and paste it into a brand-new folder (e.g., on your desktop).
- Open: Try opening the file from the new location. If successful, discard the original file and use the newly moved copy.
Method 2: Inserting Slides into a New Presentation
If the file is damaged, you can often salvage the content by importing the slides into a fresh, undamaged presentation.
- Open New PPT: Launch a blank PowerPoint document.
- Reuse Slides: Go to the Home tab, click the New Slide drop-down menu, and select “Reuse Slides.”
- Browse and Insert: Click Browse in the pane that appears and select the damaged file. Right-click on the slide thumbnails and select “Insert all slides” to transfer the content.
- Save: Save the new presentation immediately.
Method 3: Opening in Safe Mode (Expertise)
Opening in Safe Mode bypasses problematic add-ins or startup files that may be preventing the presentation from launching.
- Hold CTRL: Hold down the [Ctrl] key on your keyboard.
- Double-Click: While holding [Ctrl], double-click the PowerPoint file.
- Confirm: Click Yes in the confirmation dialog to open the file in Safe Mode. If it opens, save it under a new name to clear any internal errors.
The Best Data Loss Avoidance Strategies
The highest form of recovery is prevention. These settings ensure you minimize your risk of ever needing data recovery.
Prevention 1: Fine-Tune AutoRecover Settings
Adjust the time interval for AutoRecover backups.
- Go to Options: Click File > Options > Save.
- Set Frequency: Change the interval for “Save AutoRecover information every…” to a lower value (e.g., 2 or 5 minutes).
- Enable Safety Net: Ensure “Keep the last AutoRecovered version if I close without saving” is checked.
Prevention 2: Activate AutoSave via Cloud Storage
For Microsoft 365 users, AutoSave provides instant, continuous version control.
- Save to Cloud: Always save your presentation to OneDrive or SharePoint.
- Activate AutoSave: Ensure the “AutoSave” toggle switch in the top-left corner of the PowerPoint window is set to “On.”
AutoSave eliminates data loss by saving every change immediately to the cloud, making manual recovery unnecessary in most cases.
| Loss Scenario | Recommended Recovery Method | Prevention Strategy |
| Unsaved Work (Crash, Freeze) | Recover Unsaved Presentations (File > Open) | Set AutoRecover to 2-5 minutes in Options. |
| Deleted File (Empty Recycle Bin) | Use WinfrGUI Recovery Software | Implement consistent cloud/external drive backups. |
| Overwritten/Old Version | Use Version History (Cloud Storage or File Explorer) | Enable AutoSave (on OneDrive/M365) for continuous versioning. |
| Corrupted File (Cannot Open) | Use “Reuse Slides” into a new presentation. | Try opening in Safe Mode to clear errors. |
Conclusion
Losing hours of work is stressful, but as this guide confirms, PowerPoint is rarely a lost cause. By understanding the core recovery principles—from leveraging the instantaneous AutoRecover feature to utilizing robust tools like WinfrGUI for deep recovery—you are now equipped to handle almost any file emergency. Remember that while recovery methods are powerful, prevention remains the best strategy. Take a moment now to ensure your AutoSave and AutoRecover settings are optimized and prioritize cloud storage. With these steps, you can secure your presentations and focus on delivering impactful content, not recovering lost files.
🔗 More Tutorials: