How To Retrieve a Word Document That Was Not Saved
Accidentally closed your document without saving? Computer crash in the middle of your draft? You’re not alone — and it’s not the end of the road. If you’re searching for how to retrieve a Word document that was not saved, we’ve got good news: Microsoft Word comes with several built-in features designed to rescue your work. From AutoRecover and temporary files to hidden backups and recovery panes, Word has multiple ways to help you restore unsaved content — even if you never hit “Save.” In this guide, we’ll walk you through 7 smart and reliable methods to bring back your lost Word files on any version — including 2010, 2016, 2019, and 2021. Plus, we’ll show you a bonus recovery trick using WinfrGUI if Word’s built-in tools don’t cut it. Let’s get your hard work back where it belongs — on your screen.
Can I Recover an Unsaved Word Document?
Yes, you can recover unsaved Word documents in many ways. Microsoft Word has been a reliable tool for digital authors for a long time, and its developers have used several useful features to help in these situations:
- AutoRecover: This feature will automatically save copies of your document at regular intervals. Usually every 10 minutes. If you experience a failure or accidentally close the program, you can easily restore the latest version of Autorecover.
- Backup: Word has a built-in backup tool that creates a backup of your document each time it is saved. Select “Always Make Backup” under File > Options > Save to enable this feature. The backup will be saved in the same folder as the original document with the suffix “.wbk”.
- Subscriber auto-saving. While working, Office 365 AutoSave saves your documents every few seconds. This function prevents data loss during failure or downtime. Check the Word window’s upper left corner for auto saving.
- Document Recovery: When you resume Word, it may identify that the document was saved incorrectly and offer document recovery. Document Recovery windows appear on the left. Word allows you to view and revive documents that have not yet been stored.
If you are new to these features and haven’t set up automatic saving when you lose your documents, don’t worry. There are other ways to recover unsaved documents, make sure your hard work isn’t useless.
How To Recover Unsaved Word Documents
Now let’s see how you can recover unsaved Word documents using Microsoft Word. Whether you’re using Word 2007, Word 2010, Word 2013, Word 2016, Word 2019 or Word 2021, here’s a comprehensive list of ways to try:
Method 1: Search for Unsaved Word Documents in the AutoRecover Folder
If Word crashed or you closed your document without saving, there’s a good chance AutoRecover saved a backup for you. Here’s how you can look for it:
Step 1:Press Windows + R on your keyboard. This opens the small Run window.
Step 2: Type this exactly as shown: %AppData%. Then press OK.
Step 3: Open the Microsoft folder, then look for a folder related to Word. Check inside for any files that look like they could be your lost document.
Step 4: If you don’t see anything useful, go back one level and open the Local folder. From there, find the Microsoft folder again, and look for an Office folder. Inside, open the UnsavedFiles folder — this is where Word stores unsaved drafts.
Step 5: Another quick option:
- Open File Explorer (press Windows + E).
- In the search box at the top right, type:
*.asd - Press Enter and see if any AutoRecover files show up.
Step 6: Once you find a file ending in .asd, open Word. Go to File > Open, and in the file type dropdown, select All Files. Find your .asd file and open it.
Method 2: Recover Your Document Using Word Backup Files (.wbk)
Word sometimes creates backup copies of your documents automatically, which can help you recover lost files. Here’s how to find and open those backups:
Step 1: Open File Explorer by pressing Windows + E on your keyboard.
Step 2: Go to the folder where you usually save your Word files — common places are Documents, Downloads, or Desktop.
Step 3: In the search box at the top-right corner, type *.wbk and press Enter. This will show all backup files in that location.
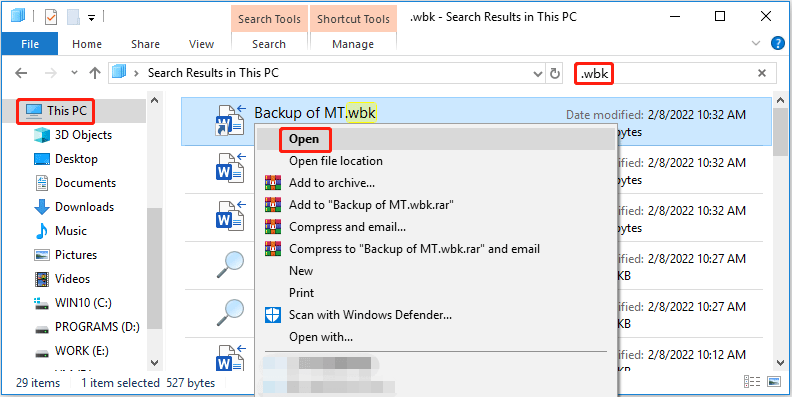
Step 4: Look for files named similarly to your lost document. Backup files often start with “Backup of” followed by the original file name.
Step 5: Double-click the backup file to open it in Word.
Step 6: If the file opens successfully, save it right away by clicking File > Save As and picking a safe spot.
Method 3: Use Word’s “Recover Unsaved Documents” Feature
Word has a handy option that lets you recover unsaved files quickly. If you accidentally closed a document without saving, this is a great place to check.
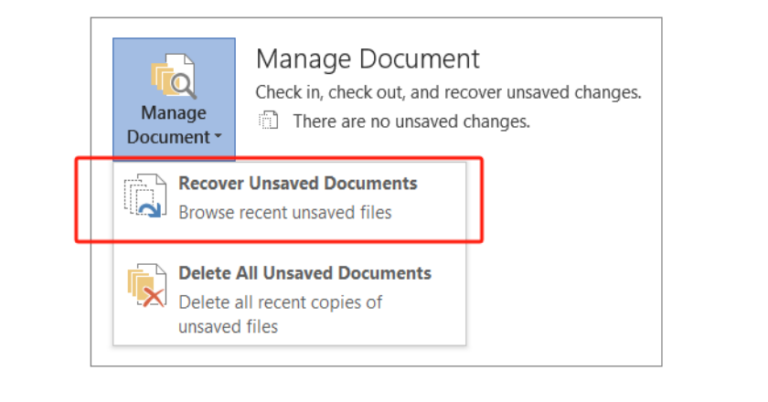
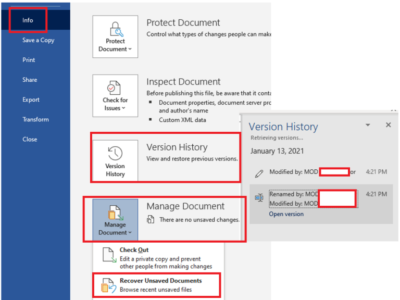
Step 1: Open Microsoft Word. Click the File tab in the upper-left corner.
Step 2: Select Info from the menu (it’s usually the first option).
Step 3: Click the Manage Document button (or Manage Versions), then choose Recover Unsaved Documents from the dropdown.
Step 4: A window will open showing unsaved files — look for files with names like Document1.asd or UnsavedDocument0.asd.
Step 5: Select the file that matches your lost work and click Open.
Step 6: If the document opens, save it immediately by clicking File > Save As and choosing a safe location.
This feature is built into Word and works best if AutoRecover was enabled. It’s often the quickest way to get back unsaved work after an unexpected shutdown or accidental closure. For more info click How to View Previous Versions of Word Document
Method 4: Recover Using Word’s Document Recovery Pane
If Word or your computer crashes unexpectedly, the Document Recovery pane often appears automatically when you reopen Word. This pane lists documents that were open or being worked on before the crash, giving you a chance to recover your work quickly.
Step 1: Restart your computer if it was off or crashed. Open Microsoft Word.
Step 2: Look to the left side of the Word window for the Document Recovery pane.
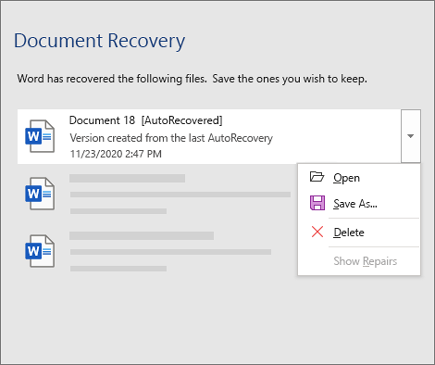
Step 3: You’ll see a list of recovered documents with labels like Recovered, Original, Autosaved, or Last Saved.
Step 4: Click the document that looks most complete or has the latest timestamp to open it.
Step 5: Review the document carefully to make sure it’s the version you want.
Step 6: Save the recovered file immediately by clicking File > Save As and choosing a safe location and file name.
Method 5: Recover Unsaved Word Documents from Temporary Files
While you’re working on a document, Word sometimes creates temporary files that can help you recover unsaved work. Here’s how to find and open those temporary files:
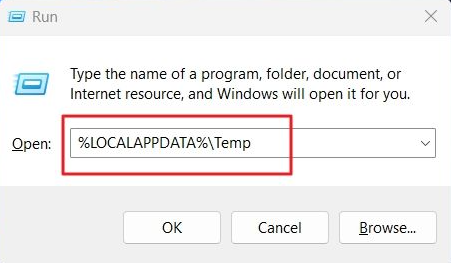
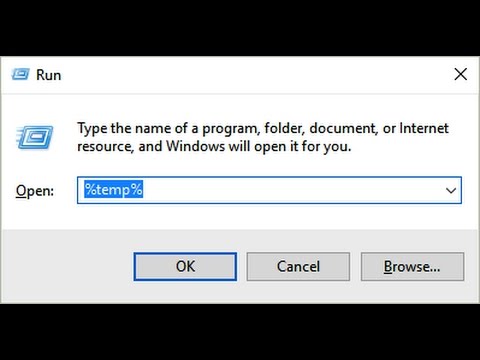
Step 1: Press Windows + R on your keyboard to open the Run dialog.
Step 2: Type %temp% and press OK. This opens the folder where temporary files are stored.
Step 3: Look through the list for files that might be your unsaved Word document. These often have names starting with a tilde (~) or end with the extension .tmp.
Step 4: Note the location of any files you think could be your document.
Step 5: Open Microsoft Word.
Step 6: Click File > Open, and change the file type filter to All Files to see .tmp files.
Step 7: Find and open the temporary file you noted earlier.
Step 8: If the file opens and contains your work, save it immediately by clicking File > Save As and choosing a secure location.
Temporary files can be a hidden lifesaver when other recovery methods don’t work. Just remember, they might not always have the most recent changes, but they’re definitely worth checking.
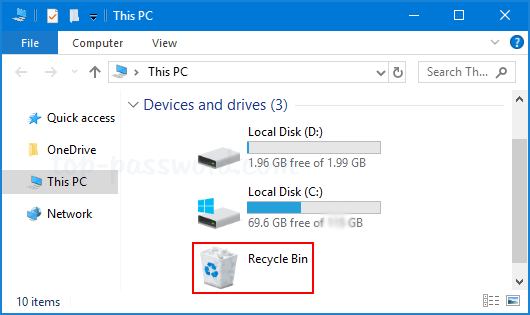
Method 6: Recover Deleted Word Documents from the Recycle Bin
If you accidentally deleted your Word document, it might still be sitting safely in your Recycle Bin. Here’s how to recover it:
Step 1: Open the Recycle Bin on your desktop.
Step 2: Look through the list for your deleted Word document. You can sort files by date or use the search box to find it by name.
Step 3: Once you find your file, right-click it and select Restore. This will return the file to its original location.
Step 4: Go to that location and open your restored document in Word to confirm everything is intact.
Method 7: Get lost Word documents with WinfrGUI:
In case the previous method failed, WinfrGUI can be a reliable solution for recovering lost Word documents. The main features of WinfrGUI include restoring lost or saved Word documents due to system failure, disk damage, virus attacks, and so on. It also supports recovery from a variety of storage media such as HDD, SSD, USB drives and SD cards.
How to use WinfrGUI effectively:
Step 1: Download and install WinfrGUI from the official website. Open the app on your PC
Step 2: Select the target disk or location where the lost Word document is stored.
Step 3: Start the scan process and check the progress to the end.
Step 4: Improve search results by selecting appropriate file types, such as Unsaved Files for Word documents.
Step 5: Discover the contents of lost Word documents and repair any damage that may occur. Restore and save them securely on your PC.
By following these methods, you can increase your chances of successfully recovering unsaved Word documents. However, protection is important in avoiding loss of important documents in the future.
How To Prevent Losing Word Documents in the Future
Q1. How often should I save my document?
Make it a habit to save your work frequently. Press Ctrl + S regularly—ideally after completing each section or major change—to minimize data loss.
Q2. What is AutoRecover and how do I enable it?
AutoRecover automatically saves copies of your document at set intervals. To enable it, go to File > Options > Save, check Save AutoRecover information every X minutes, and set the frequency (e.g., every 5 or 10 minutes).
Q3. Can AutoSave help protect my documents?
Yes! If you use Microsoft 365, AutoSave saves your files every few seconds to OneDrive or SharePoint, preventing data loss even if you forget to save manually.
Q4. How do I keep backup copies of my files?
Enable the Always create backup copy option in File > Options > Save. This creates a backup (.wbk) every time you save your document.
Q5. What’s the best way to back up my important files?
Use cloud storage services like OneDrive or Google Drive for automatic backups. Alternatively, regularly copy your files to an external hard drive or USB drive to ensure your data stays safe.
Conclusion
In conclusion, losing important Word documents may be a problem, but in the right way, you can recover unsaved documents. Take advantage of the document recovery features that are not saved in Word, or search for files manually. In more difficult situations, special recovery software such as WinfrGUI can help. Remember to take precautions such as regular saving, enable AutoRecover and AutoSave, and the non-saved Word file recovery settings can be a disappointing experience, especially when you’re working hard on important projects. However, Microsoft Word provides several features that can help you get your lost work back.
🔗 Also Read: How to Recover Word Document That Was Not Saved: 2025 Guide