How to Recover a Saved Over Word Document via File History
The moment of panic is universal: you’ve been working diligently on a critical Microsoft Word document—a report, a thesis, or a vital proposal—only to realize in a moment of haste that you have saved over the correct, complete version with an older, incomplete, or incorrect copy. This immediate fear, the realization that hours of effort might be lost with a single click, is a scenario every computer user dreads. The good news is that this data loss is often not permanent. For Windows users, the primary, built-in solution is File History. This powerful feature, available in Windows 8, 10, and 11, acts as a digital safety net, continuously taking snapshots of your personal files. It allows you to literally rewind the clock, browsing through past versions of your Word document to retrieve the file as it existed before the disastrous save. This guide provides the precise, step-by-step instructions for using File History to answer the crucial question: how to recover saved over word document. We will also explore crucial backup strategies for those instances where File History was not enabled, ensuring that you have a comprehensive plan for rescuing your valuable data.
Key Takeaways
- Windows File History: This is your “Digital Time Machine.” If enabled, right-click your file, select Properties, and go to the Previous Versions tab. You can literally scroll back in time to a version from an hour ago.
- The “Restore To” Rule: When restoring a file, never choose “Replace.” Always use the “Restore to…” option to save the recovered version in a new location (like your Desktop) so you don’t lose the current version too.
- Word’s Internal Safety Net: Open Word and go to File > Info > Manage Document. You might find a list of “Recover Unsaved Documents” or temporary snapshots that Word took right before the overwrite happened.
- OneDrive/Cloud Versioning: If your file is in a OneDrive or SharePoint folder, right-click the file and select Version History. The cloud stores dozens of previous versions independently of your PC’s settings.
- Deep Recovery with WinfrGUI: If File History was off and you have no cloud backup, use WinfrGUI. It uses Microsoft’s official recovery engine to scan your drive’s “deleted” fragments for the original file data before it’s overwritten by new system tasks.
- System Restore Warning: Don’t rely on “System Restore” for Word documents. It only backs up Windows system files and apps—it does not save your personal Word files.
Prerequisites: Making Sure File History is Ready
Before trying to recover your document, you must confirm that Windows File History was actively running before the file was overwritten. Without the right setup, this recovery method won’t work.
1. What File History Does
File History is like a continuous time machine for your personal files.
- It’s a Personal Backup: It is an incremental backup tool focused on your user files, not your entire operating system (like a System Image).
- What it Saves: It continuously and periodically saves copies of files located in key folders like Documents, Desktop, Pictures, Videos, and Libraries.
- How it Works: Every time you save a change, File History takes a snapshot of the old file version and the new one. This lets you “jump back in time” to any saved point.
- Easy to Use: Once you set it up, it runs silently in the background—you don’t have to do anything else.
2. File History Must Be Enabled
The most important rule is that File History must be turned on and operational before the accidental save happened. If you turn it on now, it won’t help you retrieve a file that was overwritten yesterday.
- How to Check: Go to Settings $\rightarrow$ Update & Security (or System in Windows 11) $\rightarrow$ Backup.
- Status Check: Look at the status next to the File History section. If it says “On” or “Running,” you are ready to proceed with recovery.
- If it’s “Off”: You will need to skip this method and use the alternative recovery options instead.
3. You Need an External Backup Drive
File History is designed to be a safe backup, so it cannot save copies to your computer’s main internal hard drive (the C: drive). If the main drive fails, both your data and your backup would be lost.
- Where Backups Go: To work, File History must be configured to save backups to a separate location, such as an external drive (like a USB hard drive) or a network location (like a folder on another computer or a NAS).
- Why it Matters: This separate, external medium is where all the previous, restorable versions of your Word document are stored. Having this external copy is foundational to understanding “how to recover saved over word document” using this method, as it ensures your backup is safely separated from the live file you accidentally overwrote.
Once you have confirmed that File History was turned on and connected to a working backup drive at the time the good file existed, you can begin the recovery process.
Step-by-Step Recovery Process Using File History
Restoring your Word document is simple and is done entirely through the Windows operating system—you don’t need to open the Word application.
Step 1: Access the File History Interface
You must start in the folder where the overwritten file is located.
- Open File Explorer and go to the file’s folder (e.g., Documents or Desktop). Do not open the document.
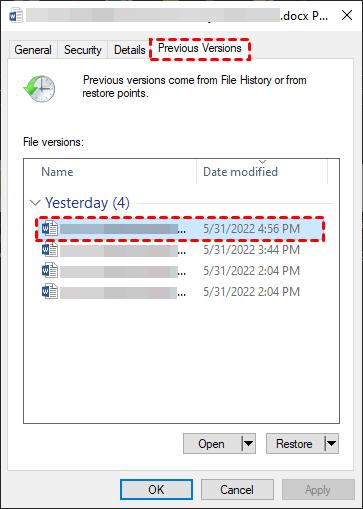
- Method A (Quick Access): Right-click the folder containing the file, select “Properties,” and click the “Previous Versions” tab.
- Method B (Direct Tool): With the folder open, click the “History” button in the File Explorer ribbon.
Step 2: Locate the Correct Version
The File History window will open, showing you a snapshot of the folder’s contents at a specific time.
- Use the large left/right arrow buttons at the bottom of the window to scroll through different dates and times.
- Move left to scroll backward in time until you find the point before your accidental save occurred.
- Identify the Word document in the preview pane. Note the date and time stamp to ensure it’s the right backup point.
Step 3: Preview and Confirm
Always confirm the file is correct before restoring.
- Select the older version of the document you want.
- Double-click the file or look for a Preview option to quickly check the content. This verifies that you are about to recover the version with the missing information.
- Once confirmed, you are ready to restore.
Step 4: Restore the File Safely
Click the restore button to bring the file back to your live drive.
- Click the green “Restore” button (the circular arrow icon).
- Because a file with the same name already exists in the original location, Windows will ask what you want to do.

✅ Recommendation for Safety: Do not choose “Replace the file.” Instead, click the gear icon and select “Restore to…” Choose a new location (like a temporary folder on your desktop) to place the recovered file. This keeps both the current (incorrect) version and the old (correct) version safe and separate.
What If File History Isn’t Enabled?
While File History is the best solution for this specific problem, what if you discover it was disabled? The situation is more challenging, but not necessarily hopeless. Word and Windows offer several fallback options, including powerful data recovery software.
1. Advanced Recovery with WinfrGUI
If File History has failed you—meaning the file was overwritten and the backup system did not capture a prior version—you may need to attempt a more complex recovery known as forensic retrieval. This is a crucial step when looking for the final answer to how to recover saved over word document.
Consider using WinfrGUI. This tool serves as a user-friendly graphical interface for Microsoft’s command-line Windows File Recovery (WinFR) tool, which is available on the Microsoft Store. The official WinFR tool is powerful but difficult to use, requiring complex command prompts. WinfrGUI simplifies the process with an easy-to-use window, making deep recovery accessible to the average user.
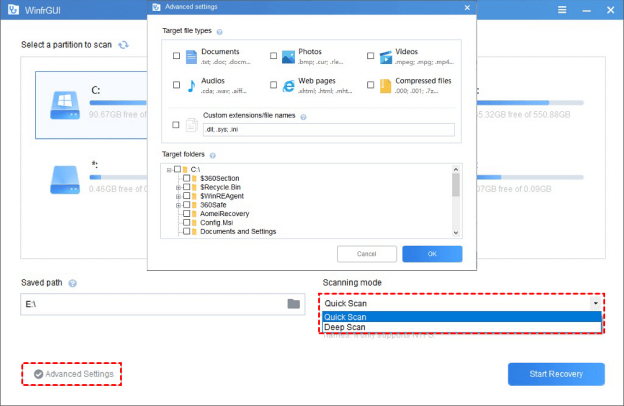
This method performs a deep scan of your hard drive, attempting to recover the fragments of files that the operating system has marked for deletion. It works best if the file was recently overwritten/deleted and the area of the disk it occupied has not yet been overwritten by new data. This offers a last resort for complex data loss scenarios. You will need to select the drive the file was on (C: drive) and the type of scan (often “Deep” or “Segment” mode for overwritten files). While this is the most advanced option, its success is not guaranteed, but it provides a fighting chance when all else fails.
2. Word’s Built-in AutoRecover/AutoSave
Microsoft Word itself has recovery mechanisms that are independent of File History. This is particularly useful for documents that were open when the computer crashed or the application was closed without saving.
- Open a new or existing document in Word.
- Go to the “File” tab, then select “Info.”
- Look for the “Manage Document” button.
- Clicking this often reveals a submenu with an option like “Recover Unsaved Documents” or a list of files saved in the AutoRecover file location. This method is primarily for unsaved documents, but it can occasionally contain a recently saved temporary version that predates the overwrite.
3. OneDrive/SharePoint Version History
If your document was saved to a cloud service like OneDrive or SharePoint (common in Microsoft 365 environments), you have access to a robust cloud-based version history. This is often the most reliable alternative to File History.
- Navigate to your OneDrive folder in File Explorer or log into the OneDrive web portal.
- Right-click the overwritten document.
- Select “Version history” (or similar wording).
- The service will show a list of saved versions, timestamped by the cloud server. You can download or restore any previous version, effectively accomplishing the same goal as File History, but using the cloud as the backup location.
4. System Restore (Less likely for a single document)
A common misconception is that System Restore can help recover individual user files. While System Restore creates restore points for system files, registry settings, and installed applications, it generally does not back up personal files like Word documents, photos, or music. A brief mention is included here only to manage expectations: you should not rely on System Restore to bring back a single overwritten Word document, as it is designed for system-level issues, not individual file recovery.
Conclusion
Accidentally saving over a vital document is a scenario of digital panic that is, fortunately, highly recoverable. The most robust and straightforward solution, as detailed in this guide, is the native Windows File History feature. We have outlined the clear recovery path: ensuring your external drive is configured, accessing the File History interface, navigating backward in time to locate the correct file, and safely restoring it using the “Restore to…” option to prevent overwriting other files. For instances where File History was inactive, remember that vital alternatives exist, ranging from Word’s own AutoRecover system and cloud-based version control (like OneDrive) to powerful, last-resort tools like WinfrGUI. The ultimate takeaway is that the best defense is preparation. By understanding all these methods, you have a complete answer to how to recover saved over word document. We strongly encourage you to take a moment right now to verify that your File History is active and regularly backing up to a connected drive. By implementing this small administrative safeguard, you establish an effective, automated protection layer, ensuring that your work is always recoverable and mitigating the threat of losing essential documents to a careless save.
🔗 More Tutorials: