How to View Previous Versions of Word Document [2026]
Let’s be honest—losing changes in a Word document still feels like a punch to the gut, even in 2026. Whether you accidentally clicked “Don’t Save,” overwrote a crucial paragraph, or a cloud sync glitch derailed your workflow, it is enough to cause instant panic. However, Microsoft’s modern ecosystem is more resilient than ever. Between AI-driven AutoSave and deep OneDrive integration, your work is rarely truly gone. If you know where to look, you can “time travel” back to any draft. Whether you are using Microsoft 365, the web editor, or local desktop files, there are built-in ways to view previous versions of Word document files and restore earlier drafts in seconds. This updated guide walks you through the most reliable recovery options available—step-by-step—so you’re never left scrambling again. Stop the panic, tap into Word’s safety nets, and regain your confidence. Just recover, review, and keep going.
Key Takeaways
- Microsoft Word offers multiple built-in ways to view and restore previous versions, including Version History, AutoSave, and OneDrive backups.
- You can quickly compare older drafts with the current version to review changes before restoring.
- Unsaved or overwritten files can often be recovered through Word’s AutoRecover feature or Windows “Previous Versions.”
- If built-in options fail, file recovery tools like WinfrGUI can help retrieve hidden backups such as .asd or .tmp files.
- Enabling AutoSave and syncing files to OneDrive are the best ways to prevent permanent data loss in the future.
How to Access Version History in Microsoft Word
Viewing previous versions of word documents is easy. You can click on the file name in the top bar of Microsoft Word. The other option is to click the “Files” button in the menu bar above, then select “Information” and then click on “Version History” button. The version history panel will appear on the right side of your screen, showing the latest version of the document at the top. Word handles changes by date conveniently, making it easier to find older versions of larger documents.
Step 1: Open your Word file, go to File > Info > Version History, and the version panel will appear on the right side with the most recent versions listed at the top.
Step 2: Click “Open Version” next to any listed entry to view that version in full, and look for the “Previous Version” tag to spot older drafts.
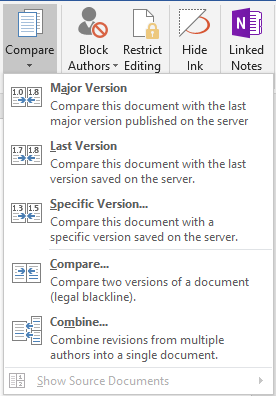
Step 3: To check differences, hit the “Compare” button next to a version, and Word will open a new file showing all the edits between that version and the last one.
Step 4: Click the small up arrow below the “Edits” label to expand a summary of all the changes made in that version.
Step 5: Use the left scroll bar to browse changes, and note the red vertical lines on the right that indicate which lines were modified.
Step 6: For a detailed view, go to the Review tab, click the arrow beside “Simple Markup,” and choose “All Markup” to see full edit highlights.
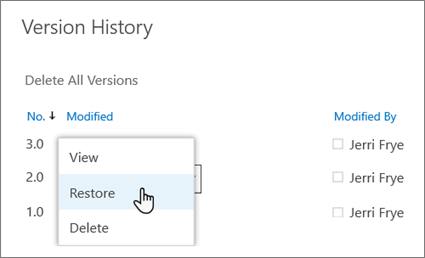
Step 7: Once satisfied, choose to save or restore the version you want to keep.
Step-by-Step: Viewing Previous Versions of a Word Document
Alright, now that you know how to view previous versions of a Word document, let’s jump into some easy ways to actually get those old versions back. Whether you saved it, forgot to save it, or have a backup lying around, these tips will help you recover your work hassle-free.
Method 1: Restore previous versions of Word documents with Word AutoSave
Besides view previous versions of word document, Word has an automatic saving feature that automatically tracks changes to receive previous versions of Word documents through automatic save:
Situation 1: If you have saved the file:
Step 1: Open the Word document you’ve previously saved and want to restore an earlier version of.
Step 2: Click the File button located in the top-left corner of the screen to open the document options menu.
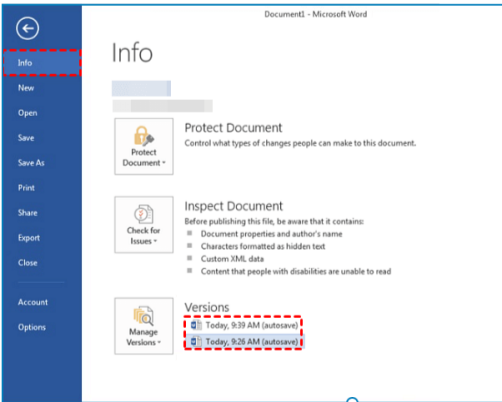
Step 3: Go to Info > Manage Document, and on the right side, you’ll see a list of automatically saved versions labeled as “Autosave.”
Step 4: Select the version you want to check, then click to open it in word.
Step 5: Click the Restore button at the top of the window (in the ribbon) to overwrite the current version or choose Save As to keep it as a separate file.
Situation 2: If you haven’t saved the file yet:
Step 1: Reopen Microsoft Word—ideally with the same file name or session where the unsaved work was lost.
Step 2: Click File > Info > Manage Document just like before.
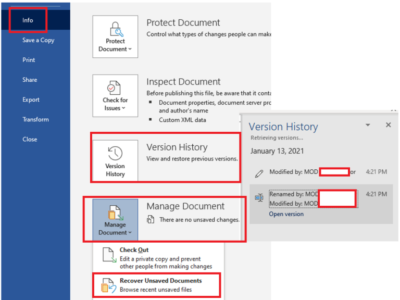
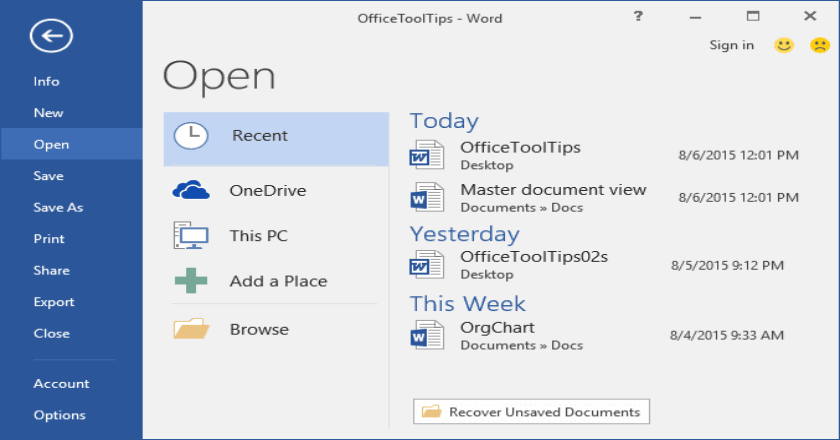
Step 3: Select Recover Unsaved Documents from the dropdown list.
Step 4: Browse the list of recent autosaved documents, open the version you want, and confirm it’s the right one.
Step 5: Once opened, save it immediately using File > Save As and choose a secure location and file name for safekeeping.
Method 2: Restore previous versions of Word documents with file recovery software.
When you work on Word documents, your computer often creates temporary backup files like .tmp and .asd. If the usual recovery methods don’t do the trick, you can try using recovery tools like WinfrGUI to find and restore those hidden backups.
Step 1: Download and install WinfrGUI from the official website and follow the on-screen instructions to complete the setup.
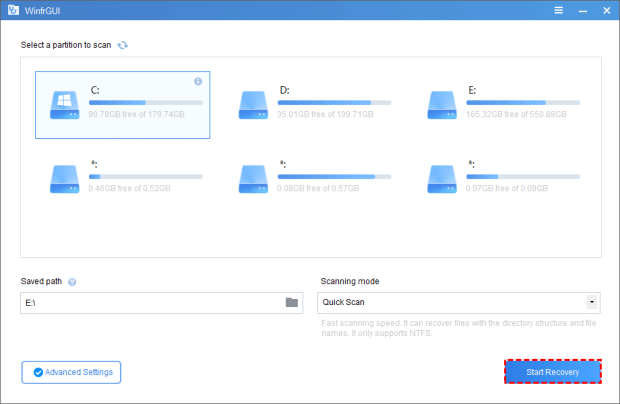
Step 2: Select the drive or specific folder where your document was last seen. Click Start to initiate a deep scan for lost or overwritten fragments.
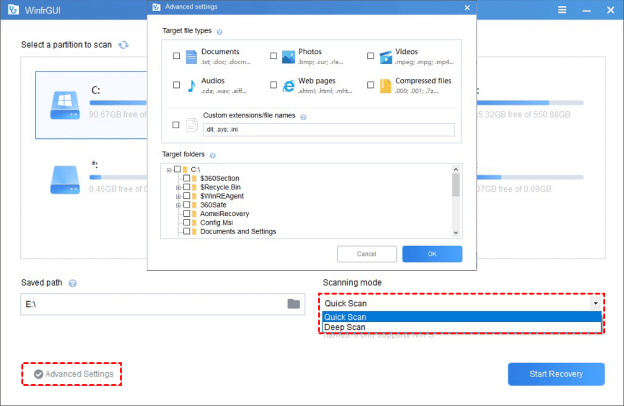
Step 3: Once the scan completes, use the filter or search bar to look for extensions like .docx, .asd, or .tmp. WinfrGUI organizes these by file structure, making it easy to spot historical drafts.
Step 4: Identify the correct version by its timestamp or size. Click Start Recovery and save the file to a different drive to prevent overwriting any remaining data.
To maximize your chances, stop writing new files to your hard drive immediately. This prevents the “hidden” previous versions from being permanently overwritten by new data.
Method 3: Restore Your Word Document Using Previous Versions in Windows
If you’ve been working on a Word file and something went wrong—don’t worry. When you’re trying to figure out how to see previous versions of a Word document, Windows can help. It quietly creates restore points in the background, and you might be able to bring your document back without using any extra software.
Step 1: Head to the folder where your word document was last saved—this might be your Desktop, Documents folder, or anywhere else you usually save files.
Step 2: Right-click on the file (even if it’s the broken or current version) and choose “Properties” from the menu that appears.

Step 3: In the “Previous Versions” tab, Windows will show you a list of older versions that were automatically saved as part of system restore points or File History.
Step 4: Click on the version you want to bring back—check the dates and times if you’re unsure—and then hit “Open” to take a look at it before doing anything else.
Step 5: If it looks right, you can either copy content from it manually or just click “Restore” to replace your current file with that version in one click.
Method 4: Restore Previous Versions Using Microsoft Word’s File History
If you’re using Microsoft 365 and saving your documents to OneDrive, Word automatically keeps a version history in the background—so even if something goes wrong, you can rewind to an earlier version with just a few clicks.
Step 1: Open the Word document you want to recover—make sure it’s the version saved in your OneDrive account through Microsoft 365.
Step 2: Click on the File tab in the top-left corner of the window to access your document settings.
Step 3: Go to Info, then click on Version History—this will open a new panel on the right-hand side labeled “Version History” or sometimes “Document History.”
Step 4: Scroll through the list of saved versions—each one will show a timestamp, so you can quickly spot the version you want to revisit.
Step 5: Click Open Version next to the one you’re interested in; Word will launch it in a separate window so you can take a closer look.
Step 6: If it looks like the correct version, go ahead and hit Restore to make it the active file again. Or, if you’re unsure, you can click the Compare option to highlight exactly what changed compared to the previous version.
Troubleshooting FAQ
Q1: Why is “Version History” greyed out in my Word document?
The “Version History” feature primarily works for files saved to OneDrive or SharePoint. If your document is saved locally on your hard drive (e.g., in a “New Folder” on your Desktop), Word cannot track historical versions in real-time. To fix this, upload your file to OneDrive.
Q2: How often does Word save AutoRecover information?
By default, Word saves AutoRecover info every 10 minutes. You can make this more frequent by going to File > Options > Save and changing the “Save AutoRecover information every X minutes” setting to 1 minute for maximum safety.
Q3: Can I recover a previous version if I accidentally clicked “Don’t Save”?
Yes! Go to File > Info > Manage Document > Recover Unsaved Documents. Word often keeps a temporary draft of unsaved files for a few days. However, this is not a permanent storage solution, so save your recovered file immediately.
Q4: Where are Word backup files (.wbk) stored?
If you have “Always create backup copy” enabled, Word stores the .wbk file in the exact same folder as the original document. If you can’t find the original folder, search your computer for *.wbk in the File Explorer search bar.k.
Conclusion
Mastering the ability to view previous versions of Word document files is more than just a troubleshooting skill—it is an essential part of a modern, stress-free workflow. In 2026, where collaboration and rapid revisions are the norm, having a “time machine” for your data provides a vital safety net. Whether you rely on Microsoft Word’s built-in version history, cloud-based OneDrive backups, or specialized recovery tools like WinfrGUI, you now have the roadmap to handle any digital mishap. By enabling automatic backups and understanding these recovery pathways, you ensure your valuable intellectual property remains secure and accessible, no matter what happens. Don’t wait for the next “accident” to happen. Take a moment today to check your AutoSave settings, sync your critical projects to the cloud, and move forward with the confidence that your hard work is always protected.
🔗 More Tutorials: