
Windows File Recovery Utility: Step-by-Step Tutorial

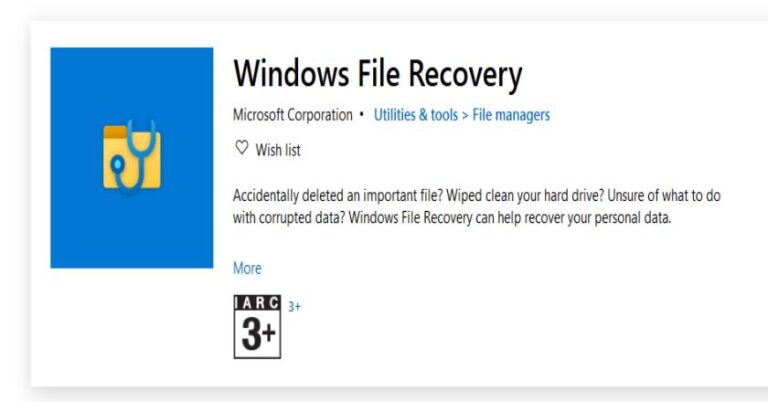
Windows File Recovery Utility is a command-line file recovery program released by Microsoft on January 21, 2020. It not only features a high success rate and security but also provides two file recovery modes, which are suitable for different file systems and file loss scenarios. If you need to recover accidentally lost or deleted JPEG, PDF, PNG, MPEG, Office files, MP3 and MP4, ZIP and other files from local hard disk, USB drive, SD card, then I believe it is definitely a good assistant. But the fly in the ointment is that it only supports Windows 10 2004 and above systems. And, as a command-line program, it lacks a friendly graphical user interface, which makes it difficult for many users without computer experience. Fortunately, this article will show you how to use this Windows 10 file recovery utility with detailed steps.
How to Use Windows File Recovery Utility
Windows File Recovery is a command-line tool that helps recover deleted files from internal drives, external USBs, or SD cards. While it’s powerful, it can look confusing at first. Don’t worry—we’ll break it down step by step so anyone can follow along.
Basic Command Syntax
The general format for running Windows File Recovery is:
winfr source-drive: destination-drive: [/mode] [/switches]
| Parameter | Description |
|---|---|
source-drive: | The drive where your lost files were originally located |
destination-drive: | The drive where recovered files will be saved (must be different from source) |
/mode | Recovery mode: Regular, Segment, or Signature |
/switches | Optional filters to narrow the scan (e.g., by file type, path, or name) |
The source and destination drives must not be the same. If you don’t have two drives, plug in a USB flash drive or an external hard drive to act as the destination.
Step 1: Choose the Correct Recovery Mode
Windows File Recovery offers two primary modes, and each is suited to different file loss situations.
| Mode | Best For | File System | How It Works |
|---|---|---|---|
Regular | Recently deleted files where the file system is intact | NTFS | Scans the Master File Table (MFT) |
Segment | Files deleted some time ago or from Recycle Bin | NTFS | Uses file record segments |
Signature | Formatted or corrupted drives, or unknown file systems | NTFS, FAT, exFAT | Searches by file header signatures |
- Regular Mode: Use this if your files were just deleted and the drive is NTFS.
- Segment Mode: Good when files were deleted a while ago or emptied from Recycle Bin.
- Signature Mode: Best for formatted drives or drives with file system corruption.
| File System | Loss Scenario | Recommended Mode |
|---|---|---|
| NTFS | Recently deleted | Regular |
| NTFS | Deleted weeks ago | Extensive (Segment) |
| NTFS | Formatted or corrupted drive | Extensive (Signature) |
| FAT/exFAT | Any type of file loss | Extensive (Signature) |
When in doubt, try Segment mode first, then use Signature if needed.
Step 2: Apply Useful Switches to Target Files
Switches allow you to narrow your scan so the tool only looks for specific files—saving time and improving accuracy.
| Switch | Purpose | Supported Mode(s) |
|---|---|---|
/n | Filters by file name, extension, or path. Examples: /n *.docx, /n \Users\*.jpg | All modes |
/y: | Recovers system files. Useful if you’ve lost Windows or config files. | Segment mode (NTFS only) |
/u | Recovers previously undeleted files, such as those emptied from the Recycle Bin. | Segment mode (NTFS only) |
Example:
winfr C: E: /segment /n *.pdf
This scans drive C: for PDF files and saves recovered files to drive E:.
Step 3: Run an Example Command
Here’s how it looks when you put everything together:
winfr C: D: /segment /n *.xlsx
- C: is the source drive where you lost the Excel files.
- D: is the destination drive where recovered files will be saved.
- /segment tells the program to use Segment mode.
- /n *.xlsx tells it to only look for Excel files.
If you’re not sure where to save recovered files, connect a USB stick and use it as drive D:.
A Simpler Free Alternative: WinfrGUI
Did you see it? Some commands you must know to perform Windows File Recovery. This can be complicated for the average user. Don’t worry, I’ll introduce you to its alternatives. WinfrGUI is a free data recovery software that fully invokes the functionality of Windows File Recovery, allowing users to recover lost files in an easier way.
WinfrGUI has the following advantages:
- User-Friendly Interface: unlike the command-line tool, WinfrGUI offers a clear and intuitive graphical interface that anyone can navigate with ease.
- Quick and Simple: recover deleted files in just a few clicks—no technical skills needed.
- Completely Free: recover a wide range of file types, including photos, videos, documents, and compressed files, all at no cost.
- Wide Compatibility: supports Windows 10 and 11 and works seamlessly with NTFS, FAT, exFAT, and ReFS file systems.
- Safe to Use: non-destructive recovery process ensures your original files remain untouched.
How to Recover Files with WinfrGUI in 3 Easy Steps
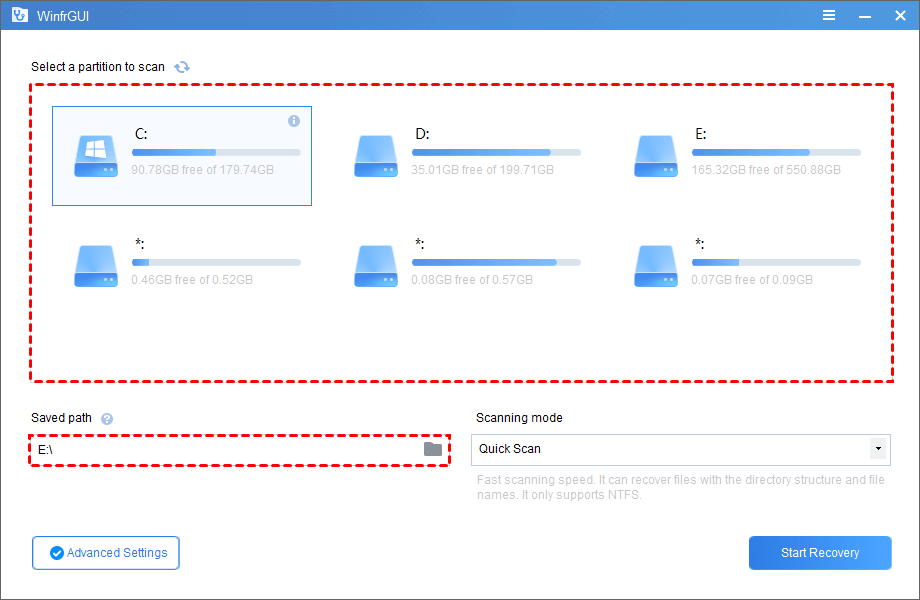
Step 1: Select the Drive: Choose the partition where you lost files and the location where you want to save recovered data.
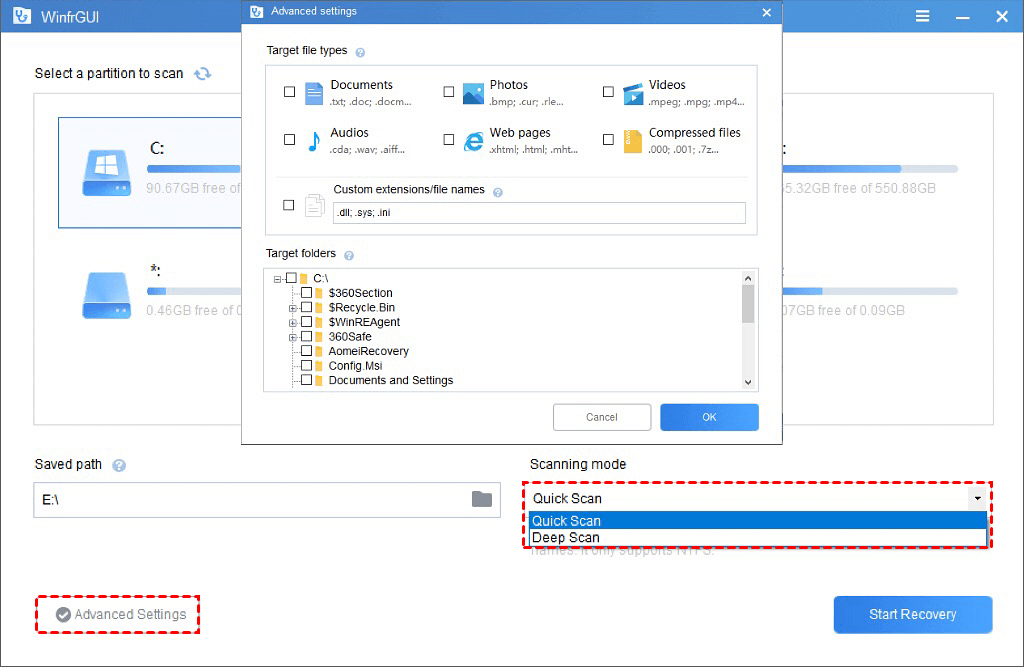
Step 2: Pick a Scanning Mode: Choose a scanning method based on your file system and type of data loss. Advanced options are available if you want more control.
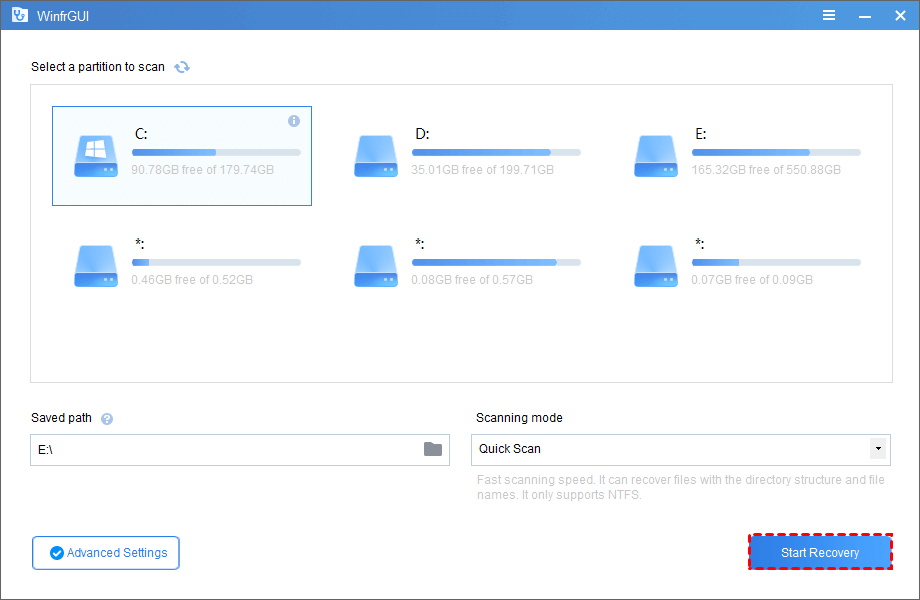
Step 3: Start Recovery: Click the “Start Recovery” button and let WinfrGUI handle the rest.
Frequent Asked Questions:
Q1. Is Windows File Recovery free to use?
Yes, Windows File Recovery is completely free. It’s an official tool from Microsoft available on the Microsoft Store for users running Windows 10 version 2004 and above, as well as Windows 11.
Q2. Why do I need a separate destination drive to recover files?
To avoid overwriting lost data, Windows File Recovery requires that you save recovered files to a different drive than the one the files were lost from. Use a USB or external drive if needed.
Q3. What types of files can Windows File Recovery retrieve?
The tool supports recovery of many common file types, including JPG, PNG, MP4, MP3, DOCX, PDF, and ZIP. Use the /n switch to target specific files, like /n *.docx.
Q4. Can I use Windows File Recovery on Windows 11?
Absolutely! Windows File Recovery works on Windows 11 as well. However, for a more user-friendly experience, you might prefer WinfrGUI, which brings all the same features with a visual interface.
Q5. Is there an easier alternative to Windows File Recovery?
Yes! If you’re not comfortable with command-line tools, try WinfrGUI. It’s a free, GUI-based version of Windows File Recovery—no commands needed, just a few simple clicks to recover your files.
Conclusion
In this guide, we’ve shown you how to use the Windows File Recovery utility to retrieve deleted or lost files, step by step. While the tool is powerful and supports a wide range of file types and storage devices, its command-line interface can be challenging for users without technical experience. That’s where alternatives like WinfrGUI come in—offering the same recovery capabilities with a much more intuitive, graphical interface. With just a few clicks, you can recover your important files without the need to type complex commands. Whether you prefer the official Windows File Recovery utility or opt for an easier solution like WinfrGUI, both tools offer reliable ways to get back lost data on Windows 10 and later. Choosing the right method depends on your comfort level with command-line tools. We hope this guide has made the recovery process clearer and more accessible. Don’t panic—your lost files may still be recoverable!
🔗 Also Read:
 MyRecover
 FoneTool
