How to Use Microsoft File Recovery Tool
Ever accidentally deleted an important file and felt that sinking panic? What do you do when you think it’s gone for good? Is there a simple way to get those photos, documents, or videos back without all the hassle?
If you’re using Windows, I’ll guide you through using Microsoft File Recovery, a free but powerful tool. It’s command-line based, which can feel intimidating, but don’t worry—I’ll walk you step by step so you can recover your files with confidence. Plus, I’ll introduce a simpler, beginner-friendly alternative with a visual interface. Let’s get your files back!
Why Do Files Get Deleted or Lost? Common Causes Explained
Before diving into recovery, it helps to understand why files disappear in the first place. Files can be accidentally deleted, drives can become corrupted, or system errors can cause data loss. Some common causes include:
- Accidental deletion: Using Shift + Delete or emptying the Recycle Bin by mistake.
- Formatting drives: Reformatting a disk without backing up files.
- Virus or malware attacks: Malicious software deleting or encrypting files.
- Hardware failure: Damaged hard drives or USB drives leading to inaccessible data.
- Software crashes: Unexpected shutdowns or system errors corrupting files.
Understanding the root cause can help you choose the best recovery approach and avoid repeating the mistake.
What Is Windows File Recovery?
Windows File Recovery is a free command-line tool developed by Microsoft. It helps you recover deleted files from hard drives, USB flash drives, and SD cards—even after they’re no longer in the Recycle Bin. This utility uses the winfr command and is available for Windows 10 version 2004 (20H1) and later. You can download it for free from the Microsoft Store.

Important limitations:
- It does not support recovering files from cloud storage (like OneDrive) or network drives.
- It requires some basic command-line knowledge, which may not be ideal for beginners.
If you’re new to using Windows File Recovery, don’t worry—this guide will walk you through every step to help you recover your lost files successfully. Before starting, make sure your system is compatible. Go to Start > Settings > System > About, and check that your Windows 10 version is 2004 or newer.
Also note: Windows File Recovery isn’t pre-installed—you’ll need to download and install it manually from the Microsoft Store.
How to Use Windows File Recovery?
Here are the steps to recover deleted files using Windows File Recovery:
Step 1: Check compatibility.
- Make sure that your computer supports Windows File Recovery by checking if you have Windows 10 version 20H1 or a newer version.
- If you have an older version, you can upgrade your Windows or use alternative data recovery tools.
Step 2: Choose a recovery mode.
- Winter 2020 Windows File Recovery features normal and extended modes.
- The mode you pick relies on the drive’s file system, when the data were destroyed, and why. format or corruption).
- Please refer to the table below as a guide for selecting the appropriate mode based on the file system:
| File System | Situation | The mode you should use |
| NTFS | The file was deleted recently | Regular mode |
| NTFS | The file was deleted a while ago | Extensive mode |
| NTFS | The disk was formatted | Extensive mode |
| NTFS | The disk is corrupted | Extensive mode |
| FAT & exFAT | Any situation | Extensive mode |
If you’re unsure about the file system, right-click on the drive and select “Properties” to confirm.
Step 3: Run the recovery command.
To begin the rehabilitation process, please follow these steps:
- Open the Windows search bar and type “Windows File Recovery.”
- Select the first result to open the Windows file recovery tool.
- If there is a notification from user account control, please click “Yes” to proceed.
Please use the following command format:
winfr source: destination: [/mode] [/switches]
Please remember that the source and destination hard disks must be different. When recovering data from your operating system drive (usually C:), use the “/n” switch to specify the user’s files or folders.
For regular mode:
To recover files from the Documents folder on drive C to drive E, use the following command:
winfr C: E: /regular /n \Users\YourUserName\Documents\
To recover PDF and Word files from drive C to drive E, use this command:
winfr C: E: /regular /n *.pdf /n *.docx
To recover files with the word “test” in the name from drive C to drive E, use this command:
winfr C: E: /regular /n test
For the extensive mode:
To recover any files that have the word “test” in the name, use this command:
winfr C: E: /extensive /n test
During the Windows File Recovery process, a folder named “Recovery_” will be created on the destination drive to store your recovered files. When prompted with “Proceed?” in the Command Prompt, press Y to continue or Ctrl + C to cancel the operation. If you’re using Extensive mode, you might see a message asking, “Do you want to view the recovered files? (Yes/No)”. After the recovery finishes, press Y to open the recovery folder and check your files. These steps should help you recover data using Windows File Recovery. But if the command line feels too complicated, don’t worry—there are easier alternatives available.
An Easy Alternative: WinfrGUI for Data Recovery
If the command-line interface of Windows File Recovery feels intimidating, WinfrGUI offers a simple, free graphical solution that makes file recovery straightforward. WinfrGUI supports recovery from multiple storage types including internal hard drives, external USB drives, SD cards, memory cards, and even CDs or DVDs. It also works with various file systems such as NTFS, FAT, exFAT, and HFS+. This tool can recover deleted files from corrupted or reformatted drives—as long as the data hasn’t been overwritten. Plus, if your computer fails to boot, a bootable version of WinfrGUI can help retrieve your important files.
Here’s how to use WinfrGUI in just a few clicks:
Step 1: Download the WinfrGUI installer from the official website or a trusted source, then run it and follow the instructions to complete the installation on your PC.
Step 2: Once installed, open WinfrGUI by double-clicking its desktop icon to launch the easy-to-use recovery program.
Step 3: In the main window under “This PC,” select the drive where your lost files were stored so the software knows where to scan.
Step 4: Click the “Start” button to begin scanning the selected drive for recoverable files, which may take a few minutes depending on the drive size.
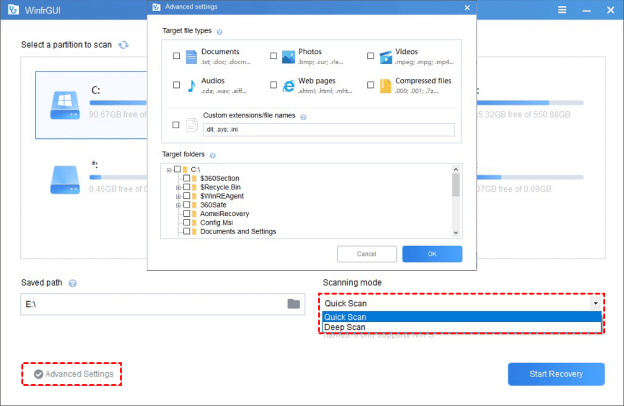
Step 5: After scanning finishes, review the list of found files, then select the ones you want to recover by checking their boxes.
Step 6: Finally, save the recovered files to a different drive or folder than the original to avoid overwriting any remaining lost data and ensure successful recovery.
How to Create a Bootable Recovery USB Using WinfrGUI
Sometimes your PC won’t boot, but you still need to recover files. WinfrGUI offers a bootable recovery option:
Step 1: Download the WinfrGUI bootable ISO image from the official site.
Step 2: Use a tool like Rufus to write the ISO to a USB flash drive.

Step 3: Boot your PC from the USB drive (you may need to change boot order in BIOS).
Step 4: Use the graphical interface to scan and recover files even if Windows won’t start.
This feature can be a lifesaver if your operating system is damaged beyond repair.
Windows File Recovery and WinfrGUI: Which One Should You Choose?
Both Windows File Recovery and WinfrGUI have their strengths:
| Feature | Windows File Recovery | WinfrGUI |
|---|---|---|
| User Interface | Command-line (text only) | Graphical user interface (visual) |
| Ease of Use | Requires command-line knowledge | Beginner-friendly, intuitive |
| Supported File Systems | NTFS, FAT, exFAT | NTFS, FAT, exFAT, HFS+ |
| Recovery Modes | Regular and Extensive modes | Automatic selection with clear options |
| Device Compatibility | Internal/external drives, USB, SD | Internal/external drives, USB, SD, CDs/DVDs |
| Bootable Recovery | Available | Available |
If you’re comfortable with commands and want full control, Windows File Recovery is great. For those who want simplicity without losing power, WinfrGUI is ideal.
Backup Strategies to Prevent Future Data Loss
It’s always better to prevent data loss than to recover files later. Setting up regular backups can save you a lot of trouble. Consider using Windows’ built-in File History or cloud services like OneDrive or Google Drive to automatically back up your important documents and photos.
That said, if you ever do lose files, don’t panic—recovery is usually still possible. Microsoft File Recovery is a powerful free tool that can help retrieve deleted files from various storage devices, though its command-line interface might feel a bit daunting at first. For an easier experience, WinfrGUI offers a user-friendly, visual alternative without sacrificing effectiveness. Both tools support multiple file systems and device types, making them versatile options. Just remember to act fast and stop using the affected drive to improve your chances of successful recovery. With the right approach and tools, you can protect your data and get back on track quickly.
🔗 Also Read: Windows File Recovery Utility: Step-by-Step Tutorial