Where to Find Deleted Files on Windows 10
Windows users inevitably face the need to remove files. Whether files are mistakenly deleted due to a lapse in concentration, lost for organizational reasons, or vanish during an unexpected system crash or failed update, the immediate feeling of panic is universal. Fortunately, in the vast majority of cases, a deleted file isn’t truly gone forever. It simply becomes invisible to the operating system, remaining on your drive until new data overwrites it. This comprehensive guide will help you understand precisely where to find deleted files on windows 10 and (11) and provide reliable,
Where Do Deleted Files Actually Go? (The Two Scenarios)
The first step in any file recovery attempt is understanding the two primary ways a file can be deleted. This knowledge dictates which recovery method you should use.
Scenario 1: The Recycle Bin (The Easy Delete)
When you delete a file using the standard methods, it is immediately moved to a temporary holding folder.
| Deletion Method | File Destination | Recovery Difficulty |
| Pressing the “Delete” key on your keyboard | The Recycle Bin | Easiest (A simple right-click and restore) |
| Using the “Remove” option from the right-click context menu | The Recycle Bin | Easiest |
Windows creates a specific “Recycle Bin” folder on every internal and recognized external storage device. This serves as a vital safety net, allowing you to quickly and easily restore files before they are truly purged from the system. The Recycle Bin has a size limit (which you can customize), and once that limit is reached, Windows will start permanently deleting the oldest files to make room for new ones.
Scenario 2: Permanent Deletion (The Hidden File)
A file is considered permanently deleted—meaning it bypasses the Recycle Bin entirely—in the following critical situations:
- Using the Shift + Delete Command: This keyboard shortcut explicitly tells Windows to skip the Recycle Bin.
- Emptying the Recycle Bin: When you right-click the Recycle Bin and select “Empty Recycle Bin,” the space the files occupied is marked as free.
- Large Files: If the file size exceeds the configured capacity of the Recycle Bin, Windows will permanently delete it.
- Deletion from an External Drive: In some configurations, files deleted from a network share or a very small USB drive are permanently deleted by default, bypassing the local Recycle Bin.
Crucial Recovery Concept: Data Remanence In all permanent deletion scenarios, the file’s binary data does not disappear instantly. Windows only removes the pointer to the file in the file system’s index (the Master File Table, or MFT, on NTFS drives). The actual data blocks remain on the drive until they are overwritten by new data. The primary rule of data recovery is: Stop using the affected drive immediately to prevent overwriting your lost files.
Initial Steps to Locate Missing Files on Windows 10
The two initial steps detailed here are crucial for establishing where to find deleted files on windows 10 before attempting complex data recovery procedures.
Step 1: Check the Recycle Bin First
The most common solution is the simplest. Don’t assume your file is gone until you’ve checked the bin.
- Access Point 1 (Desktop Icon): Double-click the Recycle Bin icon on your desktop.
- Access Point 2 (Run Command): Press Windows key + R, type
explorer.exe shell:RecycleBinFolder, and press Enter.
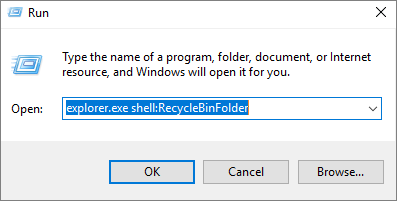
- Search and Restore: Use the search bar in the Recycle Bin window to look for the file name or file type (e.g.,
*.jpg). - Restore: Right-click the file and select Restore. This will move the file back to its original folder location.
Step 2: Use Windows File Explorer’s Search Function
Sometimes, a file isn’t deleted, but simply moved or hidden. A system-wide search is a quick way to rule out this possibility.
- Press Windows key + E to open File Explorer.
- Click “This PC” from the left-hand panel. This ensures your search spans all connected drives.
- In the search box at the top right, type the name of the file or its file extension (e.g.,
project_report.docxor*.xlsx). Press Enter. Search Filters You can refine your search by file type or modification date using the ribbon menu that appears when you click into the search box. - Check Hidden Files: While in File Explorer, navigate to the View tab in the menu bar and check the box next to Hidden items. This will reveal files that may have been accidentally set with the hidden attribute.
If your files are still inaccessible after these basic methods, they are permanently deleted and you must move to the recovery section below.
Advanced Methods to Recover Permanently Deleted Files
When the standard Windows methods fail, you must employ specialized techniques that analyze the raw data on your hard drive to reconstruct the missing file pointers. The ultimate success often depends on knowing precisely where to find deleted files on windows 10—or rather, the remnants of those files—on the physical sectors of the drive.
Method 1: Restore Files Using File History
File History is a built-in Windows feature that acts as a continuous, automated backup utility. If you enabled this feature before the file was lost and connected an external backup drive, it’s an excellent way to recover older versions or deleted files without relying on third-party software.
Prerequisite: This feature must have been enabled and configured to back up your data to an external drive before the files were lost.
Steps to Use File History:
Step 1: Open File History: Press Windows key + R, type control /name Microsoft.FileHistory, and press Enter.
Step 2: Access Restore: Click “Restore personal files” on the left side of the window.
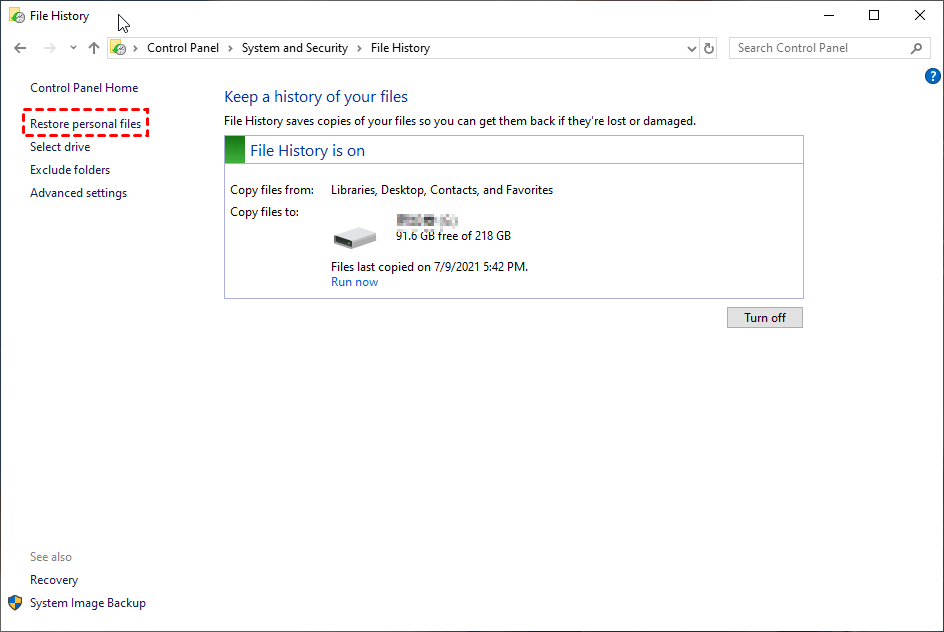
Step 3: Browse Backups: A new window will open, showing your backed-up file folders.
Step 4: Navigate and Select: Browse to the original folder where your files resided. Use the arrows at the bottom of the window to scroll back through the different versions (backups) recorded by File History.
Step 5: Restore: Select the file(s) you want to recover and click the green circular arrow button at the bottom to restore them to their original location.
Method 2: Recover Using a Data Recovery Tool
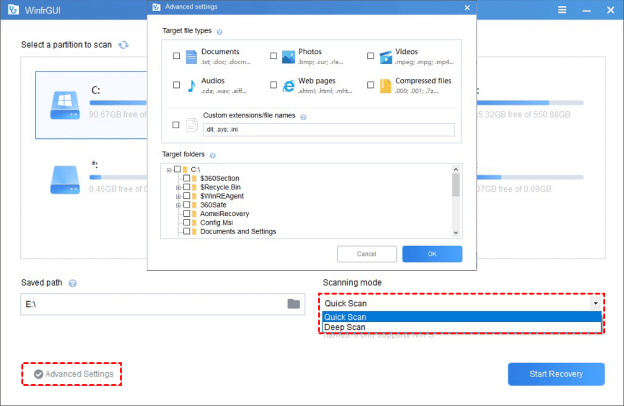
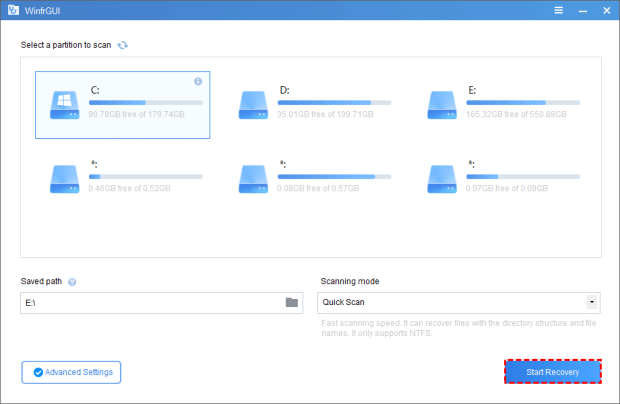
For files lost from formatted drives, system corruption, or those deleted a long time ago, a dedicated data recovery tool is the most reliable option. These programs use sophisticated algorithms to scan the raw sectors of your drive for the remnants of lost file data. While there are many excellent options (like Disk Drill, EaseUS, and Recuva), we’ll focus on the principles of using a typical, user-friendly Graphical User Interface (GUI) tool, such as the one mentioned in the original article, WinfrGUI.
General Process for GUI Recovery Tools:
Step 1: Installation Precaution: NEVER install the recovery software on the drive where the lost file was located (the Source Drive). If your lost file was on the C: drive, install the program on an external drive or a different partition (like D:).
Step 2: Download and Install: Obtain the software from a trusted official source.
Step 3: Select Source and Destination: Open the application. You must select two drives:
- Source Drive: The drive where the files were deleted (e.g., C:).
- Destination Drive: A different drive where the recovered files will be saved (e.g., an external hard drive, or a D: partition).
Step 4: Choose Scan Mode: Most tools offer a Quick Scan (faster, ideal for recent deletions) and a Deep Scan (slower, essential for formatted drives or older files). The deep scan can take a significant amount of time (hours) depending on the drive size.
Step 5: Review and Filter: Once the scan is complete, the software will present a list of found files. You will typically be able to filter by file type (e.g., pictures, documents) and status (e.g., Good, Poor, Overwritten). Files with a “Good” status have the highest chance of full, successful recovery.
Step 6: Recover: Select the files you need and execute the recovery. They will be saved to your specified Destination Drive.
Method 3: Using the Advanced Windows File Recovery (WFR) Tool
For users comfortable with the command line, Microsoft offers its own free, powerful tool: Windows File Recovery (WFR), available on the Microsoft Store. This tool offers maximum control but requires specific syntax.
WFR Syntax Overview:
The basic command structure is: winfr source-drive: destination-drive: [/mode] [/switches]
| Parameter | Description | Example |
| Source-drive: | The drive where the files were deleted. | C: |
| Destination-drive: | The drive where recovered files will be saved (MUST be different). | E: |
| Mode | Regular (quick, for recently deleted NTFS files) or Extensive (deep, for all file systems/scenarios). | /regular or /extensive |
| Switch | Filters the search, typically using /n (for specific file path/name) | /n *.docx (to find all Word documents) |
Example Command (Regular Mode): To recover all recently deleted .jpg files from your C: drive’s Pictures folder and save them to your E: drive:
winfr C: E: /regular /n \Users\<your username>\Pictures\*.jpg
The complexity of the command line is why GUI tools like WinfrGUI were created, but the WFR tool remains a highly potent and free first-party option for advanced users.
The Best Practices to Prevent Future File Loss
The most successful file recovery is the one you never have to perform. Implementing a simple backup strategy is your ultimate safeguard, eliminating the need to search for where to find deleted files on windows 10 repeatedly.
- Enable File History: Configure File History to run automated backups to a dedicated external hard drive. It’s free and built right into Windows.
- Adopt the 3-2-1 Rule: Maintain 3 copies of your data, using 2 different media types (e.g., internal drive and external drive), with 1 copy stored offsite (e.g., cloud storage like OneDrive, Google Drive, or Dropbox).
- Be Mindful of Shortcuts: Train yourself to always check the Recycle Bin before emptying it, and avoid using the Shift + Delete command unless you are absolutely certain the file should be permanently erased.
- Cloud Sync: Use a cloud service like OneDrive to automatically sync your critical folders (Documents, Desktop, Pictures). This creates an immediate, easily accessible backup copy in the cloud.
Conclusion
The deletion of an important file on Windows 10 or 11 can be stressful, but it should rarely be permanent. Deleted files are not simply “lost in the air”; they remain as dormant data on your storage device until they are overwritten by a new file. By following a logical process—starting with the Recycle Bin, moving to File History, and finally deploying a powerful tool like WinfrGUI or the Windows File Recovery command line—you significantly increase your chances of successful data recovery. The key is to act quickly and avoid using the affected drive to protect the integrity of the data you are trying to retrieve.
🔗 Also Read: 3 Ways to Recover Deleted Files Not In Recycle Bins. Alternatively, the file history can be a useful tool if it is enabled and used regularly before the files are deleted.