How to Recover Data from Broken Hard Drive: Full Guide
Seeing your computer fail to recognize a hard drive can feel like your data is gone forever. This isn’t always true. While some conditions cause irreversible data loss, many seemingly “dead” hard drives (HDDs) can be successfully recovered or even repaired. Understanding the cause of the failure is the critical first step in determining how to recover data from broken hard drive. This guide focuses exclusively on traditional Hard Disk Drives (HDDs), which use spinning magnetic platters, not modern Solid State Drives (SSDs). We’ll cover when recovery is possible and provide step-by-step methods for both data retrieval and drive repair.
Understanding Hard Drive Failure: The Causes
Unlike modern flash storage, an HDD stores data on rotating magnetic platters accessed by a delicate read/write head. The presence of these many moving parts makes them vulnerable.
Hard drive failures typically fall into two main categories:
1. Logical Damage (Recoverable)
This damage affects the way the drive organizes and presents data, without physically harming the components. This type of damage is often recoverable because the data remains intact on the platters.
- File System Corruption: Damage to the Master File Table (MFT) or other directory structures makes the operating system unable to access or read the data, rendering the drive “unreadable.”
- Accidental Deletion/Formatting: Deleting files or formatting a drive only removes the pointers to the data, not the data itself.
- Malware Attacks: Viruses, especially anonymous ransomware that encrypts files or malware that corrupts system files, can prevent data access or format the drive.
2. Physical Damage (Challenging or Irreversible)
This involves a mechanical or electrical failure of the physical components. Recovery is significantly more difficult, often requiring professional help.
- Mechanical Failure (“Click of Death”): Failures in the motor, spindle, or the delicate read/write head assembly. Scratches on the magnetic platter (known as platter damage) make data recovery nearly impossible.
- Electronic Failure: Damage to the Printed Circuit Board (PCB), often caused by power surges or overheating.
- Severe Physical Trauma: Damage from being dropped, which can cause the read/write heads to crash onto the platters.
Is Data Recovery Possible?
The short answer is: Yes, in most cases of logical damage.
✅ Logical Damage Recovery: Do This First!
If the hard drive powers on but the data is inaccessible (e.g., due to accidental deletion, virus attack, or file system corruption), the information is likely still on the disk and can be retrieved using software methods described below. This is the simplest path to recover data from broken hard drive. The key is to STOP using the drive immediately to prevent new data from overwriting the missing files.
❌ Physical Damage Recovery: Call a Professional!
If the drive is making unusual clicking, grinding, or buzzing noises, or if the magnetic platters or heads are damaged, do not attempt home recovery.
- A Class 100 Cleanroom environment is essential to open a hard drive for repair, as even a speck of dust can cause catastrophic data loss.
- While superficial damage (like a broken exterior case) might allow simple data extraction, internal mechanical failure requires specialized tools and expertise. Consult a professional data recovery provider for physically damaged drives. They possess the necessary resources to safely recover data from broken hard drive when home methods fail.
Data Recovery Methods (For Logical Damage)
If your drive has logical damage (corrupted, deleted, or missing files), start with these steps to recover data from broken hard drive.
Method 1: Restore From a Backup (The Easiest Way)
Always check your backups first. If you use a system like Windows File History, this is the most secure and fastest recovery method.
Step 1: Open the Start Menu and search for “File History.” Select the Control Panel option.
Step 2: Click on “Recover Personal Files” in the File History Control Panel.
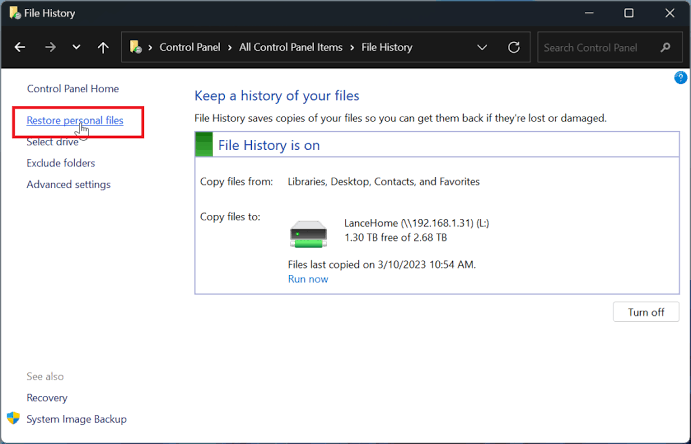
Step 3: Navigate to the location where your files were stored. Use the arrow buttons to browse through different backup timestamps.
Step 4: Select the desired file(s) and click the Restore button. The file will be returned to its original folder.
Method 2: Check the Recycle Bin
Before using advanced tools, check the Recycle Bin—it’s the temporary storage for locally deleted files.
Step 1: Open the Recycle Bin on your desktop.
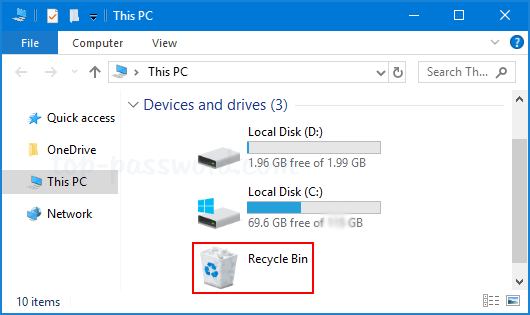
Step 2: Locate the file(s) you want to recover.
Step 3: Right-click on the selected file(s) and select “Restore.”(Tip: Hold CTRL to select multiple files.)
Step 4: Restored files will be returned to their original location.
Method 3: Recovering Data with WinfrGUI (Deep Scan)
For files permanently deleted, lost after formatting, or inaccessible due to a corrupted file system, third-party data recovery software like WinfrGUI can perform a deeper scan. WinfrGUI provides a simple graphical user interface (GUI) for Microsoft’s powerful recovery engine, Windows File Recovery. The most secure place to find WinfrGUI is on its official website or the Microsoft Store.
Step 1: Download and install WinfrGUI on a different computer or drive (to avoid overwriting the lost data on the affected drive).
Step 2: Launch the software, select the corrupted hard drive, and click “Scan.”The software will automatically scan your hard drive for missing information. Use the search box for a quick file search with relevant keywords.
Step 3: Once the scan is complete (or even while it’s running), select the file(s) you wish to recover and choose a secure location (another separate drive) to store them.
Further Reading: How to use WinfrGUI to recover accidentally closed excel without saving?
Hard Drive Repair Methods (After Data Recovery)
Once your valuable data is safely recovered, you can attempt to repair the drive for future use. Note that a drive with physical damage is often unrepairable and should be replaced.
Method 1: Repair File System with CheckDisk (chkdsk)
The CheckDisk utility is a built-in Windows tool that can identify and repair file system errors and mark bad sectors as unusable, preventing future data storage there.
Step 1: Right-click the Start button and select “Windows PowerShell (Admin)” (Windows 10) or “Terminal (Admin)” (Windows 11). Click “Yes” if the UAC prompt appears.
Step 2: Type the following command, replacing D: with the letter of your problematic drive: chkdsk /f /r D:
chkdsk /f /r D:
Step 3: Press Enter. The process will scan the drive, fix logical errors (/f), and recover readable information from bad sectors (/r).
Method 2: Fix Corrupted Windows System Files
If the drive failure is related to a corrupt Windows installation, the System File Checker (SFC) and Deployment Image Servicing and Management (DISM) tools can help restore system integrity.
Step 1: Right-click the Start button and select “Windows PowerShell (Admin)” or “Terminal (Admin).”
Step 2: Run the DISM tool to prepare the component store: DISM.exe /online /cleanup-image /restorehealth
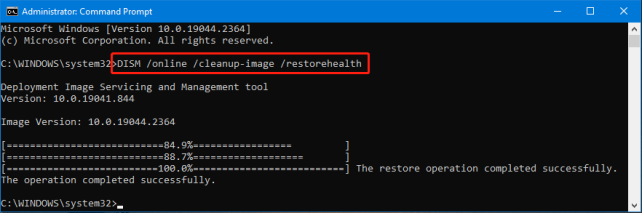
Step 3: Once the DISM process is complete, run the SFC tool to scan and replace corrupted or lost system files:sfc /scannow
Method 3: Virus Scanning
Since malware can cause severe logical damage, a full system scan can restore functionality by removing the cause of the corruption.
Step 1: Press Windows Key + S and search for “Windows Security.” Open it.
Step 2: Click on “Virus & threat protection.”
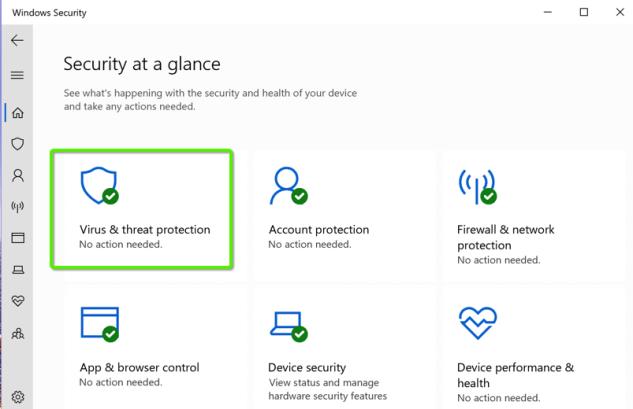
Step 3: Select Scan options. Choose the most comprehensive scan type (ideally a Full scan) and click “Scan Now” to start the process.
Conclusion
A “dead” hard drive is a scary sight, but the word is often misleading. For logical problems—the most common issues—appropriate recovery software and system tools can often retrieve your data and repair the drive. These techniques often succeed to recover data from broken hard drive when the physical components are intact. Remember: If you hear clicking, grinding, or any unusual mechanical sounds, do not attempt further recovery; immediately power down the drive and consult a professional data recovery service to maximize the chance of saving your files.
🔗 More Tutorials: