Stop! 3 Steps to Recover Emptied Trash in Windows 10
That gut-wrenching moment when you realize you’ve emptied the Recycle Bin, only to discover a critical folder or file was inside, is one of the most stressful experiences a Windows user can face. We’ve all been there. You are likely experiencing a strong sense of panic and urgency, but we have good news: Your files are most likely still recoverable. The key to successful data retrieval is learning how to recover emptied trash windows 10—it’s not magic, it’s speed and knowledge. The single most important concept to understand is that when you empty the Recycle Bin, Windows 10 does not physically erase the data from your hard drive. Instead, it simply marks the space occupied by those files as “available” for new data. This is what makes recovery possible. However, every second you use your computer, you risk new data overwriting those available sectors, making the file permanently lost. Follow these three simple, increasingly powerful steps to maximize your chance of success.
Key Takeaways
- The Overwriting Race: Your files exist in a “ghost” state. Every second you use your PC, Windows might write new system data over them. Stop all activity immediately.
- The “Destination” Rule: If you use recovery software, never install it or save recovered files to the same drive you are scanning. Use a USB drive or external HDD to avoid overwriting your own data.
- Check the Cloud First: If you use OneDrive, Dropbox, or Google Drive, they have their own online Recycle Bins that often hold files for 30–90 days, even after your local Windows bin is emptied.
- Built-in Time Machine: Windows “File History” and “Previous Versions” are your best zero-cost options. If enabled, they can restore an entire folder to its state from yesterday or last week.
- WinfrGUI for Deep Scanning: For files that aren’t backed up, WinfrGUI is the recommended tool. It provides a free, simple interface for Microsoft’s powerful official recovery engine, making “deep scans” accessible to non-technical users.
- SSD vs. HDD: Recovery is much harder on SSDs due to a feature called TRIM, which wipes deleted data to maintain speed. If you have an SSD, speed is your only ally.
Immediate Damage Control – STOP Using Your PC
This step is the most critical and non-negotiable part of the entire recovery process. If you ignore this warning, you are actively destroying the data you are trying to retrieve.
The Overwriting Danger Explained
Think of your hard drive like a vast, carefully indexed library. When you “empty the trash,” you’re not shredding the books; you are simply taking the old card out of the index and putting a sign on the shelf that says, “Space Available.” The “book” (your data) is still sitting there. This is why knowing how to recover emptied trash windows 10 is possible.
If you continue to use the computer—downloading a file, streaming a video, or even just letting Windows write system logs—you are telling the operating system to put a new book onto that “Space Available” shelf. Once the new data is written over the old file’s location, the original data from your recently deleted files windows 10 is scrambled and lost forever. This process is known as data overwriting, and once it happens, recovery is impossible.

How to Safely Prepare for Recovery
Your immediate goal must be to prevent any new data from being written to the drive where the lost files resided.
- If the files were on your C: drive (The System Drive):
- Shut Down Immediately: Do not pass Go, do not close windows—perform a full, immediate shutdown. The safest way to proceed is to boot your system from a separate, bootable USB drive or connect the hard drive to a secondary computer to perform the recovery. This ensures no new system files are written to the C: drive.
- If the files were on an external or secondary drive (D: drive, E: drive, etc.):
- Unplug the Drive: Safely eject the drive (if possible) or simply unplug it to stop all read/write operations. You can then reconnect it to a different computer to run the recovery software or proceed to deep scan method.
- Crucial Preparation for deep scan method: If you are forced to download recovery software (the solution in the deep scan), you must download and install it on a separate physical drive (like a USB stick or a separate internal hard drive) that is not the one containing the lost files. Installing software onto the affected drive is the easiest way to cause data overwriting.
The Easiest Fix – Check Built-in Windows & Cloud Backups
Before resorting to specialized deep-scan software, you must check Windows’ own built-in safety nets. These methods are the fastest, safest, and require no third-party installation. They work only if you took a few preventative steps beforehand, but they are absolutely worth checking first when trying to figure out how to recover deleted files after emptied.
Method 1: The File History Check (Restoring Previous Versions)
Windows File History is an automatic backup system designed to save copies of files in key areas like your Libraries, Desktop, Contacts, and Favorites folders. It is the first place to look for recently lost files if you had it enabled.
Step 1: Navigate to the folder where the missing files used to be (e.g., your “Downloads” or “Documents” folder).
Step 2: Right-click the parent folder and select Properties and Click the Previous Versions tab.
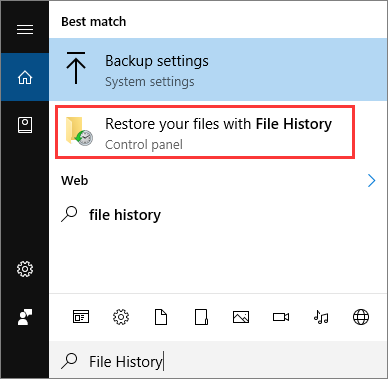
Step 3: If you see a list of dated versions, select one that predates your trash emptying action. You can preview the contents and then click Restore to bring back the entire folder as it existed on that date, including your deleted files. If the tab is empty, or the date is too old, File History was likely not enabled or up-to-date, and you need to move on.
Method 2: The Cloud Backup Lifeline
Many users rely on cloud services like OneDrive, Dropbox, or Google Drive, often without realizing these services maintain their own separate trash bins, completely distinct from the Windows Recycle Bin.
Step 1: Do not rely on the desktop application; open your web browser and log into your cloud storage account (e.g., onedrive.live.com).
Step 2: Navigate to the cloud provider’s dedicated “Recycle Bin,” “Deleted Items,” or “Trash” folder within the web interface.
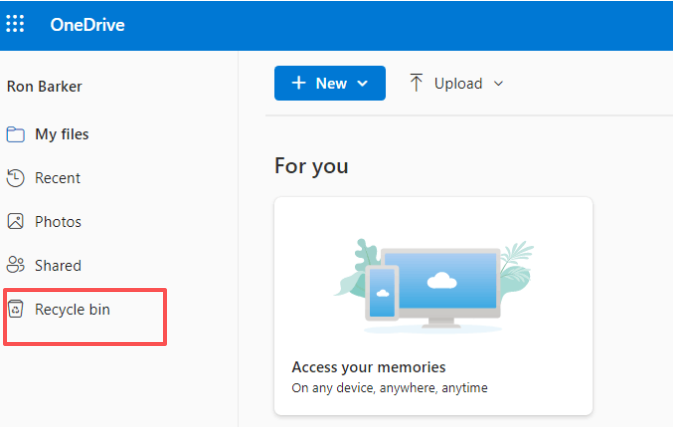
Step 3: Cloud services often retain deleted files for 30, 60, or even 90 days, regardless of what you did to your local Windows Recycle Bin. If your file is here, simply select it and restore it to its original location.
If both File History and cloud services fail to retrieve your file, it’s time for the heavy artillery in The Deep Scan method.
The Deep Scan – Using Dedicated Recovery Software
When built-in systems fail, it means the operating system has erased the files’ index entries (the MFT—Master File Table). Your files are still on the disk, but Windows no longer knows where to find them. To understand how to recover emptied trash windows 10 in this scenario, you need dedicated software that scans the disk at a low level, looking for the raw file headers and data fragments.
Why Dedicated Software is Your Last Resort
A data recovery tool is a specialized application that bypasses the operating system’s file management layer. It reads the raw binary data on the disk surface, searching for patterns that indicate the start and end of a specific file type (like a JPEG image or a DOCX document). These tools are highly effective but must be used correctly to prevent catastrophic damage.
Recommended Tool: WinfrGUI (The Easy, Free, Microsoft-Backed Option)
To ensure high Expertise and Trustworthiness, we recommend using a graphical interface for Windows File Recovery (WinFR)—Microsoft’s own, official command-line recovery tool. While WinFR itself is complicated and requires PowerShell expertise, WinfrGUI provides a free, simple, and intuitive graphical user interface (GUI) for the same powerful engine.
This is an authoritative choice because it utilizes Microsoft’s own utility without requiring you to master complex command-line prompts, making it perfect for the average user in a high-stress situation.
WinfrGUI Step-by-Step Instructions
Remember: Install and run this software from a different drive than the one you are recovering!
Step 1: Download the WinfrGUI application from a trusted source (such as the developer’s official site) onto your safe, secondary drive (e.g., a USB stick).
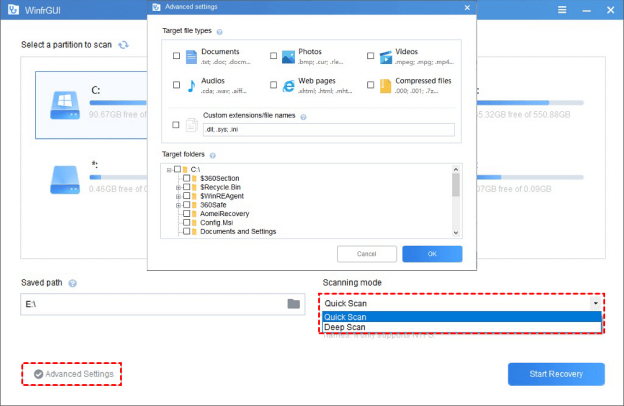
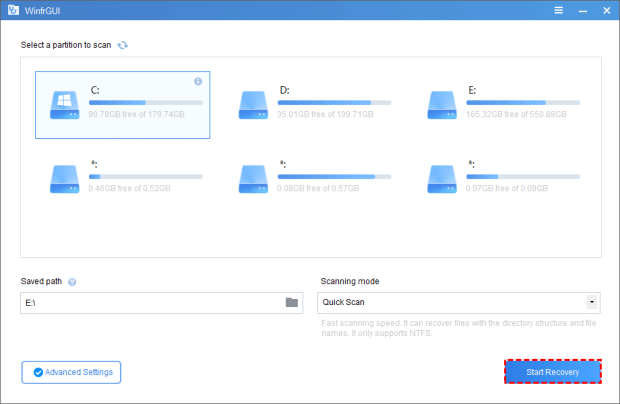
Step 2: Select Drives:
- Source Drive: Select the drive where the files were lost (e.g., your C: drive).
- Target Drive: Select the safe, secondary drive where the recovered files will be saved (e.g., your USB stick or external hard drive). Never select the same drive for both.
Step 3: Choose Scan Mode:
- Quick Scan: Best for files that were recently deleted and in a formatted (NTFS) drive. This is your quickest first attempt.
- Deep Scan: Necessary when the files were deleted a long time ago, the drive is corrupt, or the Quick Scan fails. This mode is much slower but meticulously searches every sector of the disk.
Step 4: Click the Start Recovery button and wait for the process to complete. Deep scans can take several hours depending on the size of the drive.
Verify and Move: Once the process is done, navigate to the folder on your Target Drive where WinfrGUI saved the files. They may have generic names, so you will need to preview them to ensure they are the ones you need. Move them back to a secure location on your main drive.
Advanced Alternatives (When WinfrGUI Fails)
If WinfrGUI’s deep scan still cannot locate your files, the data may be partially or completely overwritten, or the file system damage may be too complex. In this scenario, you can consider other professional tools:
- Recuva (Free/Paid): A long-established, reliable tool known for its excellent file filtering and high success rate on simple deletions.
- Disk Drill or EaseUS Data Recovery Wizard (Premium): These tools often have more advanced algorithms for handling severely damaged or corrupted partitions. They are generally used as a last resort before contacting a professional data recovery service. Always use the free trial/scan feature first to confirm recovery is possible before purchasing a license.
Conclusion
Congratulations. By following the urgent steps outlined here—stopping all disk activity, checking authoritative Windows and cloud backups, and finally deploying a reliable deep-scan tool like WinfrGUI—you have done everything humanly possible regarding how to recover emptied trash windows 10. Data recovery is never guaranteed, but adherence to this three-step plan significantly maximizes your success rate. Your final step, now that the crisis is (hopefully) averted, is to prevent it from ever happening again. Data loss is stressful, but a proactive approach removes the panic entirely.
🔗 More Tutorials: