How to Show Hidden Files Windows 10 [Step-by-Step Guide]
How to show hidden files Windows 10 is a common question when files mysteriously disappear from your PC. Don’t worry! It’s likely that your files have been hidden by the system or a third-party application, and there’s an easy fix. Whether it’s caused by an accidental setting change, a Windows update, or even a virus, hidden files are more common than you think. Luckily, revealing them is a simple task if you know where to look. In this guide, we’ll walk you through step-by-step methods to unhide your files so you can access them again quickly. Plus, if your files are lost rather than just hidden, we’ll introduce you to WinfrGUI, a free recovery tool to help restore deleted or corrupted data. Let’s get started!
Why Files Might Be Hidden in Windows 10

Before diving into the methods, it helps to understand why files might be hidden in the first place:
- System Protection: Windows hides essential system files to protect users from deleting or modifying them.
- User Settings: You or someone else may have manually set specific folders or files as hidden.
- Software Interference: Syncing apps, antivirus programs, or file managers can apply hidden attributes automatically.
- Malware/Virus Activity: Some viruses hide files to prevent detection or to trick users into thinking data has been lost.
- After Updates or Errors: A Windows update or error can reset folder views or even relocate files to different profiles.
No matter the cause, let’s explore how to uncover them.
Method 1: Show Hidden Files via File Explorer
The easiest and most common way to show hidden files Windows 10 is through File Explorer.
✅ Steps:
- Open File Explorer: First, press Windows + E to open File Explorer. You can also click the File Explorer icon in your taskbar or use the Start menu to search for it. This opens a new window where you can navigate through your files and folders.
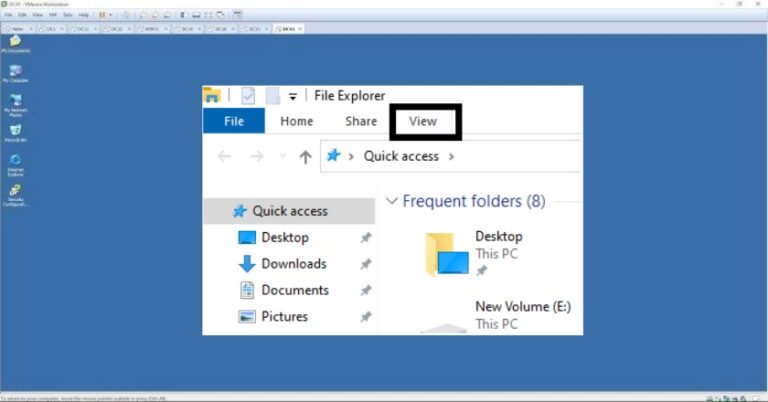
- Access the View Tab: Once File Explorer is open, look toward the top of the window for the View tab. This tab contains various options for customizing your File Explorer experience. Click on the View tab to reveal a list of display options.
- Enable Hidden Items: In the View tab, you’ll see an option called “Hidden items.” Simply check the box next to it. This will immediately make any files or folders that were previously hidden visible.
- Locate Hidden Files: After enabling this option, any file or folder that has been marked as hidden will appear in the same locations as the other files, but with a faded icon. This fading indicates that they are still hidden, but now visible to you.
Once you tick this box, any file or folder marked as hidden will appear slightly faded, indicating it’s hidden but now visible.
This method is perfect for locating user-hidden files and folders across any directory.
Need to recover lost or deleted files? Check out our guide on Recover Permanently Deleted Files Windows 11 Free Tools
Method 2: Reveal Protected Operating System Files
Some critical files are not just hidden—they’re protected. If you need to see these (usually for troubleshooting), follow these steps carefully.
✅ Steps: How to Show Hidden Photos and System Files
- Open File Explorer, click the View tab, then select Options and choose Change folder and search options.
- In the Folder Options window, switch to the View tab.
- Scroll down and uncheck the box next to “Hide protected operating system files (Recommended)”.
- A warning box will pop up—click Yes to confirm your choice, then click Apply.
⚠️ Warning: These files are hidden for good reason. Don’t delete or move them unless you’re absolutely sure.
Method 3: Use Command Prompt (CMD) to Show Hidden Files
If your hidden files are on a USB, SD card, or external drive—or if File Explorer methods aren’t working—Command Prompt (CMD) is your next tool.
This method is especially effective when a virus or malware has altered file attributes.
✅ Steps:
- Press Windows + R, type
cmd, and hit Enter. - In the Command Prompt window, type the following command: bash
attrib -h -r -s /s /d D:\*.*ReplaceD:with your actual drive letter.
What the Flags Mean:
-h: Removes the hidden attribute-r: Removes the read-only attribute-s: Removes the system file attribute/s /d: Applies changes to all files and folders inside the drive
This command helps unhide files that have been affected by malware or permission issues.
Still Can’t Find Your Files? Try WinfrGUI to Recover Them
Sometimes, files don’t just get hidden—they get accidentally deleted or corrupted during updates, malware removal, or system crashes. If none of the above methods work, it’s time to consider data recovery.
Try WinfrGUI — A Free Data Recovery Tool
WinfrGUI is a free, user-friendly tool based on Microsoft’s Windows File Recovery command-line utility—but with a major upgrade: a graphical interface. That means no scary commands, just a few clicks to get your files back.
⚡Key Features:
- Recover lost or deleted files including photos, documents, videos, and archives.
- Supports internal drives, external HDDs, USB drives, SSDs, and SD cards.
- Quick Scan for recently deleted files.
- Deep Scan for files lost due to formatting or severe corruption.
- Clean UI – No command-line needed.
✅ How to Use WinfrGUI:
- Download & Install from the official website.
- Launch the tool and select the drive where your files were stored.
- Choose a scan mode (Quick or Deep).
- Click Start Recovery.
- After scanning, preview and recover the files to a new location.
Whether your files vanished after a Windows update or a USB drive got messed up by malware, WinfrGUI is your recovery safety net.
Bonus: Keep Hidden Files Always Visible
If you’re a developer, IT professional, or someone who works regularly with hidden files and folders, configuring Windows 10 to always show hidden items can save you time and make navigating system files much easier.
While Windows hides certain files by default to prevent accidental modifications, there are times when you need quick access to these files. By enabling this setting, you can eliminate the need to repeatedly adjust the view settings each time you need to find hidden files.
✅ Steps to Always Show Hidden Files:
- Open File Explorer on your Windows 10 device.
- Click the View tab at the top of the window.
- In the drop-down menu, select Options to open Folder Options.
- Under the View tab, scroll down and select “Show hidden files, folders, and drives.”
- Click Apply to save your changes, then press OK.
Once this setting is enabled, Windows will always display hidden files, folders, and drives, even after restarting your computer. This setting remains active until you manually change it, so you won’t have to go through these steps again unless you choose to modify it.
Conclusion
Now that you know how to show hidden files in Windows 10, it’s easy to uncover your missing data, whether it’s tucked away by the system or hidden by an app. The methods we’ve outlined, from File Explorer to Command Prompt, should solve most visibility issues. And remember, if your files have been lost, rather than just hidden, WinfrGUI is an excellent tool to recover them. Taking a few minutes to check these settings can save you hours of frustration. Stay on top of your file management, and never lose track of your important data again!
Also Read👉 How to Restore Permanently Deleted Files: 5 Easy Methods
FAQ: Hidden Files in Windows 10
❓1: Why can’t I see hidden files even after enabling the setting?
A: Some files are protected OS files or have permissions issues. Use Method 2 or CMD.
❓2: Can a virus hide my files?
A: Yes, many viruses set files as hidden or system-type. Try the CMD method or run antivirus + recovery tools.
❓3: I lost files after a Windows update—what can I do?
A: Use WinfrGUI to scan your system and recover files that may have been moved, corrupted, or deleted.
❓4: Is it safe to unhide system files?
A: Only if you know what you’re doing. Do not modify or delete system files unless necessary.
❓5: How do I know if a file is hidden?
A: Hidden files in Windows 10 appear slightly faded compared to normal files when “Hidden items” is enabled in File Explorer. You can also right-click the file > Properties, and under the General tab, check if the “Hidden” attribute is selected. Uncheck it and click Apply to make the file visible permanently.