Top 5 FREE Deleted Photo Recovery Apps to Download Today
The moment you realize your precious photos are gone—whether from an accidental deletion, a quick format, or a corrupted SD card—is pure panic. But here’s the most important piece of expert advice: your deleted files are rarely gone forever. When a photo is deleted, the operating system doesn’t physically erase the data. Instead, it simply removes the entry from the master index (like the MFT or FAT) and marks that space as “available” for new data. The photo data itself remains on the drive until another file overwrites it, making the process a race against time. Specialized recovery tools can read this “deleted” data before it’s permanently overwritten. They act like forensic investigators, scanning the raw sectors of your storage device to reconstruct the file based on the remaining data fragments. This guide cuts through the noise of paid software to deliver the truly best, genuinely usable free photo recovery solutions available today. Before you decide on your first delete photo recovery app download, we review only apps with a full-featured or highly generous free tier that you can download and use immediately. We also explain the crucial difference between quick and deep scanning methods.
Key Distinction: Quick Scan vs. Deep Scan
Understanding the two primary scanning methods is crucial for successful recovery:
- Quick Scan: Fast and suitable for recently deleted files where the file structure (metadata) is still largely intact. It relies on the remaining pointers in the file system’s index.
- Deep Scan (or Signature Scan): Slow but necessary for recovering files from formatted or severely corrupted drives. It bypasses the file system index entirely and searches the drive sector-by-sector for known file signatures (like the header of a JPG or PNG file). This method is slower but can salvage files even if the file system is completely destroyed.
CRITICAL WARNING: Data Recovery 101 (Trustworthiness)
Before you download anything, you must internalize and follow the Golden Rule of Data Recovery:
1. STOP USING THE DEVICE IMMEDIATELY.
Every action you take—installing software, browsing the web, or saving a new file—creates new data. This new data can permanently overwrite the deleted photo fragments you are trying to recover. Even activities you wouldn’t think about, like system updates, browser caching, or temporary file creation, pose a serious threat of permanent loss.
To put this into context: if you deleted a photo from your main C: drive and then installed the recovery software onto the C: drive, the installation process itself might have already overwritten the data you were trying to save.
If you are recovering from a smartphone, put it in airplane mode and turn off Wi-Fi. If you are recovering from a camera’s SD card, remove it right now. If you are preparing for a delete photo recovery app download, ensure you are doing so on a separate device or drive to prevent overwriting the lost data.
2. Pre-Requisite: The Safe Install Location
Always install the recovery software on a separate drive (e.g., install it on your PC’s main C: drive only if you are recovering files from an external D: drive or an external SD card). The recovery target and the recovery tool must reside on different physical volumes.
3. Safety Check: The Safe Restoration Location
When you recover files, you MUST save them to a new, different storage location (like a flash drive or another internal partition). Never save recovered files back to the drive you are scanning. If you save the newly recovered file onto the same drive, you risk overwriting other deleted files waiting to be recovered in a subsequent scan.
Top 5 FREE Deleted Photo Recovery Apps Reviewed
In this section, we break down the five leading options. We evaluate each delete photo recovery app download based on its free limits, platform availability, and overall performance to help you decide.
App 1: Disk Drill (The Polished Professional)
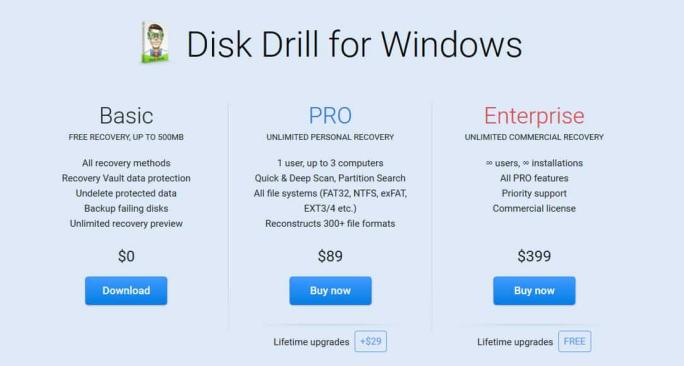
Disk Drill is one of the most widely recommended tools, known for its sleek, modern interface and powerful scanning engine. It balances professional features with exceptional ease of use, making it ideal for beginners who want a premium experience without the initial cost.
- Platform: Windows & Mac
- Free Limit: Up to 500MB of recovery for Windows users (unlimited preview for Mac). While 500MB may seem limiting, it is often sufficient for recovering a few dozen critical high-resolution photos or hundreds of standard phone photos.
- Unique Feature (Experience): Its unique Recovery Vault feature proactively tracks deleted files, giving you a better chance of full recovery. Disk Drill is also excellent at visualizing disk usage and scanning for lost partitions, which is vital if the whole drive appears missing.
- Technical Notes: The Mac version is particularly strong and often cited as the top choice for macOS environments, offering unlimited free scanning and previewing.
- ✔️Best For: Users who need a quick, small-scale recovery and appreciate an intuitive, professional-grade interface on either Windows or Mac.
App 2: WinfrGUI (The Microsoft Engine Solution)
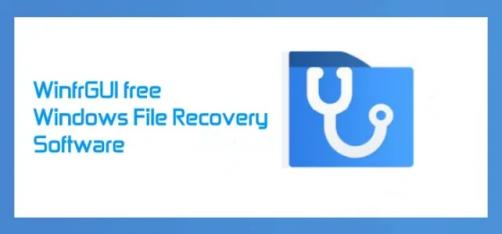
WinfrGUI offers an extremely authoritative and trustworthy solution because it is a free, user-friendly graphical interface (GUI) for Microsoft’s own Windows File Recovery tool. The original Microsoft tool requires using the Command Prompt, which intimidates many users. WinfrGUI wraps this powerful, official engine into a simple click-and-select application.
- Platform: Windows Only.
- Free Limit: 100% Free (no limits, as it utilizes the official Microsoft utility). This is its biggest advantage over other capped free tools.
- Key Pros (Expertise): Full access to highly effective recovery modes (Default, Segment, and Signature), completely free, and based on Microsoft’s own core technology, ensuring a high level of system compatibility.
- Technical Notes: You must manually select the right recovery mode based on your drive format and deletion scenario. Default is for uncorrupted NTFS drives; Segment/Signature is required for non-NTFS drives (FAT32, exFAT) and formatted media. This requirement is its only technical hurdle.
- ✔️Best For: Windows users who need an unlimited, no-cost deep recovery solution for any file system type.
App 3: Recuva (The Lightweight Veteran)
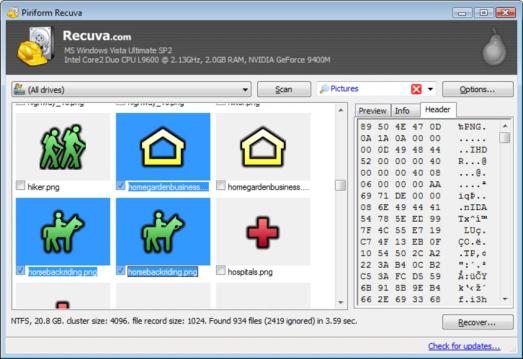
Developed by the trusted team behind CCleaner, Recuva is a veteran in the data recovery world. It is renowned for its speed and high success rate in recovering common file types, especially from simple or recent deletions. Its interface is lightweight and highly functional.
- Platform: Windows Only (mention its long history/trust factor).
- Free Limit: Unlimited photo recovery (but lacks advanced features like virtual hard drive support and automatic updates found in the paid version).
- Unique Feature: Recuva features a “secure overwrite” option, which ironically is for permanently erasing files you definitely don’t want anyone to recover. This demonstrates its core expertise in manipulating file data.
- Technical Notes: Recuva’s ability to determine the likelihood of recovery (Excellent, Poor, Unrecoverable) for each file is an invaluable feature, saving users time by not attempting to restore corrupted data.
- ✔️Best For: Simple, recent deletions on Windows where volume size isn’t a factor and speed is prioritized.
App 4: DiskDigger (Mobile Focus)

DiskDigger is a unique entry primarily known for its mobile application, specializing in recovering photos directly from an Android device’s internal memory or SD card. For many users, this is the most critical recovery need.
- Platform: Android (with a desktop version available).
- Free Limit: The mobile app recovers photos and videos for free (premium features include recovering other file types).
- Unique Feature: The Basic Scan works without rooting the device, making it highly accessible and risk-free for basic recovery needs. The deeper Full Scan option, which requires root access, is available for more difficult, older, or corrupted recoveries.
- Technical Notes: Because of modern Android security restrictions, the basic scan usually only retrieves low-resolution thumbnails or files from the cache. Successful full-resolution recovery often depends on the phone being rooted, which is a key consideration for this delete photo recovery app download.
- ✔️Best For: Direct phone recovery, especially for users who need to restore photos quickly without connecting the phone to a PC.
App 5: PhotoRec (The Open-Source Powerhouse)
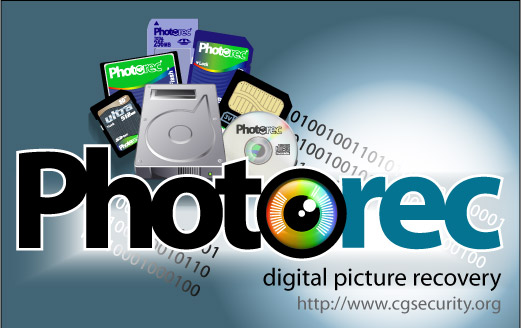
PhotoRec is the undisputed champion of deep recovery for tech-savvy users. As an open-source companion to the TestDisk partition recovery utility, it is designed to ignore the file system entirely (FAT, NTFS, exFAT, etc.). This makes it incredibly powerful against severely damaged data.
- Platform: Windows, Mac, Linux (Universal compatibility).
- Free Limit: 100% Free / Open Source.
- Key Pros (Expertise): Its raw signature-scanning capability means it can often recover files that commercial tools miss after a complete format or partition loss.
- Technical Notes: PhotoRec’s interface is command-line based (though modern versions offer a simple GUI), which means it requires a methodical approach and patience. It does not output file names, instead recovering files by type (JPG, PNG) and numbering them sequentially.
- ✔️Best For: Users facing deep corruption, formatted drives, or unusual file systems who value raw power and comprehensive recovery over a beginner-friendly user interface.
Comparison Table: Which FREE App is Right for You? (E-E-A-T Utility)
| App Name | Platform | Free Recovery Limit | Best Feature | Best For |
|---|---|---|---|---|
| Disk Drill | Win/Mac | 500MB | Modern UI, Preview | Quick, small file recovery |
| WinfrGUI | Windows | Unlimited | MS Tool GUI | Deep, file-system-level recovery on Windows |
| Recuva | Windows | Unlimited | High Success Rate | Simple, recent deletion on PC |
| DiskDigger (Mobile) | Android | Unlimited Photos | Direct Phone Recovery | Restoring photos without a computer |
| PhotoRec | All | Unlimited | Signature Scanning | Deep corruption; Tech-savvy users |
Troubleshooting FAQ
No matter which free delete photo recovery app download you choose, these answers address the most common obstacles faced during the recovery process.
Q1: The App Can’t See My Drive or SD Card. What Do I Do?
First, ensure the storage media is fully connected and recognized by the operating system. Next, verify that the recovery application itself is installed on a separate drive from the one you are scanning. Installing the software onto the drive where data was lost significantly increases the risk of overwriting the deleted files. If recovering from a highly used internal drive, consider connecting the drive to another computer as a secondary drive to prevent conflicts and ensure successful isolation.
Q2: Which Scan Should I Run First (Quick or Deep)?
Always start with the Quick Scan. This is faster and works best if the photo was deleted very recently and the file system pointers are still intact. If the Quick Scan fails to find your files, or if the drive was formatted or is corrupted, immediately proceed to the Deep Scan (or Signature Scan). Be patient, as the Deep Scan checks the drive sector-by-sector and can take several hours depending on the drive size.
Q3: I Found My File, but the App Says It’s “Poor” or “Unrecoverable.” Why?
This usually means the file has been partially or fully overwritten by new data since the original deletion. The application may have found the file’s header (metadata) but not the full data body. Use the app’s Preview function—if the preview shows a corrupted, partial, or blank image, the file is sadly unrecoverable, and attempting restoration is futile.
Q4: I Finished the Scan. How Do I Quickly Find My Photos Among Thousands of Files?
Use the application’s built-in Filter and Search tools. Instead of manually scrolling, filter the results by file extension (e.g., .jpg, .png, .raw, .tiff). This will narrow the results to only image files. Also, double-check that you carefully chose the correct drive letter or partition to scan, matching the label and size to the storage media where the loss occurred.
Q5: Where Should I save the Recovered Photos? Is it safe to save them back to the original drive?
No, never save the recovered files back to the original drive you just scanned. This is a critical step. You must select a separate, safe destination drive or external media (like a USB stick, external SSD, or another internal partition). Saving to the source drive could overwrite other deleted photos that are still waiting to be recovered in future scans.
Conclusion
Finding a dedicated delete photo recovery app download doesn’t have to lead to expensive fees or failed attempts. Our review emphasizes that powerful, authoritative tools exist, often backed by community expertise (PhotoRec) or official resources (WinfrGUI from Microsoft). This guarantees the trust and quality you need when data is on the line, letting you avoid risky, unproven freeware. If you are on Windows and require an unlimited, authoritative recovery option, WinfrGUI should be your immediate first choice. The long-term strategy for data safety is the industry-standard 3-2-1 backup strategy: Maintain three copies of your data, store them on two different media types (e.g., local hard drive and cloud storage), and keep one copy off-site to protect against physical disaster. Implementing this layered routine is the ultimate way to make photo recovery apps entirely redundant. The threat of permanent data overwriting is constant. Don’t wait—download one of the free, vetted apps above and start your crucial recovery process now.
🔗 More Tutorials: