How to Restore Windows 10 from Boot Menu
Is your Windows 10 PC stuck in a boot loop, crashing after updates, or just not acting right? Don’t panic—Windows 10 System Restore from boot could be the lifeline your system needs. Whether you’re dealing with sudden errors, driver conflicts, or settings gone haywire, System Restore is like a time machine that rolls your computer back to a stable, working state—without deleting your personal files. And the best part? You can launch it even if you can’t log into Windows. In this guide, we’ll walk you step-by-step through how to access and use System Restore from the boot menu, how to enable it (because it’s often off by default!), and how to make the most of this powerful tool. If your system’s giving you trouble and you want to avoid a full reinstall, learning how to do a Windows 10 system restore from boot could save you time, stress, and your sanity.Can you restore the system from the boot menu?
How System Restore Helps Fix Windows 10 Problems
System Restore is a built-in Windows 10 feature designed to roll back your system settings and critical files—like drivers, the Registry, and installed applications—to an earlier, stable state without touching your personal files. Think of it as a safety net or a system-level “Undo” button for when things go wrong. You should consider using System Restore if:
- Your PC becomes unstable after a Windows or driver update.
- A newly installed program causes system errors or crashes.
- You made manual Registry changes that now prevent Windows from booting properly.
System Restore is not enabled by default in Windows 10. You must manually turn it on before creating or using restore points. If you want to fix serious issues without a full system reinstall, Windows 10 System Restore from boot is one of the fastest and safest recovery options available.
Step 1: Turn On System Restore (If It’s Disabled)
Before you can use System Restore, you need to make sure it’s enabled—it’s turned off by default in Windows 10. Here’s how to turn it on:
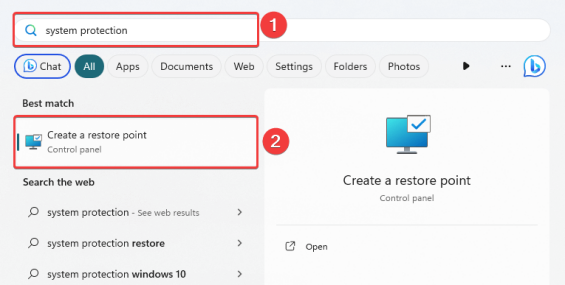
- Click the Start menu and type “Create a restore point”, then select the matching result.
- In the System Properties window, go to the Protection Settings section.
- Select your system drive (usually C:), then click Configure.
- Choose Turn on system protection.
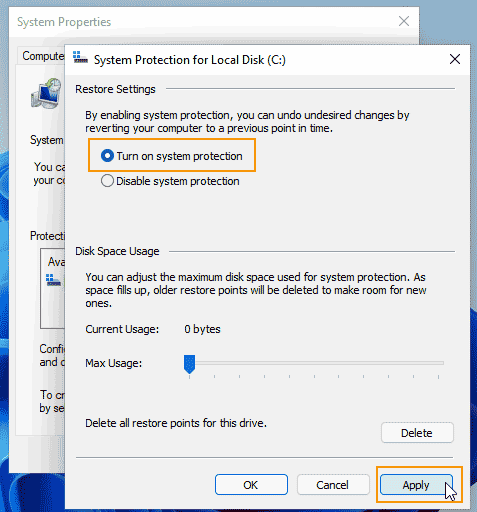
- Adjust the Max Usage slider to allocate disk space for restore points (we recommend 5–10% of your drive).
- Click Apply, then OK to save your settings.
✅ Once enabled, Windows will automatically create restore points before major updates, driver installations, or system changes—giving you a safety net if anything goes wrong.
Step 2: Create a Manual Restore Point (Optional but a Smart Move)
Even though Windows creates restore points automatically during major updates, it’s always a good idea to create one yourself before making any big changes—like installing new drivers or tweaking system settings.
Here’s how to do it:
- Open the Start menu and type “Create a restore point”, then select the matching Control Panel result.
- In the System Protection tab, select your system drive (usually C:), then click the Create… button.
- Type a descriptive name for the restore point (e.g., “Before GPU driver update”).
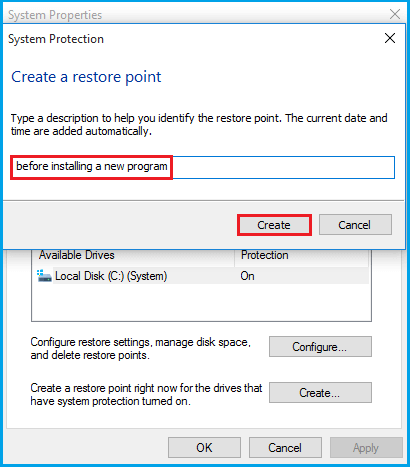
- Click Create, and once it finishes, hit Close.
That’s it! Now you’ve got a safety net. If something goes wrong, you’ll have a restore point to roll back to—no panic, no full reinstall. It takes less than a minute and can save you a ton of time later.
Step 3: Restore Windows 10 from the Boot Menu
If your PC won’t start normally, you can still run System Restore from the boot menu using the Windows Recovery Environment (WinRE). Here’s how:
- Force your PC into recovery mode by turning it on and then holding the power button to shut it down—repeat this three times in a row. On the third startup, Windows should enter recovery mode automatically.
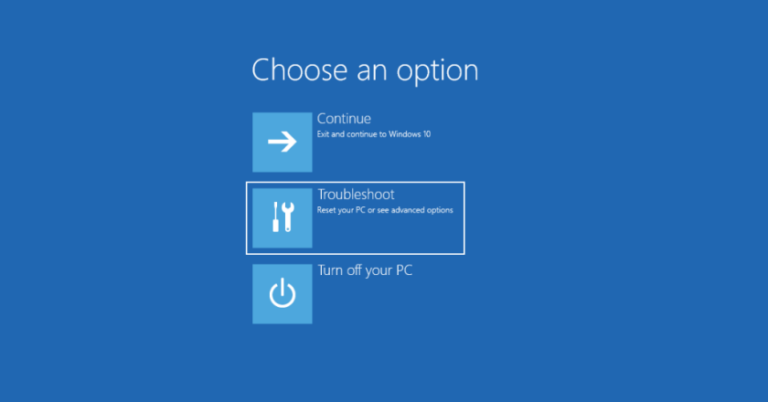
- On the Choose an option screen, select:
- Troubleshoot
- Advanced options
- System Restore
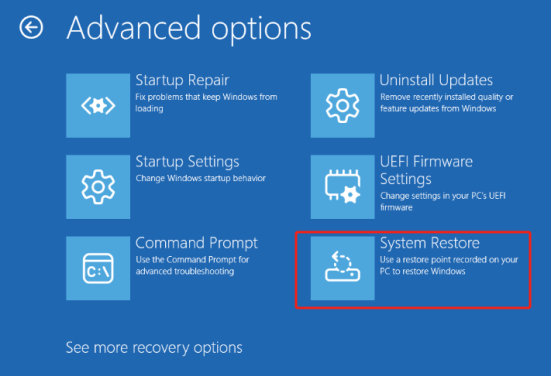
- Choose your user account and enter your password if asked.
- In the System Restore window, select a restore point from the list and click Next.
- Confirm your choice and click Finish to start the restoration.
Windows will restart and begin rolling back your system files and settings to the point you selected—without affecting your personal data.
How to Use System Restore from Inside Windows 10
If your computer still starts up but isn’t running right—maybe it’s crashing, freezing, or acting strangely—you can use System Restore from inside Windows to roll things back to a better state. Here’s what to do:
- Click the Start menu and type “Control Panel”, then open it.
- Go to Recovery, then click “Open System Restore”.
- The System Restore wizard will appear. Click Next to see a list of available restore points.
- Pick a restore point that was created before your problems began. (You can also click “Scan for affected programs” to see what changes will be undone.)
- Click Next, then Finish to confirm.
Your PC will restart and begin restoring system files, drivers, and settings to the selected point in time. Don’t worry—your personal files like documents and photos won’t be touched. It’s a simple and safe way to fix software issues without reinstalling Windows.
Restoring Previous Versions of Files and Folders
System Restore doesn’t actually bring back your personal files like photos or documents. But don’t worry—Windows 10 has another handy feature called File History that can help you recover earlier versions of your files and folders. Here’s the deal:
- Just type “Restore your files with File History” into the Start menu and open it.
- Set up File History by picking an external hard drive or a network location where Windows can save backup copies of your stuff.
- Once it’s up and running, if you ever need to recover a file, just right-click it (or a folder), choose “Restore previous versions”, and select the version you want.
Just remember: File History only works if you’ve turned it on before you lose or change files—it can’t help with things from the past. But once it’s set up, it’s a great safety net for your important stuff!
Common System Restore Issues (And Fixes)
| Problem | Solution |
|---|---|
| System Restore is greyed out | Ensure protection is enabled on system drive |
| No restore points available | Create restore points manually and check if System Restore is enabled |
| Restore failed with error | Disable antivirus temporarily and retry in Safe Mode |
| Not enough space | Allocate more disk space in System Protection settings |
| Some programs reappear after restore | Some apps may not fully uninstall — use dedicated uninstallers if needed |
Recover Files If Restore Doesn’t Work
If System Restore fails or causes file loss, use a recovery tool like WinfrGUI — a free, user-friendly interface for Microsoft’s Windows File Recovery command-line tool. It helps recover permanently deleted files from internal or external drives without technical complexity.
Why Use WinfrGUI? Key Features and Must-Know Benefits
- User-Friendly Interface: Simplifies Microsoft’s complex command-line tool with an easy-to-navigate graphical interface — no coding skills needed.
- Recover Permanently Deleted Files: Restore files emptied from the Recycle Bin or deleted using Shift + Delete.
- Supports Multiple Drives: Works with internal hard drives, external USB drives, SD cards, and more.
- Flexible Recovery Modes: Offers quick and deep scan options to maximize file recovery success.
- Preview Before Recovery: Lets you preview recoverable files before restoring them to save time and storage.
- Free and Lightweight: Completely free to use with minimal impact on system performance.
- Safe and Reliable: Developed by Microsoft, ensuring trustworthiness and ongoing updates.
Using WinfrGUI gives you a powerful second chance to get your important files back—even when other recovery methods fail.
Conclusion
When your PC refuses to cooperate, freezes at startup, or crashes after updates, a clean reinstall might sound like the only way out—but it’s not. Windows 10 System Restore from boot offers a smarter solution: roll back your system to a previous, error-free state without losing personal files. As long as System Restore is enabled beforehand, you can access it directly from the Windows Recovery Environment and recover your system fast—even if Windows won’t start normally. We’ve shown you how to enable it, create restore points manually, and restore your system from the boot menu. Now, you’re ready to use one of Windows 10’s most underrated yet effective troubleshooting tools. Combine this with regular backups and File History, and you’ll be far more prepared for future system issues. Don’t let crashes catch you off guard—learn to master Windows 10 system restore from boot, and stay one step ahead of disaster.
🔗 Also Read: How to Perform Windows 11 factory reset from boot