How to Do a System Restore on Windows 10
When your Windows 10 PC starts experiencing errors, crashes, or unexpected behavior after updates or software changes, knowing how to do a system restore on Windows 10 can be a lifesaver. System Restore allows you to roll back your computer’s system files, settings, and installed programs to a previous, stable state without affecting your personal documents or photos. This process can resolve many common issues caused by faulty updates, driver conflicts, or software installations. In this article, we will provide a detailed, step-by-step guide on how to do a system restore on Windows 10, whether you’re running the system normally, need to use Safe Mode, or have to restore via Advanced Startup options. With these instructions, you’ll be able to troubleshoot and recover your PC effectively, minimizing downtime and avoiding unnecessary frustration.
What Is System Restore in Windows 10?
System Restore is a built-in Windows feature that lets you revert your system to an earlier point in time—called a restore System Restore is a built-in Windows 10 feature that allows the system to revert to a previous state using restore points. These restore points capture critical system files, registry settings, installed drivers, and configuration changes made at specific times.
Windows automatically creates restore points during significant system events like updates, driver installations, or software changes. Users can also manually create restore points before making major modifications.
System Restore is primarily intended to fix issues caused by recent system changes. It is useful for troubleshooting crashes, performance problems, or instability following software or driver updates.
Affected by System Restore:
- System files
- Windows settings
- Device drivers
- Recently installed programs
Not Affected:
- Personal files (documents, photos, videos)
- User folders like Desktop or Downloads
System Restore is not a tool for recovering deleted files. For file recovery, tools like WinfrGUI—a free graphical interface for Microsoft’s Windows File Recovery—are more appropriate. If your issue relates to lost administrator rights preventing system changes, consider checking our detailed guide 4 Possible Solutions to Restore Admin Rights Windows 10.
Before You Start: What You Need to Know
Before performing a System Restore on Windows 10, ensure the following:
- System Protection is enabled: Without it, restore points won’t be created or available. Verify this in the System Properties under “System Protection.”
- Restore points exist: Windows typically creates them automatically during updates or software installations. You can also create restore points manually before making major changes.
- Backup important data: Although System Restore doesn’t affect personal files, it’s wise to back up critical data to avoid unexpected loss.
- Understand the impact: System Restore reverses recent system changes such as driver updates or software installs, which may uninstall programs added after the restore point.
- Administrative privileges: You need administrator rights to initiate a system restore.
Following these prerequisites helps ensure the restore process completes successfully and minimizes potential issues.
How to Do a System Restore on Windows 10
If your Windows 10 PC is running normally and you can access the desktop, the easiest way to perform a system restore is directly from within Windows. Follow these steps to revert your system to an earlier state:
✅ Method 1: Use System Restore Inside Windows
If your PC is still booting normally, follow these steps to restore your system:
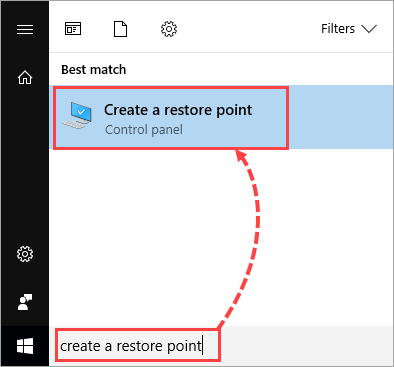
Step 1: Click the Start menu, type “Create a restore point”, and select the matching result. This opens the System Properties window focused on the System Protection tab.
Step 2: Click the System Restore… button located near the bottom of the window to start the restore wizard.
Step 3: Click Next to view a list of available restore points. Select one by checking the date and description carefully—choose a point created before you started experiencing problems.
Step 4: Click Scan for affected programs to generate a list of software and drivers that will be removed or restored by this action. This helps you anticipate changes.
Step 5: After reviewing, click Next, then click Finish to confirm and begin the process. Your PC will automatically restart, and System Restore will apply the selected settings.
Pro Tip: For added protection beyond System Restore, consider creating a dedicated recovery partition on your Windows 10 PC without needing extra software. Our detailed guide on “Windows 10 Create Recovery Partition Without Extra Tools” explains how to set this up, giving you an additional layer of safety to recover your system in critical situations.
✅ Method 2: Use System Restore in Safe Mode
If you can’t access Windows normally:
Step 1: Restart your PC. During boot, press F8 repeatedly to access the Advanced Boot Options menu. If this doesn’t work, you can hold the Shift key while clicking Restart from the login screen or Start menu.
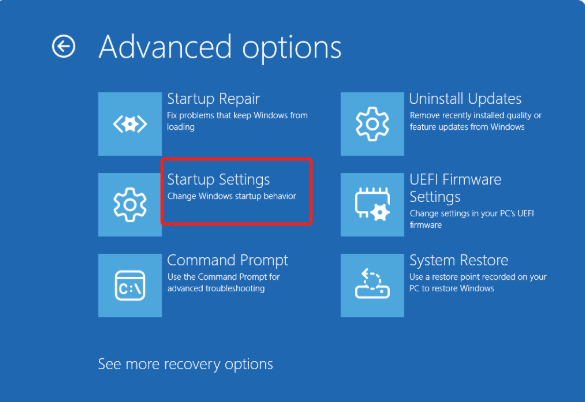
Step 2: From the recovery menu, select Troubleshoot → Advanced options → Startup Settings → Restart.
Step 3: When your PC restarts, a list of options appears. Press the number key associated with Safe Mode (usually 4 or F4).
Step 4: Once in Safe Mode, repeat the steps from Method 1: open Create a restore point from the Start menu, click System Restore, and follow the prompts to choose and apply a restore point.
✅ Method 3: Use System Restore from Advanced Startup
If Windows fails to boot entirely, you can use Advanced Startup options to perform System Restore without logging in:
Step 1: Power your PC on and off three times abruptly during boot. After the third failed attempt, Windows should automatically load the recovery environment.
Step 2: From the recovery screen, choose Troubleshoot → Advanced options → System Restore.

Step 3: Select an available restore point that predates the issue you are troubleshooting.
Step 4: Confirm your selection, and Windows will begin restoring system files and settings to the selected point.
Step 5: Allow the process to finish without interruption. Your PC will restart when done and inform you if the restore was successful.
What to Expect After a System Restore and Troubleshooting Tips
After you initiate a System Restore on Windows 10, your PC will automatically restart to apply the changes. When the process completes, a message will confirm whether the restore was successful. Keep in mind that any applications or drivers installed after the chosen restore point will be removed, as your system reverts to an earlier state. This may require reinstalling recently added software.
If the issue persists, try selecting a different restore point or consider additional troubleshooting methods. Occasionally, one restore point may not fully resolve the problem. And if you happen to lose personal files after a major reset or system change, tools covered in “Top Tools to Recover Files After a Factory Reset on Windows 11” can be a lifesaver for getting your data back quickly and safely.
When System Restore Fails
If System Restore does not work as expected, try these fixes:
- Enable System Protection: Verify that System Protection is enabled for your system drive in System Properties. Without it, restore points cannot be accessed or created.
- Boot into Safe Mode: Running System Restore in Safe Mode can bypass issues that prevent normal operation.
- Repair System Files: Use the commands sfc /scannow and DISM to scan and fix corrupted system files that may interfere with System Restore.
Need to Recover Deleted Files?
System Restore does not recover deleted personal files. If you want to retrieve deleted documents, photos, or other files, consider using WinfrGUI. It’s a free, easy-to-use graphical interface for Microsoft’s Windows File Recovery tool, designed for users who prefer not to use command-line tools.
Key features of WinfrGUI include:
- A simple, user-friendly interface suitable for beginners.
- Support for multiple file systems, including NTFS and FAT.
- Quick and deep scan modes for various recovery scenarios.
- Preview recoverable files before restoring.
- Non-destructive recovery to protect your data integrity.
By combining System Restore with tools like WinfrGUI, you can effectively fix system issues and recover lost files without hassle.
Common FAQs on Windows 10 System Restore
Q: Will System Restore delete my personal files?
A: No, System Restore only affects system files, settings, and installed programs. Your personal files such as documents, photos, and downloads remain untouched and safe.
Q: Can I undo a System Restore if it doesn’t work?
A: Yes, you can easily undo a System Restore using the same System Restore tool. This lets you revert your PC back to the state before the restore if it doesn’t fix the issue or causes new problems.
Q: How often should I create restore points?
A: Windows automatically creates restore points before significant system changes like updates or driver installations. However, it’s a good practice to manually create a restore point before installing new software or making major system changes to ensure a reliable fallback.
Q: What should I do if System Restore fails repeatedly?
A: If System Restore fails multiple times, try running it in Safe Mode or use built-in repair tools like sfc /scannow and DISM to fix corrupted system files. If problems persist, consider alternative recovery options or professional help.
Q: Does System Restore fix all system problems?
A: No, System Restore can resolve many system-related issues but not hardware failures, malware infections, or data loss. For recovering deleted files, you’ll need dedicated recovery tools like WinfrGUI.
Conclusion
Mastering how to do a system restore on Windows 10 equips you with a powerful troubleshooting option that can resolve many common system issues without risking your personal data. Whether you use the standard restore process, Safe Mode, or the Advanced Startup environment, System Restore offers a safe way to undo recent changes that disrupt your PC’s performance. However, if you face persistent problems or accidentally lose important files, relying on additional solutions like WinfrGUI for file recovery is highly recommended. This easy-to-use tool complements System Restore by helping you recover deleted files quickly and efficiently. With the knowledge and tools shared in this guide, you can confidently handle system errors and data loss, keeping your Windows 10 experience smooth and secure.
🔗 Also Read: Is It Possible to Recover Data After Windows 10 Reset?