What If I Accidentally Clicked Don’t Save On Word
We’ve all been there—hours of work gone in a second because you accidentally clicked “Don’t Save” when closing your Microsoft Word document. It’s frustrating, even panic-inducing. But don’t worry—Word includes several built-in recovery features that can help you get your work back. In this guide, we’ll explain what happens when you click “Don’t Save”, how to recover unsaved Word documents, and how to prevent data loss in the future.
What Happens When You Accidentally Click “Don’t Save” in Microsoft Word?
Accidentally clicking “Don’t Save” when closing a Word document can feel like a disaster—especially if you’ve spent hours working on something important. It’s a common mistake, and thankfully, Microsoft Word includes several recovery features to help you retrieve that lost content. When you click “Don’t Save,” Word doesn’t permanently delete everything right away. Instead, it may still retain a copy through features like AutoRecover, Unsaved Document Recovery, or even hidden temporary files. Understanding how these recovery methods work can save your day. Let’s walk through the top options and compare them to see which is best for your situation.
Word Document Recovery Options After “Don’t Save”
| Recovery Method | File Type | Where to Find It | Success Rate | Best Used For |
|---|---|---|---|---|
| AutoRecover | .asd | Word > File > Info > Manage Document | ⭐⭐⭐⭐☆ | Recently auto-saved versions |
| Unsaved Document Recovery | .asd or hidden | Word > File > Open > Recover Unsaved Docs | ⭐⭐⭐⭐☆ | Files closed without saving |
| Temporary File Recovery | .asd, .tmp | File Explorer (AutoRecover file location) | ⭐⭐⭐☆ | Older or unexpected shutdown sessions |
Each method offers a path back to your unsaved work—but some are more effective depending on your situation. If you closed Word and clicked “Don’t Save,” your best first step is to try AutoRecover, then explore the Recover Unsaved Documents feature. If those fail, digging into temporary file locations might do the trick. Want help with step-by-step instructions for each method? I can provide that next too.
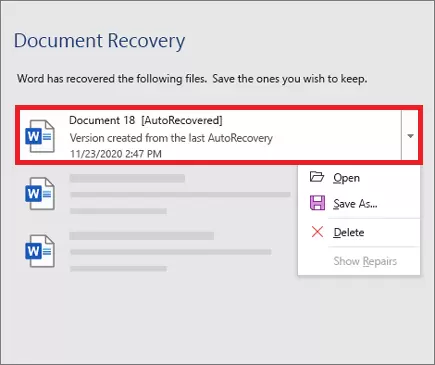
Method 1: Recover Unsaved Documents Using Word’s Built-In Recovery
Microsoft Word comes with a handy recovery option for retrieving documents that were never saved. This works well if the program closed unexpectedly or if you accidentally hit “Don’t Save.”Step-by-step are as follows:
Step 1: Open Microsoft Word (do not open or create any new files yet).
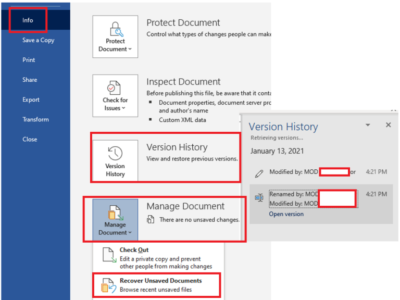
Step 2: Click the File tab in the top-left corner, and select Info.
Step 3: Click on Manage Document (or Manage Versions, depending on your version of Word).
Step 4: From the dropdown menu, choose Recover Unsaved Documents.
Step 5: A new window will appear showing a list of unsaved files (usually with the .asd file extension).
Step 6: Select the file you want to recover, click Open, and then choose Save As to store it permanently.
Do this ASAP. These unsaved files get deleted over time—especially if Word is closed and reopened multiple times.some cases. To tackle similar problems in Excel, don’t miss our article👉 7 Fixes to Accidentally Clicked Don’t Save Excel Issue
Method 2: Recover from AutoSaved Versions (AutoRecover)
If you had already saved the document once but forgot to save your latest changes, AutoRecover can come to the rescue. It stores versions at fixed intervals while you’re working—like little time machines for your doc. How to find your AutoSaved version:
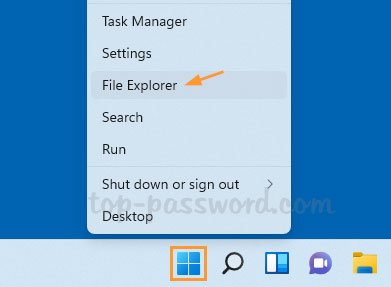
Step 1: Press Win + E to open File Explorer.
Step 2: Go to the following folder path (you can paste it directly into the address bar): C:\Users\<YourUsername>\AppData\Local\Microsoft\Office\UnsavedFiles
Replace <YourUsername> with your actual Windows username. If you don’t see the AppData folder, enable hidden items from the View tab.
Step 3: Inside the folder, you’ll see files with the .asd extension like: AutoRecovery save of Document1.asd
Step 4: Identify your file by name and date modified.
Step 5: Right-click the file and choose Open with > Word.
Step 6: If it opens successfully, immediately click File > Save As to save a permanent copy.
How to configure AutoRecover settings:
Step 1: In Word, click File > Options (bottom-left corner).
Step 2: In the Word Options window, select the Save tab on the left.
Step 3: Make sure these two checkboxes are enabled:
- ✅ “Save AutoRecover information every X minutes” (Set this to every 1–5 minutes for better protection.)
- ✅ “Keep the last AutoRecovered version if I close without saving”
Step 4: Click OK to apply and save the changes.
Even if you clicked “Don’t Save,” Word may have autosaved a version before you closed it—especially if you’re working for 10+ minutes. This method is perfect for recovering the most recent changes to an already saved file.
Method 3: Recover Word Docs from Temporary Files
If nothing shows up in Word’s built-in recovery menu, you can search for hidden temporary files created while editing documents. These are usually stored in Windows system folders. How to find temporary Word files:
Step 1: Press Win + R on your keyboard to open the Run dialog box.
Step 2: Type the following path into the Run box and press Enter:
shell:localappdata\Microsoft\Office\UnsavedFiles
Step 3: A File Explorer window will open, showing a list of unsaved Word files. These files usually have names like: AutoRecovery save of Document1.asd
Step 4: Look for your lost file by checking the file name and last modified date.
Step 5: Once you find the correct file, right-click it and choose Open with > Word.
Step 6: If the file opens successfully, click File > Save As, choose a safe location, and rename it to avoid confusion.
Alternative search paths: If the above path is empty, try these:
C:\Users\[YourUsername]\AppData\Local\TempC:\Users\[YourUsername]\AppData\Roaming\Microsoft\Word- Search manually: In File Explorer, enter
*.asdor*.tmpin the search bar and filter by date.
Do not restart or install new apps before checking these folders, or temp files could be wiped permanently. For more tips on recovering missing Word files, take a look at I Saved My Word Document but It Disappeared? Top 4 Solutions
Additional Recovery Options
If the previous methods don’t restore your lost Word documents, you still have options. First, check the AutoRecover folder thoroughly, as unsaved or temporarily saved files might be there. However, some documents may contain sensitive information that cannot be copied easily, and in such cases, professional data recovery services might be necessary. Keep in mind these services can be expensive and don’t always guarantee success. If your Word files are deleted or lost due to device errors or other reasons, using file recovery software like WinfrGUI can be a lifesaver. WinfrGUI scans your hard drive and helps recover deleted Word documents quickly and easily.
How to Use WinfrGUI in 3 Steps:
Step1: Download it from the official website and select the drive where the file was saved.
Step2: Scan for deleted Word documents using Quick or Deep Scan.
Step3: Recover and save your files to a different location.
WinfrGUI is beginner-friendly and supports recovery from various storage devices including hard drives, USB drives, and SD cards. Using this tool increases your chances of successfully recovering lost documents and helps protect your important work.
Troubleshooting FAQ: How to Prevent Data Loss in Microsoft Word
Avoiding the dreaded “Don’t Save” mistake starts with proactive habits. Below are five essential tips in FAQ format to help you prevent losing your important work in the future:
Q1: What’s the easiest way to avoid accidental data loss in Word?
Get into the habit of saving your work frequently. Use the keyboard shortcut Ctrl + S (Windows) or Command + S (Mac) to quickly save changes as you go.
Q2: Can Word automatically save my work for me?
Yes! Enable Word’s AutoSave or AutoRecover feature. You can configure the interval (e.g., every 1–5 minutes) by going to File > Options > Save.
Q3: How can I protect my documents from being lost due to system crashes?
Store your files on a cloud service like OneDrive or Dropbox. These platforms automatically save and sync your files in real time, providing a backup if your local files are lost.
Q4: Is there a way to recover older versions of a file?
If you’re using OneDrive or SharePoint, you can access Version History to restore previous versions of your document — even if you overwrote the current one.
Q5: Should I back up my files outside of Word?
Absolutely. Make it a habit to back up critical documents to an external hard drive or a cloud backup service (e.g., Google Drive, iCloud). This adds an extra layer of protection in case of hardware failure or accidental deletion.
Conclusion
Accidentally clicked “Don’t Save” on Word? Don’t panic—your work might not be lost forever. Microsoft Word offers several built-in recovery features, including AutoRecover, unsaved document recovery, and temporary file recovery. These tools can often retrieve your lost content, especially if you act quickly before the temporary files are overwritten. While these methods are helpful, prevention is always better than cure. To avoid future stress, make a habit of saving your work regularly, adjusting Word’s autosave settings for shorter intervals, and backing up important documents using cloud storage or external drives. Mistakes happen—we’ve all clicked “Don’t Save” by accident—but with the right tools and preparation, you can reduce the risk of permanent data loss and keep your work safe. Use recovery methods wisely, and consider installing recovery software like WinfrGUI for extra peace of mind when built-in options fall short.
🔗 Also Read: 10 Solutions to Microsoft Word Not Responding Not Saved Issue