How to Recover Lost Word Document: 6 Easy Solutions

Accidentally losing a Word document can be stressful, especially when important work or personal files are at risk. Whether you’ve forgotten to save, deleted by mistake, or lost the file due to a system crash, knowing how to recover lost word documents can save you time and frustration. Thankfully, there are several methods to help retrieve your lost files, from built-in Word features to advanced data recovery tools. In this article, we’ll explore 6 proven solutions to recover your documents, offering step-by-step instructions for each method. By the end of this guide, you’ll be equipped with the knowledge to recover your lost Word documents and protect yourself from future data loss. Let’s dive in and restore your valuable work!
2025 Backup&Recovery Metrics
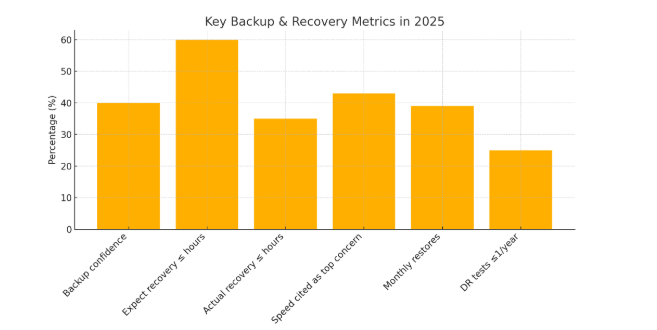
According to Unitrends’ State of Backup and Recovery Report 2025, just 40% of organizations feel confident in their current backup systems, yet 60% believe they could recover from downtime within hours—even though only 35% actually meet those recovery expectations. A 2025 Infrascale study shows 43% of MSPs cite data recovery speed as their top concern and 39% of IT decision‑makers perform data restores at least monthly, while Unitrends also reports 25% of organizations test their disaster‑recovery plans once a year or less, underscoring a preparedness gap.
With these metrics in mind, let’s explore six proven recovery solutions—ranging from built‑in Word features to advanced third‑party tools—that will equip you to restore your documents quickly and confidently.
Solution 1. Check AutoRecover Files in Microsoft Word
Microsoft Word’s AutoRecover feature is designed to save a temporary version of your document while you work, making it easier to get how to recover lost word documents. Here’s how to access AutoRecover files:
Step 1: Launch the Microsoft Word application on your computer.
Step 2: In the top-left corner, click the File tab to access the backstage view.
Step 3: From the left-hand menu, choose Info to see document options.
Step 4: Under the Manage Document section, click the drop-down menu to reveal recovery options.
Step 5: Select “Recover Unsaved Documents”. This will open a folder containing recently unsaved Word files.
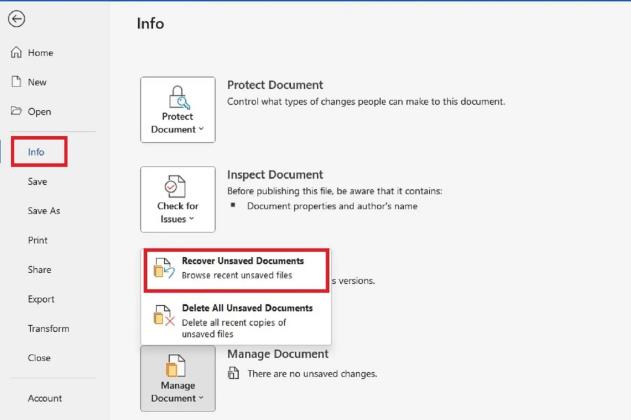
Step 6: If you see the unsaved file you need, open it, then immediately click Save As to avoid losing it again.
Using AutoRecover is an effective way to retrieve unsaved word documents. Be sure to enable AutoSave in Word’s settings for added protection.
Solution 2. Restore from the Recycle Bin
If you’ve accidentally deleted your word document, it might be in the Recycle Bin. Here’s how to recover it:
Step 1: Double-click the Recycle Bin icon on your desktop to open it.
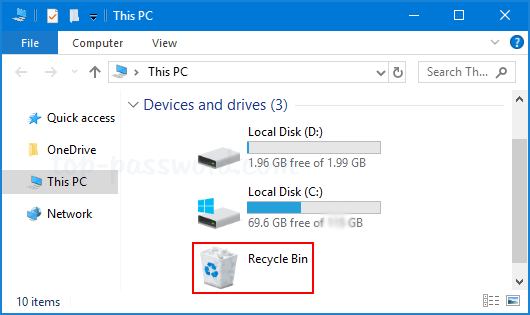
Step 2: Browse through the files to find the deleted Word document you want to recover.
Step 3: Right-click on the document you wish to restore.
Step 4: Click Restore to recover the file to its original folder on your computer.
This is an easy and quick way to recover deleted documents before they’re permanently erased.
Solution 3. Use Previous Versions or File History
Windows’ Previous Versions or File History feature allows you to restore earlier versions of documents. Follow these steps to recover your lost Word file:
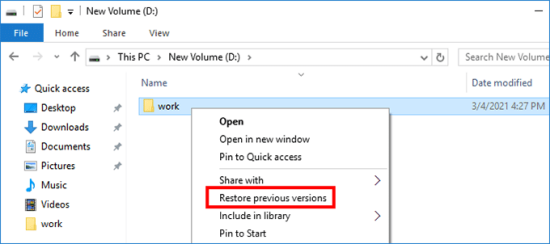
Step 1: Right-click the Folder: Open File Explorer and navigate to the folder that previously contained your lost Word document.
Step 2: Select Restore Previous Versions: Right-click the folder and select Restore previous versions from the context menu.
Step 3: Choose a Version: A list of available previous versions will appear. Browse through the versions and select one that likely contains your document.
Step 4: Preview and Restore: Click Open to preview the document. If it’s the correct version, click Restore to recover it to its original location.
Note: This method works only if File History or System Restore was previously enabled. Make sure to enable these features for future protection.
Solution 4. Recover Unsaved Documents Using Temporary Files
If you forgot to save your document, you can attempt to recover it from temporary files. Follow these steps:
Step 1: Open File Explorer: Press Windows + E to open File Explorer.
Step 2: Go to C:\Users\YourUsername\AppData\Local\Microsoft\Office\UnsavedFiles. (Replace “YourUsername” with your actual username.)
Step 3: Look for Temporary Files: Search for .asd or .tmp files, which are temporary versions of unsaved documents.

Step 4: Open the File in Word: Double-click the file to open it in Microsoft Word.
Step 5: Save the Document: Once the document is open, save it immediately to avoid losing it again.
This method works if the document was temporarily saved by Word but never officially saved by you.
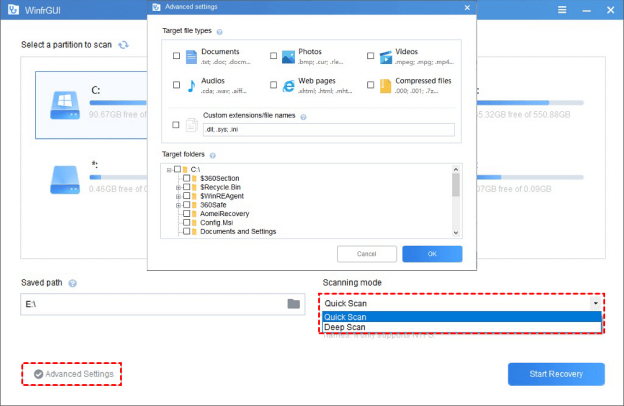
Solution 5. Use Data Recovery Software
If the usual methods don’t work, don’t worry — third-party tools like WinfrGUI can come to the rescue. It’s a free and easy-to-use data recovery software that helps you recover permanently deleted documents, even those missing from the Recycle Bin. With WinfrGUI, you get a powerful recovery option without spending a dime. Here’s how:
Step 1: Download WinfrGUI and install the software on your computer.
Step 2: Launch the Program: Open the software and select the drive where the lost document was stored.
Step 3: Scan for Deleted Files: Start a quick scan to search for permanently deleted files, including Word documents.
Step 4: Preview and Recover: Once the scan is complete, preview the recovered files. Select your Word document and click Recover.
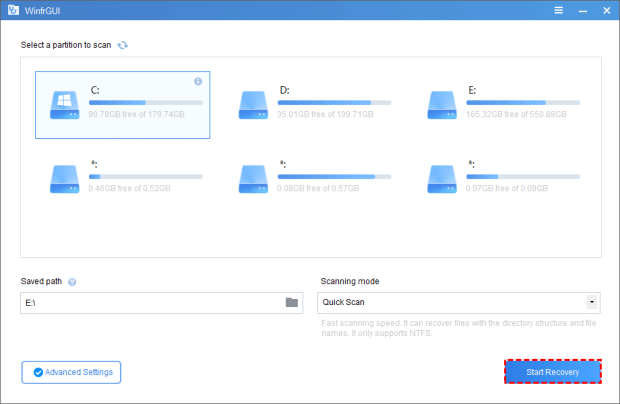
Step 5: Save the Recovered File: Save the restored document to a different drive to avoid overwriting any data.
Data recovery software is a last-resort option but can be highly effective if used quickly after data loss.
Solution 6. Enable AutoSave and AutoRecover for Future Protection
To avoid losing important documents in the future, enable AutoSave and AutoRecover features in Microsoft Word:
Step 1: Open Word Settings: Click File > Options.
Step 2: Enable AutoSave: Under the Save tab, check the box for AutoSave OneDrive and SharePoint Online files by default (if using OneDrive or SharePoint).
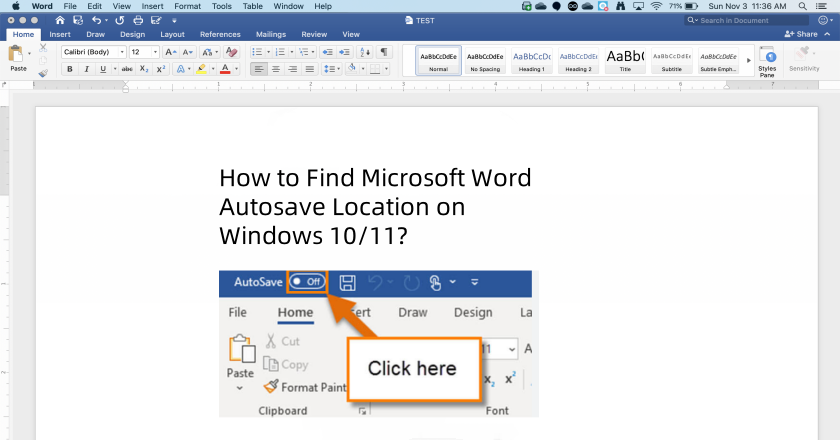
Step 3: Enable AutoRecover: Ensure the Save AutoRecover information every X minutes option is checked. Set the interval to your preference.
Step 4: Save Work Regularly: In addition to AutoRecover, make a habit of manually saving your documents using Ctrl + S or the Save icon.
Step 5: Backup to Cloud: Regularly back up your files to cloud services like OneDrive, Google Drive, or an external drive to further protect your documents.
These steps provide extra layers of protection on how to recover lost word documents, reducing the risk of data loss in the future.
How to Recover Lost Word Documents FAQs
If you have further questions or encounter Word recovery problems, refer to the following FAQs:
Q1. How do I recover a lost Word document from Windows 10?
A: Follow these steps: Click the “File” tab, choose “Info”, then select “Manage Documents”. Select “Recover Unsaved Documents” from the drop-down menu. Open the selected document and click “Save As” to save your Word document.
Q2. How to retrieve lost Word documents from USB?
A: If you have unsaved changes to a Word document stored on a USB drive, you can recover your work in two ways. Firstly, try opening the document from the Recent Documents list in Microsoft Word. Alternatively, you can search for the Autosave folder on the USB drive. If you find the file, open it in Word to recover your work.
Q3. How to retrieve a lost Word document in Word 2016?
A: Try the following methods to restore lost Word documents in Word 2019, 2016, 2013, or 2010: check your recently opened documents, try opening a temporary file, or use the AutoRecover tool.
Q4. Where are lost Word files stored?
A: You can find these Word files by going to “File” > “Open” and clicking the “Recover Unsaved Documents” button at the bottom of the Recent File List.
Final Thoughts
In conclusion, this tutorial provides five methods on how to recover lost word documents on windows devices. With the assistance, you can recover lost, unsaved, and deleted word files without relying on word backup files. Remember to create backup copies of your Word documents to prevent future data loss.
🔗 Also Read: How to View Previous Versions of Word Document?