[Fixed] I Accidentally Clicked Don’t Save on Microsoft Word

I accidentally clicked “Don’t Save” on Microsoft Word — is my document gone forever? Don’t panic. This is one of the most common accidents users face, and thankfully, Microsoft Word provides several built-in recovery features to help. Whether you closed the file without saving, Word crashed, or your PC restarted unexpectedly, you still have a good chance of getting your work back. In this guide, we’ll show you how to recover unsaved Word documents after clicking “Don’t Save,” using options like Recent Documents, AutoRecover, and even temporary files. And if those don’t work, you can use WinfrGUI, a free file recovery tool, to recover deleted Word files in just a few clicks. These solutions work on all modern versions of Word (2003 to 2021) and are compatible with Windows 10, 8, 7, Vista, and XP.
Can You Recover a Word Document After Clicking “Don’t Save”?
Yes — if you’ve ever thought, “I accidentally clicked ‘Don’t Save’ on Microsoft Word,” you can often still get your document back. Microsoft Word has built-in safety nets like AutoRecover and Version History that quietly save backup copies of your work behind the scenes. These features are designed to help you recover unsaved files in just a few simple steps. And if those don’t work, don’t worry — you can still try other methods, like using a file recovery tool such as WinfrGUI to recover temporary or deleted versions of your document. Let’s walk through how to get your lost Word file back, step by step.
Why Word Documents Get Lost Without Saving
Before we dive into recovery solutions, it’s helpful to understand how this situation usually happens. Here are the most common reasons people lose Word files without saving:
- You accidentally clicked “Don’t Save” while closing the document — an easy mistake when rushing or multitasking.
- Microsoft Word or your computer crashed before you could hit Save.
- Unexpected power loss or shutting down the wrong window.
- AutoSave wasn’t enabled, so Word didn’t create continuous backups.
Whatever the cause, Word typically leaves behind temporary backup files that you can recover — if you know where to look. And if those aren’t available, third-party recovery tools can often step in to help.
3 Effective Ways to Recover Unsaved Word Documents
Word actually has some neat built-in tricks to help you get your work back. I’m gonna walk you through three easy ways to recover your unsaved file, starting with the quickest and simplest one.
Solution 1: Recover Unsaved Word Files via Recent Documents (Word 2013 and Newer)
If you accidentally closed a Word document without saving it, don’t worry — Microsoft Word often keeps a temporary backup that you can retrieve through the Recent Documents section. Here’s how to do it:
Step 1: Open Microsoft Word. Launch Word from your desktop, Start menu, or taskbar.
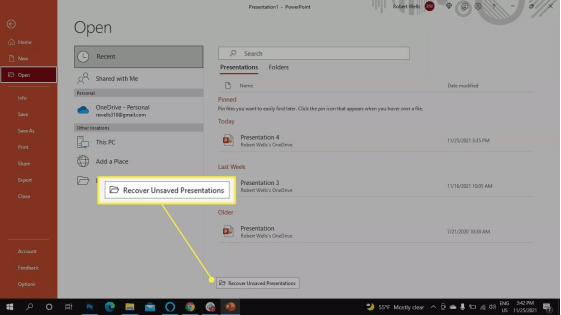
Step 2: Go to File > Open > Recent. This will show a list of documents you’ve recently worked on.
Step 3: Click “Recover Unsaved Documents”. Scroll to the bottom of the Recent Documents list — you’ll see this option in small text. Click it.
Step 4: Browse the AutoRecover folder. A new File Explorer window will open, showing any available unsaved files (usually with an .asd extension).
Step 5: Select the file and click Open. Word will open the unsaved version of your document in a new window.
Step 6: Go to File > Save As. Manually save the file to a secure location with a new name so you don’t lose it again.
This method only works for recently closed unsaved files. Act quickly before Word deletes the temporary file.
Solution 2: Recover a Word Document Using Version History
If you saved the document at least once before losing changes, you may be able to roll back to an earlier version using Word’s Version History feature — especially if you’re using OneDrive or SharePoint.
For Documents Saved to OneDrive or SharePoint (Word 2016+):
Step 1: Open the saved Word document. Locate the file you last saved — even if it’s missing the latest edits.
Step 2: Click File > Info > Version History. This will open a list of previously saved versions stored in the cloud.
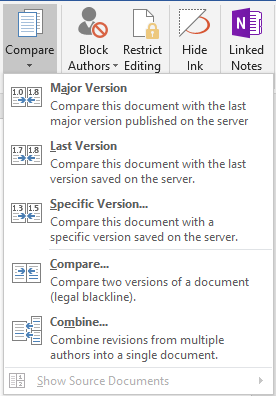
Step 3: Click “Open version” next to the one you want to review. Word will launch the older version in a separate window so you can check the contents.
Step 4: Go to File > Save As. Save this version under a new file name to preserve both the current and recovered versions.
Not Using OneDrive or SharePoint?
No problem — Word still offers a way to recover unsaved versions locally.
Step 1: Go to File > Info > Manage Document > Recover Unsaved Documents.
Step 2: Click Open, then immediately go to File > Save As to save it permanently.
Compatibility Note: This method works in Office 2010 and newer versions, but cloud-based version history is available only if the file is saved to OneDrive or SharePoint.
Solution 3: Restore Unsaved Word Files from Temporary Files (AutoRecover)
Microsoft Word’s AutoRecover feature automatically saves backup copies of your documents in hidden folders. This can be a lifesaver if Word crashes or you accidentally close a file without saving. Here’s how to find and restore those temporary files:
Step 1: Open Word and go to File > Options
Step 2: Find and copy the AutoRecover file location. Under the “Save documents” section, look for AutoRecover file location. Copy the folder path listed there (it usually looks something like C:\Users\[YourName]\AppData\Roaming\Microsoft\Word\).
Step 3: Open File Explorer and paste the copied path into the address bar, then press Enter. This will take you to the folder where Word stores temporary AutoRecover files.
Step 4: In this folder, search for any files ending with .asd. These are your AutoRecover files. If you spot one that matches your missing document’s name or approximate save time, that’s likely your unsaved Word file.
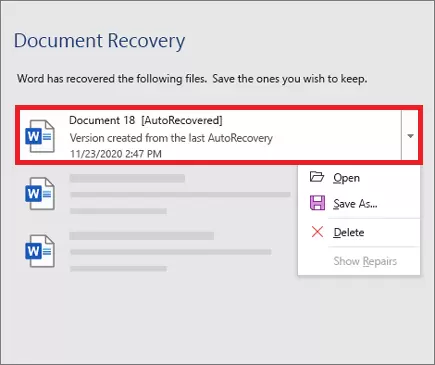
Step 5: Back in Word, click File > Open, then at the bottom of the window, click Recover Unsaved Documents.
Step 6: Browse to the location where you found the .asd file, select it, and click Open. Word will open the recovered document in a new window.
Step 7: Finally, go to File > Save As and save your document to a permanent location. Be sure to give it a new name or save it somewhere different to avoid accidentally overwriting your original file.
Common AutoRecover locations:
C:\Users\[YourName]\AppData\Roaming\Microsoft\Word\C:\Users\[YourName]\AppData\Local\Microsoft\Office\UnsavedFiles\
If the file doesn’t open correctly or shows an error message, go to File > Open and choose the file again. In the Open window, click the drop-down arrow next to the Open button and select Open and Repair to attempt repairing the document before opening it.
When Built-in Recovery Fails: Use WinfrGUI
If none of Word’s built-in recovery features — like AutoRecover or Version History — can bring back your unsaved document, don’t give up just yet. It’s still possible that the file is sitting on your drive, waiting to be recovered. This is especially true if the file was lost due to accidental deletion, formatting, corruption, or a system crash. That’s where WinfrGUI comes in. It’s a free and beginner-friendly Windows file recovery tool that brings the power of Microsoft’s Windows File Recovery tool into a simple, click-based interface. No coding, no command-line — just scan, preview, and recover.
How to Recover a Deleted Word Document with WinfrGUI:
Step 1: Download WinfrGUI and select the drive or folder where your document was last saved. Then, click Scan.
Step 2: Wait for the scan to complete. Click Documents in the file type filter sidebar to narrow down the results. Preview files to spot your missing Word document.
Step 3: Select your document, click Start Recovery, and save it to a different folder or external drive — never the original location to avoid overwriting.
To increase your chances of a successful recovery, avoid using the drive where the file was lost until after the recovery process is complete. Any new activity—like saving files or installing apps—can overwrite the deleted data and make it harder (or impossible) to recover.
Frequently Asked Questions
❓ 1. Can I recover a Word document after clicking “Don’t Save”?
Yes! Use Word’s Recover Unsaved Documents feature, check the AutoRecover folder, or try a recovery tool like WinfrGUI. Your file is often still on your PC.
❓ 2. How do I enable AutoSave to avoid losing work in the future?
Go to File > Options > Save in Word, then check:
- “Save AutoRecover information every X minutes” (2–10 minutes recommended)
- “Keep the last autosaved version if I close without saving”
Click OK to save your settings.
❓ 3. Can I recover Excel or PowerPoint files the same way?
Yes. Both Excel and PowerPoint have AutoRecover. Check under File > Info > Manage Versions or look in the AutoRecover folders for unsaved files.
❓ 4. What if Word crashes—how do I recover my files?
Restart Word; it may automatically open recovered files. If not, try starting in Safe Mode, disabling Add-ins, or repairing Office via Control Panel.
❓ 5. Is it possible to recover files deleted due to formatting or corruption?
Yes, but built-in recovery won’t help. Use a free tool like WinfrGUI to scan your drives and recover deleted Word or Office files.
❓ 6. Can I batch recover multiple unsaved or deleted documents?
Unfortunately, batch recovery isn’t supported for unsaved files—you’ll need to recover each document individually.
Conclusion
So, if you’ve ever found yourself whispering in frustration, “I accidentally clicked Don’t Save on Microsoft Word,” don’t panic—you’re definitely not alone, and there’s a good chance your document can still be recovered. Start by exploring Word’s built-in tools: check the Recent Documents list, dive into the AutoRecover folders, and review the Version History if your file was saved at least once. These features often save the day. If those options don’t bring your document back, don’t lose hope. Professional recovery tools like WinfrGUI can scan deeper and help retrieve your lost Word file quickly and easily. And to prevent future heartaches, make sure to enable AutoSave—it’s a simple setting that regularly backs up your work without you even noticing. Accidents happen, but with the right know-how and tools, your hard work doesn’t have to disappear.
🔗 Also Read: How to Recover PowerPoint File Not Saved