How to Recover Replaced Files After Accidental Overwrite
Accidentally overwriting or replacing important files can feel like a nightmare, especially when you don’t have a backup handy. If you’ve ever found yourself wondering how to recover replaced files after saving over them by mistake, you’re not alone. Luckily, recovering replaced files is often possible if you act quickly and use the right methods. In this article, we’ll guide you through the best techniques to recover replaced files after accidental overwrite, whether you’re using Windows, Mac, cloud services, or specialized recovery tools.
How File Overwrite Happens and Common Causes of Accidental Replacement
When a file is overwritten, the new data is written over the original file’s storage space on your hard drive or SSD. This means the previous version might be partially or fully lost, depending on how much of the original data was overwritten. However, the overwritten data isn’t always immediately erased — sometimes fragments remain, giving data recovery tools a chance to restore your files.
Understanding this process is key because it explains why recovering replaced files is possible but also why it can be complicated. The success of recovery depends on factors like how soon you attempt recovery after overwrite and the specific way your file was replaced.
Common scenarios that lead to accidental file overwrite include:
| Scenario | Description | Impact on Recovery Chances |
|---|---|---|
| Saving over an existing file | Editing and saving a document with the same filename | Moderate – original data partly overwritten but some recoverable |
| Copy-pasting files with identical names | Replacing files in a folder by confirming overwrite | Moderate to low – depends on file size and overwrite method |
| Software auto-save conflicts | Auto-save features overwrite previous versions | Moderate – depends on how software saves data |
| Version confusion | Mistakenly replacing newer files with older versions | Moderate to low – recovery depends on timing and backup availability |
Acting quickly is critical because every new file saved or operation performed on the drive may overwrite the sectors where your replaced files reside, reducing recovery chances.
Methods to Recover Replaced Files
Recovering replaced files after accidental overwrite can be approached from several angles, depending on your system setup and available tools. Below are the most effective methods with detailed steps and tips:
1. Using File History or System Restore (Windows)
Windows offers native tools that may help you restore previous versions of files without needing additional software.
What is File History?
File History is a Windows feature that automatically backs up versions of your files stored in Documents, Pictures, Music, Videos, and Desktop folders to an external drive or network location. When enabled, it regularly saves copies of your files, allowing you to restore previous versions if you accidentally overwrite or delete a file.
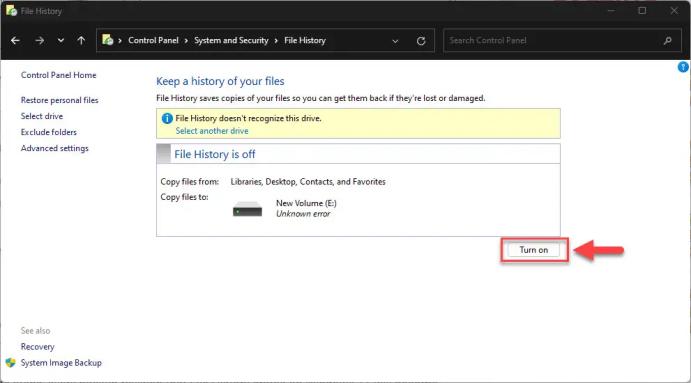
How to Restore Replaced Files Using File History:
- Go to the folder where the original file was saved — or right-click the file itself if the overwritten version is still there.
- From the right-click menu, choose Properties, then click the Previous Versions tab. You’ll see a list of older versions created by File History or System Restore.
- Look through the list and pick a version dated before the file was replaced. You can click Open to preview it before restoring.
- Click Restore to replace the current file with the older version. Or choose Copy if you want to save the older version somewhere else and keep both copies (this is usually the safer option).
How to Use System Restore:
- Click the Start button and type “System Restore.” Select Create a restore point from the search results to open the System Properties window.
- In the System Properties window, click the System Restore button. This launches a wizard that guides you through selecting a restore point.
- You’ll see a list of restore points, each representing a snapshot of system files and settings from specific dates. Choose one created before the accidental overwrite.
- Confirm your selection and let Windows restart to apply the restore. Note that this process will roll back system files and settings but will not recover user documents directly.
Tips:
- Ensure File History is enabled to avoid future data loss.
- Regularly back up important folders to external drives.
2. Recovering from Mac’s Time Machine
Mac users benefit from Time Machine, a comprehensive backup system that can restore files to previous states.
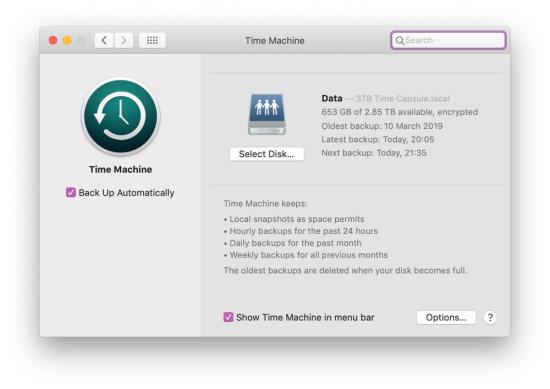
Steps:
- Before you open Time Machine, first go to the folder where your file was originally saved — the one that got replaced or lost. This way, Time Machine will show you the exact versions for that specific location.
- Next, look for the Time Machine icon — a small clock with a counter-clockwise arrow — in the menu bar at the top of your screen. Don’t see it? You can turn it on by opening System Preferences, clicking Time Machine, and checking “Show Time Machine in menu bar.”
- Click the icon and choose Enter Time Machine. Your screen will change, showing the current folder with a timeline on the right side. That timeline lets you go back through different snapshots of your files.
- Use the arrows or scroll through the timeline until you land on a date before the file was replaced. As you move through time, the contents of the folder will update to show how it looked back then.
- Once you spot the version of the file you want, click it to select it, then hit the Restore button. Time Machine will bring that version back to where it originally was on your Mac.
Tips:
- Set up Time Machine backups to an external drive regularly.
- If the file was saved in iCloud Drive, check iCloud’s version history via the web interface.
3. Using Data Recovery Software
When backups or built-in restore options aren’t available, specialized recovery software offers a powerful solution. WinfrGUI — A Recommended Tool: WinfrGUI is a free, easy-to-use recovery program based on Microsoft’s Windows File Recovery engine, designed specifically for Windows users.
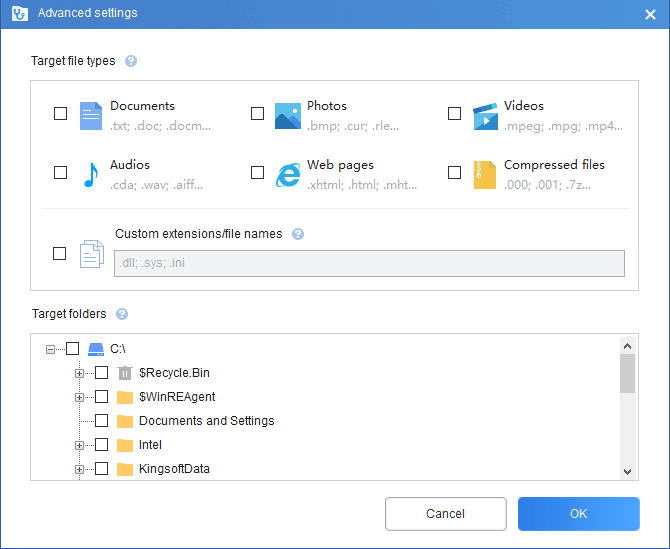
Key Features:
- Supports multiple recovery modes, including default, segment, and signature modes, for different file types and overwrite scenarios.
- Allows scanning for recoverable files on internal and external drives.
- Provides file preview before recovery to help you confirm what you’re restoring.
How to use WinfrGUI for recovering replaced files:
- Download and install WinfrGUI from its official website.
- Launch the program and select the drive where the replaced file was located.
- Choose the recovery mode — for overwritten files, the Segment Mode is often effective.
- Start the scan, which may take time depending on drive size.
- Browse the results, preview files, and recover them to a different drive.
Tips:
- Avoid installing the software or saving recovered files to the affected drive to prevent further data loss.
- Use the preview feature to ensure you recover the correct versions.
4. Checking Cloud Backup Services
Many users rely on cloud storage services like OneDrive, Google Drive, and Dropbox, which maintain version history automatically.
How to recover replaced files from cloud:
OneDrive:
- Visit the OneDrive website and sign in with your Microsoft account.
- Navigate through your folders or use the search function to find the file you want to recover.
- When you right-click (or click the three dots next to the file), an option called Version history will appear.
- OneDrive shows a list of previous file versions, complete with timestamps and editor names (if applicable).
- Select the version of the file before it was overwritten and click Restore. The restored version will replace the current file but older versions will still be available if needed.
Google Drive:
- Log in to your Google account and open Google Drive. Find the file either by browsing or using the search bar.
- For Google Docs, Sheets, or Slides, open the file in its respective editor. For other file types, select the file with a single click.
- For Google Docs, Sheets, or Slides: Click File > Version history > See version history.
- For other files: Click the three-dot menu next to the file and select Manage versions.
- Google Drive displays all saved versions, showing who edited the file and when.
- Click the three-dot menu next to the chosen version and select Restore this version.
Dropbox:
- Visit Dropbox.com and log in with your credentials.
- Use the sidebar or search tool to find the specific file.
- Then, look for the Version history option, usually accessible from the file’s options menu (three dots or right-click).
- Dropbox will list earlier versions with modification dates.
- Choose the appropriate version and click Restore. This will replace the current file with the selected one.
Tips:
- Enable automatic backup syncing for critical folders.
- Regularly check cloud settings to ensure version history is active.
5. Professional Data Recovery Services (When All Else Fails)
If software tools don’t recover your files or if the data is highly valuable, professional data recovery services may be your last resort.
Expertise and Specialized Equipment
Professional data recovery companies use advanced techniques and state-of-the-art equipment to recover files from physically damaged storage devices, such as:
- Hard drives with mechanical failures (e.g., clicking sounds, motor issues)
- SSDs with firmware corruption or NAND chip problems
- Flash drives or memory cards suffering from severe logical damage or corruption
- Drives exposed to water, fire, or physical trauma
They operate cleanroom environments—dust-free labs that allow technicians to safely open and repair delicate storage devices without further contamination or damage.
Tips:
- Stop using the drive immediately if you suspect physical damage.
- Research reputable recovery services with proven track records.
- Ask about costs upfront and chances of success.
Conclusion
Knowing how to recover replaced files after accidental overwrite can save you from losing valuable data. Whether you rely on built-in features like Windows File History, Mac’s Time Machine, cloud backups, or powerful tools such as WinfrGUI, there are effective ways to restore your files. The key is to act promptly and avoid further overwriting. By following the steps outlined here and adopting good backup habits, you can prevent future data loss and confidently recover replaced files whenever accidents happen.
Also Read👉How to Recover an Overwritten Excel File Without Previous Versions