How to Compress a Folder Without Losing Data [2025]
Ever tried to send a folder full of files via email, only to get hit with the dreaded “file too large” error? Or maybe your hard drive is running out of space, and you’re looking for ways to free some up without deleting anything important. If that sounds familiar, you’re not alone — and the solution is simpler than you might think.
In this 2025 guide, we’ll show you exactly how to compress a folder without losing data, no matter what operating system you’re using. Whether you’re on Windows or Mac, or prefer using third-party software like 7-Zip or WinRAR, this tutorial covers it all. And best of all — compressing folders the right way won’t corrupt your files or cause data loss.
Let’s get started.
What Does It Mean to Compress a Folder?
Before we jump into the how-to, let’s break down what compression actually does.
When you compress a folder, you’re using a process called lossless data compression to reduce the overall size of the files inside. That means the folder is “shrunk” into a smaller archive file — like a .zip or .rar — without actually changing the contents of the files. Everything stays intact. When you extract or unzip the folder later, the files return to their original state.
Common compressed file formats include:
.zip(most widely used, built-in support on both Windows and macOS).rar(popular with WinRAR users, supports encryption and high compression).7z(created by 7-Zip, offers high compression ratio)
So, in short: compression ≠ deletion or data loss. It’s simply a smarter way to package your files.
Will I Lose Data If I Compress a Folder?
This is one of the biggest fears users have — and it’s a myth.
✅ Compression is safe as long as you’re using trusted tools and following basic precautions.
Here are the only real scenarios where you might run into problems:
- You’re using untrusted or corrupted compression software.
- The process is interrupted (e.g., power outage, crashing system).
- You overwrite or delete the original folder without verifying the compressed file works.
To stay safe, always:
- Use reliable, well-known tools (like Windows’ built-in feature, 7-Zip, or WinRAR).
- Back up your original folder before compressing, especially if it contains sensitive data.
- Test your compressed archive by opening it after the process is done.
If you ever accidentally delete a folder during this process or while managing files, check out my detailed guide on 4 Methods to Recover Accidentally Deleted Folder on Computer. It covers proven ways to get your files back quickly and safely.
I’ve personally used compression tools for over 10 years — everything from sharing large design files with clients to backing up projects before upgrades — and I’ve never experienced data loss when done correctly.
Method 1: How to Compress a Folder on Windows (No Extra Software Needed)
If you’re using Windows 10 or Windows 11, you’re in luck — both versions come with a built-in ZIP compression tool that lets you compress folders without needing to install anything extra. This is a fast and reliable way to reduce folder size for storage or sharing, especially for users who prefer simplicity.

✅ Step-by-Step Instructions:
Step 1: Open File Explorer and find the folder you want to compress. It could be on your desktop, in your Documents folder, or anywhere else on your PC.
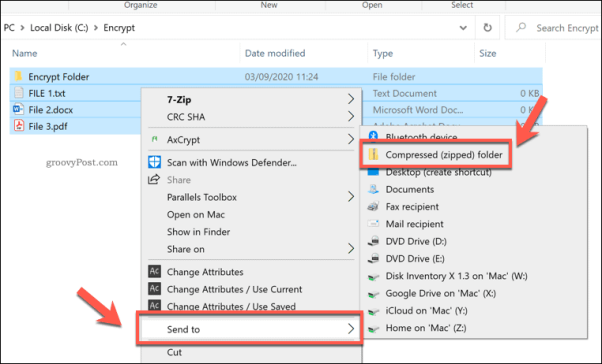
Step 2: Right-click the folder. This will bring up a menu with several options.
Step 3: Hover over “Send to” in the menu. A side list will pop out.
Step 4: Click “Compressed (zipped) folder.” Windows will start creating a ZIP file of the folder.
Step 5: You’ll see a new file appear in the same location, ending in .zip. Feel free to rename it if you want.
Step 6: That’s it! Your folder is now zipped and ready to be emailed, stored, or shared.
Need help opening that ZIP file later? Check out this quick guide: How to Open a Zip File on Windows: Free & Quick Methods
📝 Pro Tips for Windows Compression:
- Close Programs Using Files in the Folder: If any files in the folder are open in Word, Excel, or another app, close them first to avoid interruptions or errors.
- Rename the Archive: Give the ZIP file a meaningful name, especially if you’re sending it to someone else. For example:
project_docs_April2025.zip. - No Password Support by Default: Windows doesn’t let you set a password for ZIP files using the built-in tool. If you need encryption or password protection, consider using 7-Zip or WinRAR.
⚠️ What If You Accidentally Delete the Folder?
Accidentally deleting the original folder during or after compression happens more often than you might think — especially when reorganizing files. If this occurs, don’t worry.
WinfrGUI is a free, easy-to-use recovery tool for Windows that can quickly restore deleted folders and files from NTFS drives. Its intuitive interface and powerful recovery engine make retrieving lost data simple and reliable — a true lifesaver when important files go missing unexpectedly.
Method 2: How to Compress a Folder on macOS
Mac users also have a built-in compression feature that’s fast, secure, and easy to use. Whether you’re using macOS Ventura, Sonoma, or earlier versions, the compression process is nearly identical.
✅ Step-by-Step Instructions:
Step 1: Open Finder and go to the folder you want to compress.
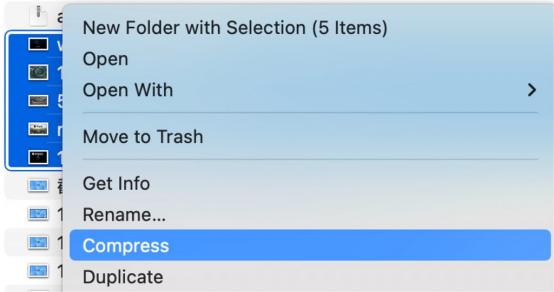
Step 2: Right-click the folder. If you don’t have a right-click button, just hold the Control key and click the folder.
Step 3: From the menu that appears, select “Compress [folder name]” — for example, “Compress Marketing_Assets.”
Step 4: macOS will create a ZIP file in the same location with the same name as your folder, but with a .zip extension.
The resulting ZIP file can be emailed, uploaded, or stored as needed. macOS’s native ZIP format is fully compatible with Windows systems, making it perfect for sharing files between platforms.
📝 Extra Tips for macOS Users:
- File Compatibility: The ZIP files created on Mac are 100% readable on Windows PCs — no extra software is needed for the recipient.
- Batch Compression: You can also select multiple folders or files, right-click, and choose “Compress” to create a single archive containing everything.
- Limited Compression Settings: macOS doesn’t offer compression level adjustments or encryption natively. For more control, you’ll need a third-party tool.
Method 3: How to Compress a Folder Using 7-Zip, WinRAR, or PeaZip
If you need advanced features like stronger compression, password protection, or custom archive formats, third-party compression tools are the way to go. Among the most popular are 7-Zip, WinRAR, and PeaZip — all of which are free or offer free versions.
How to Compress a Folder with 7-Zip (Best for Power Users)
7-Zip is a free, open-source file archiver that supports a wide range of formats and offers superior compression ratios.
✅ Steps:
Step 1: Visit 7-zip.org and download the version that matches your system. Install it following the prompts.
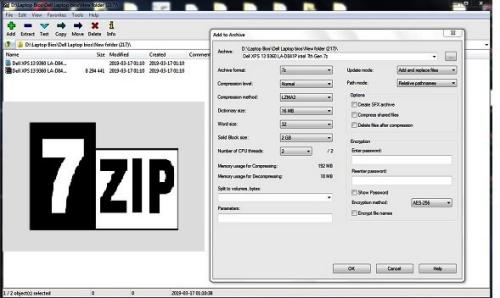
Step 2: Once installed, find the folder you want to compress. Right-click it, then choose 7-Zip > Add to archive…
Step 3: In the window that pops up, you can customize your compression:
- Archive Format: Pick .zip for universal compatibility or .7z for better compression.
- Compression Level: Choose Normal, Maximum, or Ultra depending on how much you want to shrink the file.
- Encryption (optional): Set a password and enable filename encryption if you want to keep your files extra secure.
Step 4: Click OK, and 7-Zip will create the compressed archive right next to your original folder.
How to Compress a Folder with WinRAR (Great for RAR Format)
WinRAR is another powerful tool, known especially for its proprietary .rar format, which allows better compression for certain file types.
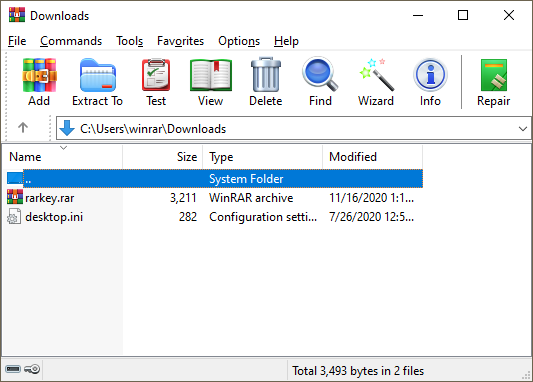
✅ Steps:
Step 1: Go to rarlab.com and download the version of WinRAR that fits your system. Install it like any other program.
Step 2: Right-click the folder you want to compress and select “Add to archive…” from the menu.
Step 3: In the settings window, customize your archive:
- Archive Format: Choose between .rar (default) or .zip.
- Compression Method: Pick from Normal, Good, Best, etc., depending on how much you want to compress.
- Split Archive: Use this if you want to split large folders into smaller parts for easier sharing.
- Set Password: Click the “Set password…” button to add encryption and protect your files.
Step 4: Hit OK, and WinRAR will create the compressed file according to your choices.
How to Compress a Folder with Password Protection (Using PeaZip)
If your folder contains confidential or sensitive files — such as business contracts, client data, or personal records — adding a password to your compressed file is a smart move. While Windows and macOS don’t offer this by default, 7-Zip makes it easy.
Protecting Your ZIP File with 7-Zip:
If your folder includes sensitive data — like business documents, financial records, or private media — adding a password is a great way to protect it. Unlike Windows or macOS, which don’t offer built-in encryption, PeaZip lets you compress and secure your files with ease.
Protecting Your ZIP File with PeaZip:
Step 1: Right-click the folder you want to compress.
Step 2: Choose PeaZip > Add to archive from the menu.
Step 3: In the archive window, pick the format you want (like .zip or .7z).
Step 4: Find the Encryption section and enter your password twice.
Step 5 (Optional): Check “Encrypt file names” if you want to completely hide what’s inside the archive.
Step 6: Click OK to create your compressed, password-protected file.
Important: If you forget the password, there’s no built-in way to recover the files. Always store it securely in a password manager or safe place.
Best Practices to Avoid Data Loss While Compressing Folders
Although compressing folders is safe, there are a few best practices to follow to ensure nothing goes wrong.
Do This:
- ✔️Always keep a copy of the original folder somewhere safe before compressing, especially if it includes important documents or media.
- ✔️Make sure all files inside the folder (Word docs, spreadsheets, etc.) are closed before starting the compression process.
- ✔️Stick to trusted software like 7-Zip, WinRAR, or macOS’s native compressor. This reduces the risk of errors during compression.
- ✔️After compressing, open the archive to confirm that all files are intact and accessible.
- ✔️Recover Lost Files: If something goes wrong, use free tools like WinfrGUI to recover deleted or lost files easily on Windows.
Avoid This:
- ❌ Don’t Compress While Files Are In Use.You risk incomplete compression or errors.
- ❌ Don’t Delete the Original Too Soon. Always make sure your compressed file works correctly before deleting the source folder.
- ❌ Don’t Use Untrusted Tools. Stick to reputable software like 7-Zip, WinRAR, or PeaZip to avoid malware or corrupted archives.
Conclusion: Compress Smarter, Not Harder
Compressing folders is a simple yet powerful way to save space, organize files, and share large amounts of data quickly. Whether you use Windows’ built-in ZIP feature, macOS’s native compressor, or advanced tools like 7-Zip and WinRAR, following best practices helps ensure your data stays safe and intact throughout the process.
Remember to always back up your important folders before compressing, close any open files, and verify your archives once they’re created. And if you ever run into trouble — like accidental deletion or corruption — tools like WinfrGUI can be a real lifesaver, helping you recover lost files with ease.
With these tips and tools, you can confidently compress your folders in 2025 and beyond, knowing your data is protected every step of the way.
Also Read👉 How to Show Hidden Files Windows 10 [Step-by-Step Guide]
FAQ: How to Compress a Folder
❓1. Will compressing a folder reduce quality?
No — compression is lossless. The contents remain exactly the same after extraction.
❓2. What’s the best format — ZIP, RAR, or 7Z?
- ZIP: Most universal.
- RAR: Great for multi-part archives, better compression.
- 7Z: Best compression ratio, free with 7-Zip.
❓3. Can I email a compressed folder?
Yes, but make sure the resulting ZIP/RAR file is under the email service’s size limit (usually ~25MB). For larger folders, consider using Google Drive, Dropbox, or WeTransfer.
❓4. Can I compress a folder on my phone?
Yes! Apps like ZArchiver (Android) or iZip (iOS) let you compress folders on mobile devices.