Quick Fix: How to Retrieve Deleted Photos on Any Device

Accidentally deleting your favorite photos can be distressing, but recovering them might be easier than you think. In today’s digital age, whether your images were lost on a smartphone, tablet, or computer, this guide provides a quick fix for restoring them. With clear, step-by-step instructions and practical tips, you’ll soon find that if you’ve ever wondered how to retrieve deleted photos and how to recover permanently deleted photos , the solution is within reach.
Why Photos Get Deleted
Photos can be lost due to:
- Accidental Deletion: A common mistake when cleaning up files.
- Software Glitches: Operating system errors or app malfunctions.
- Storage Failures: Damage to internal storage or memory cards.
- Syncing Issues: Cloud services sometimes overwrite or delete photos unintentionally.
Keeping these factors in mind, it’s important to know which recovery method to choose based on the device and cause of deletion.
Methods for Photo Recovery: How to Get Your Lost Photos Back
Is it possible to recover permanently deleted photos? Follow our complete guides:
Method 1. Checking Default Recovery Folders:
Before trying any complicated recovery tools, the first place to look is your device’s built-in “trash” or “recently deleted” folders, where deleted photos are temporarily stored—usually for about 30 days—giving you a simple way to get them back quickly.
1. Windows Recycle Bin:
On your desktop, double-click the Recycle Bin icon to open it. Browse or search for the deleted photos you want to recover. When you find them, right-click the files and select “Restore”—this will return the photos to their original folders exactly where they were before deletion.

2. MacOS Trash:
Look for the Trash icon in your Dock and click to open it. Scroll through to find your deleted photos. Once located, right-click on them and choose “Put Back” to restore the files to their original location, preserving your folder structure.
3. Android Trash (Google Photos):
Open the Google Photos app, then tap Library at the bottom of the screen, followed by Trash. Here, you’ll see photos deleted within the last 30 days. Select the ones you want to recover and tap Restore to return them to your gallery.
4. iOS Recently Deleted Album:
Launch the Photos app, tap Albums, then scroll down to find Recently Deleted. This album keeps deleted photos for about 30 days. Select the images you want to recover, tap Recover, and they’ll be restored to your main photo library.
Remember: These folders are your first and easiest option to recover accidentally deleted photos, but they only keep files temporarily—so check them as soon as possible after deletion to avoid permanent loss.
Method 2. Using Built-In Recovery Tools
If you’ve set up backup features on your computer, you can often recover deleted photos by restoring previous versions of your files or folders. Here’s how to do it on Windows and Mac:
1. File History on Windows
Windows’ File History is a handy backup tool that regularly saves copies of your files, allowing you to roll back to earlier versions.
- Connect your backup drive where your File History backups are stored (usually an external hard drive or network location).
- Find the folder where your photos were originally saved.
- Right-click the folder and choose “Restore previous versions.” This will show you a list of backed-up versions with timestamps.
- Select a version from a date before you deleted the photos, then click “Restore.”
- Windows will recover the folder’s contents, including your missing photos, and place them back in their original location.
This feature is incredibly useful when you accidentally delete or overwrite files, as it doesn’t require any extra software.
2. Time Machine on Mac
macOS users can rely on Time Machine, an intuitive and powerful backup system that automatically saves snapshots of your files.
- Connect your Time Machine backup drive (an external hard drive or Time Capsule).
- Open the folder where your photos were last located.
- Click the Time Machine icon in the menu bar and select “Enter Time Machine.”
- You’ll see a timeline on the right side—use it to navigate back to a date before your photos were deleted.
- Select the photos you want to recover, then click “Restore.”
- The files will be restored to their original folder, just like magic.
“ Is there a way to retrieve deleted photos“, the answer is often simpler than you think. This method effectively restores lost photos using your backups.
Method 3. Use Recovery Software to Retrieve Deleted Photos
When built-in recovery options or cloud backups aren’t enough, dedicated photo recovery software can help restore deleted images—even after they’ve been permanently removed. Here are three popular tools worth considering, each with its own pros and cons:
Tool 1. PhotoRec
- ✔️ Completely free and open-source, making it accessible for all users.
- ✔️ Supports a broad range of file formats, including RAW photo and video files.
- ✔️ Compatible with multiple file systems like FAT, NTFS, exFAT, ext2/ext3/ext4, and HFS+.
- ❌ The command-line interface is not beginner-friendly and may feel intimidating for non-technical users.
- ❌ Recovered files often lose their original filenames and folder structure, making organization more difficult.
Tool 2. WinfrGUI
- ✔️WinfrGUI offers a graphical interface for Windows File Recovery, simplifying the recovery process for users to recover deleted photos Windows 10.
- ✔️ A 100% free tool that brings the powerful Windows File Recovery command-line tool into an easy-to-use graphical interface.
- ✔️ Great for Windows 10/11 users looking to recover deleted photos quickly and intuitively.
- ✔️ Supports common file systems like NTFS and exFAT and allows recovery with just a few clicks.
- ❌While user-friendly, it may not support as extensive a range of file types as some other recovery tools, and scanning can be time-consuming.
Tool 3. Disk Drill
- ✔️Disk Drill provides a modern interface and supports a wide range of file formats.
- ✔️It offers additional features like data protection and disk health monitoring.
- ❌The free version has limitations on the amount of data that can be recovered.
- ❌Some users have reported concerns about upselling and potentially intrusive prompts to upgrade to the paid version.
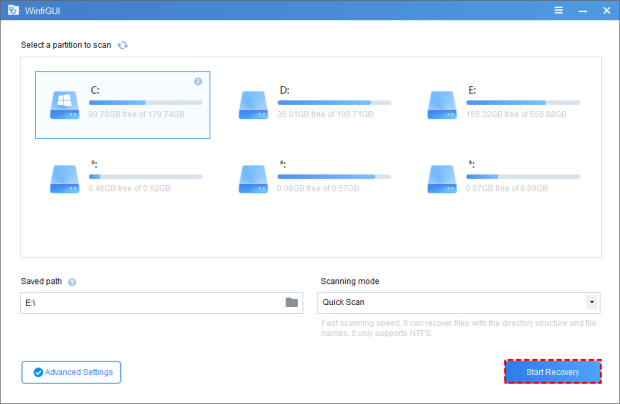
4. Step-by-Step Guide for Using WinfrGUI:
Step 1: Visit the official WinfrGUI website, download the latest version, and install it by following the on-screen instructions.
Step 2: Choose the drive where your photos were deleted from as the source, and pick a different drive or external storage as the destination to avoid overwriting.
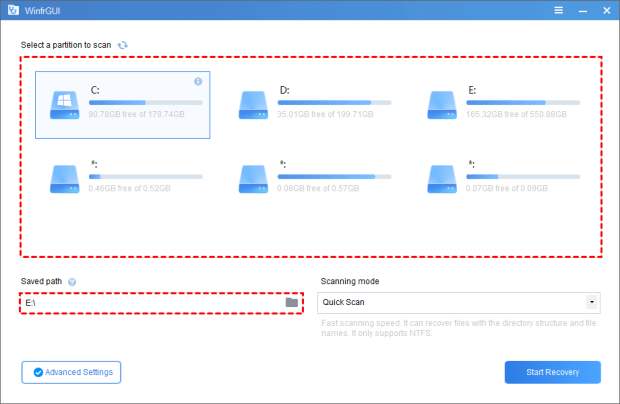
Step 3: Set recovery options by selecting file types like images and applying any filters to help narrow down the scan.
Step 4: Click “Scan,” wait for the results, preview the found photos, then select and restore them to your chosen location.
Troubleshooting FAQs: Preventing and Responding to Photo Loss
Q1: How can I prevent photo loss in the future?
The best way to avoid losing photos is to set up automatic backups using cloud services like Google Photos, iCloud, or OneDrive, and to regularly save important files to external drives or storage cards.
Q2: What should I do if recovery software doesn’t find my deleted photos?
If tools like WinfrGUI or Recuva don’t work, consider contacting a professional data recovery service—they use specialized equipment to retrieve data from damaged, corrupted, or non-functional devices that software can’t fix.
Q3: Why is it important to stop using a device after deleting photos?
When you continue using a device after deletion, new data can overwrite the space where your lost files were stored, making photo recovery much harder or even impossible.
Q4: What if my recovery tool seems outdated or unreliable?
Make sure you’re using the latest version of your chosen recovery software, as outdated tools may lack compatibility with newer file systems or fail to detect all recoverable files.
Q5: Can I recover photos if I formatted the drive or SD card?
Yes, but only if you act quickly—some recovery tools can retrieve photos even after formatting, as long as the data hasn’t been overwritten yet.
Q6: Should I rely only on cloud backup services?
While cloud backups are convenient, it’s smart to use a second layer of protection—like an external hard drive or manual transfers—just in case cloud syncing fails or is interrupted.
Summary
In summary, reclaiming lost images doesn’t have to be an overwhelming challenge. By following the straightforward steps outlined in this guide, you’ll learn how to retrieve deleted photos quickly and protect your memories for the future. Embrace a proactive approach—set up reliable backup systems and act quickly when deletions occur—to ensure that your cherished images are never lost for good. Enjoy the peace of mind that comes with knowing your digital memories are safe and easily retrievable.
🔗 Also Read: How to Delete Recently Deleted Photos and Free Up Storage Space