Recover Files emptied from Recycle Bin: 4 Ways

Losing an important file is one of the most frustrating experiences for any computer user. While the Recycle Bin offers a safety net for files you accidentally delete, what happens when you hit “Empty Recycle Bin” and those files vanish completely? Whether you’re on Windows 10 or Windows 11, files that have been permanently deleted are often still recoverable—if you act fast and use the right strategy. This comprehensive guide walks you through the four most reliable ways to recover files emptied from Recycle Bin, including using specialized data recovery software and leveraging native Windows backup features..
Can You Recover Files Deleted from Recycle Bin After Emptying?
The short answer is yes, in most cases. The key to successful recovery lies in understanding how Windows truly deletes a file.
When you delete a file, Windows does not immediately wipe the data from your hard drive (HDD or SSD). Instead, it does two things:
- It marks the space the file occupies as “available” or “free” for new data to overwrite.
- It removes the file’s entry from the operating system’s file index.
This is why immediate action is critical. If you continue to use your computer—downloading, saving, or installing new programs—you risk overwriting the data blocks of the deleted file. Once overwritten, the file is lost forever.
Crucial Tip: Immediately stop using the drive where the lost files were located. If the files were on your C: drive (system drive), avoid saving any new data, and ideally, shut down the computer to prevent automatic processes from overwriting the data until you are ready to perform the recovery.
You have four reliable paths to retrieve files emptied from the Recycle Bin:
- Software Recovery: Using specialized tools like WinfrGUI for a deep scan to recover files emptied from Recycle Bin.
- Native Recycle Bin Feature: The simplest path, if the bin wasn’t truly emptied.
- File History/Backup: Restoring from a previous snapshot of your system.
- Previous Versions: Utilizing Windows’ built-in file versioning feature.
Method 1: Recover Files Emptied from Recycle Bin by Software (The Deep Scan)
When files have been permanently wiped (by emptying the Recycle Bin or using “Shift + Delete”), professional-grade file recovery software is often the only way to get them back. Tools like WinfrGUI (a graphical user interface for Windows File Recovery) can scan the raw data on your hard drive to find the pointers and data fragments of the deleted files.
This method is highly recommended for situations where files were permanently deleted due to:
- Emptying the Recycle Bin.
- Using the Shift + Delete key combination.
- A file being too large to be stored in the Recycle Bin.
- Files being purged after the default 30-day storage period.
Perform Windows File Recovery Using WinfrGUI
To perform Windows file recovery using WinfrGUI, follow these three steps:
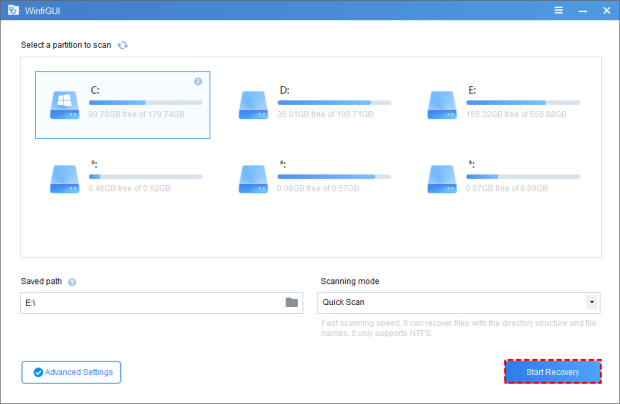
Step 1: Select Drive and Scan Type
- Download WinfrGUI Free and install the recovery software.
- Start the application and select the specific drive where the deleted files were originally located (e.g., your C: drive, a D: partition, or a connected USB drive).
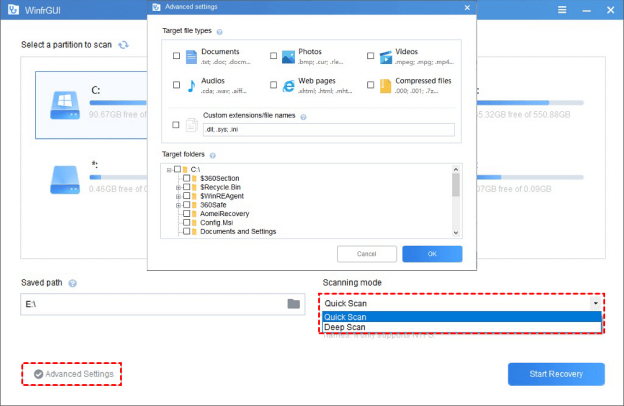
- Choose a scan type:
- Quick Scan: Faster, effective for recently deleted files.
- Deep Scan: Recommended to recover files emptied from Recycle Bin. It performs a thorough, sector-by-sector scan to rebuild lost file structures.
Step 2: Filter and Preview Deleted Files
- The software will begin scanning. After the scan, found items are sorted by file types, such as images, videos, documents, audio, and other files.
- You can filter the scan results by file name, file type (e.g.,
.docx,.jpg), or size to quickly locate the specific files you need. - Use the preview feature (if available) to ensure the file is intact and is what you’re looking for before initiating the recovery.
Step 3: Recover and Save to a New Location
- Click on the “Recover” button to restore the selected file(s).
- Select a new storage location on your computer—one that is different from the drive you are recovering from. This is crucial to prevent the recovered file from immediately corrupting or overwriting other missing files on the source drive.
- Make sure your destination drive has enough storage space to hold all the recovered files.
Method 2: Recover Deleted Items from the Recycle Bin (The Quick Check)
This method is the simplest solution and works if you only thought you emptied the Recycle Bin, but the files are still technically inside. Windows Recycle Bin retains recently deleted files for 30 days by default (or until you manually empty it).
Steps to Recover Files Still in the Recycle Bin:
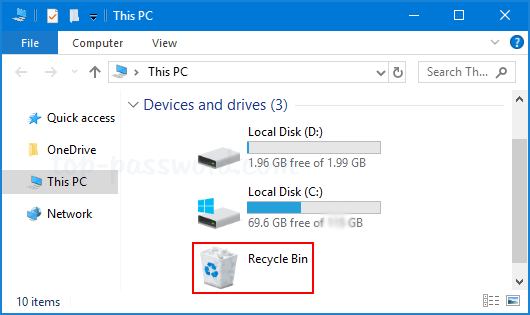
Step 1: Open the Recycle Bin by double-clicking its icon on the desktop.
Step 2: Find the deleted files you want to recover. You can use the search bar in the top right corner or sort by “Date Deleted” to quickly find recent items.
Step 3: Select a single deleted file or use the control button (Ctrl) to select multiple files.
Step 4: Right-click on the selected item and select “Restore” to confirm.
- Alternative: You can also go to the “Manage” tab in the top ribbon and then click “Restore Selected Items”.
The recovered file will instantly reappear in its original location on your computer with the similar content, date, and time intact, allowing you to access and use it again immediately.
Method 3: Recover Deleted Items from File History or System Backup
A reliable backup is your ultimate defense against permanent data loss, including files permanently deleted from the Recycle Bin. This process, however, will fail without a pre-existing backup.
For Windows 8/10/11 Users (Using File History):
The File History feature automatically saves versions of files in your Documents, Pictures, Videos, and Desktop folders to a separate designated drive (usually an external HDD).
Step 1: Open the Control Panel (you can search for it in the Start menu).
Step 2: Click “File History.” and click “Restore personal files” on the left-hand side.
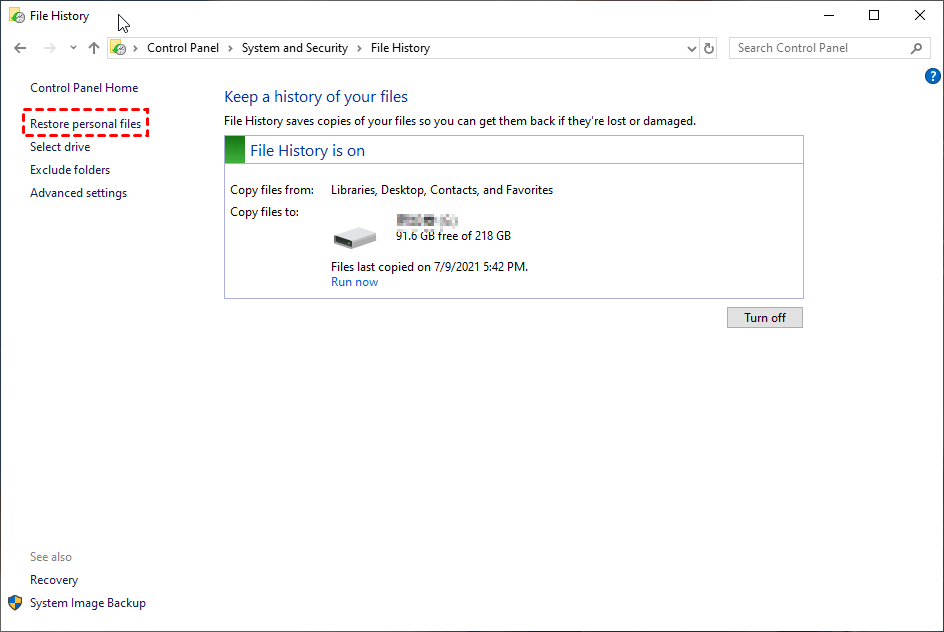
Step 3: Use the left and right arrows at the bottom of the window to browse through your backed-up file versions. Navigate to the folder where the lost file was located.
Step 4: Select the desired file version and click the “Restore” button (the green circular arrow) to move it back to its original location.
For Windows 7 Users (Using Backup and Restore):
Step 1: Click Start, then open the Control Panel.
Step 2: Choose “System and Security.”
Step 3: After clicking “Backup and Restore”, select “Restore My Files.”
Step 4: Follow the on-screen instructions to select the backup you wish to restore from and complete the process.
We strongly advocate utilizing a professional backup solution and a dedicated, separate storage device to regularly back up essential data to prevent file loss. This proactive step is the most effective way to recover files emptied from Recycle Bin and other scenarios, including system crashes and hard drive failures.
Method 4: Restore Recycle Bin Contents with the Previous Version
Windows has a feature that saves Previous Versions—shadow copies of files and folders—that are automatically created as part of a restore point or File History backup. This can sometimes restore an entire folder back to a state before the file was deleted.
How to Recover Deleted Items Using Previous Versions:
Step 1: Locate the Folder. Open File Explorer and navigate to the parent folder where the lost file was originally located.
Step 2: Access Properties. Right-click on that parent folder and select “Properties.”

Step 3: Find Previous Versions. Click the “Previous Versions” tab in the properties window.
Step 4: Select the Correct Date. Select the version of the folder that was saved before the deletion date.
Step 5: Restore or Copy. Click “Restore” to revert the folder to that version (overwriting the current one), or click “Copy” to save the older version of the folder to a new, safe location.
After the recovery process, check the original location of your computer to see if the missing file appears again. If this method fails, the data may require the deeper scanning capability of software like WinfrGUI.
Troubleshooting FAQs for the Windows Recycle Bin
Maintaining your Recycle Bin settings is key to preventing files from being permanently deleted without your intention. Here are answers to common issues:
Q1. How do I increase the storage size of the Recycle Bin?
- Right-click the “Recycle Bin” and select “Properties.”
- Select the drive and enable “Custom Size.”
- Adjust the desired size (in MB).
- Click “Apply” and “OK.”
Q2. What do I do if the Recycle Bin icon is missing or damaged?
- Right-click the desktop and select “Personalize.”
- Go to “Themes,” then “Desktop Icon Settings.”
- Check the “Recycle Bin” box, click “Restore Default,” and press “Apply.”
Q3. Can I force a permanent deletion (skip the Recycle Bin)?
Yes. Use the keyboard shortcut Shift + Delete. Files deleted this way bypass the Recycle Bin and require advanced recovery (Method 1).
Q4. How long does the Recycle Bin keep deleted files?
By default, the Windows Recycle Bin retains deleted files for 30 days. This duration can be adjusted in the Recycle Bin Properties.
Q5. Why did a large file I deleted bypass the Recycle Bin?
If a file is larger than the maximum size set in the Recycle Bin properties, it will be deleted permanently. Increase the maximum size (see FAQ 1) to prevent this.
Q6. What should I do if the Recycle Bin is corrupted?
Try the icon reset (FAQ 2) first. If it fails, use the command-line fix: rd /s /q C:\$Recycle.bin in an elevated Command Prompt to reset the system folder.
Conclusion
This post provides four distinct, reliable solutions to recover files emptied from the Recycle Bin. For files that are temporarily deleted (within the 30-day limit), the native Recycle Bin Restore is your quickest fix. For files that are permanently wiped (using Shift+Delete or after emptying the bin), professional software like WinfrGUI is the most effective tool to scan your disk deeply and retrieve the data. This powerful software can also help to recover deleted files on SD card or other external storage devices, making it a versatile tool for any data loss scenario. Remember, the success of any recovery depends on speed. Stop using your drive immediately and start your recovery process with a deep scan tool to maximize your chances of getting your important files back.
🔗 More Tutorials: