How to Fix Problem Ejecting USB Mass Storage Device [7 Ways]
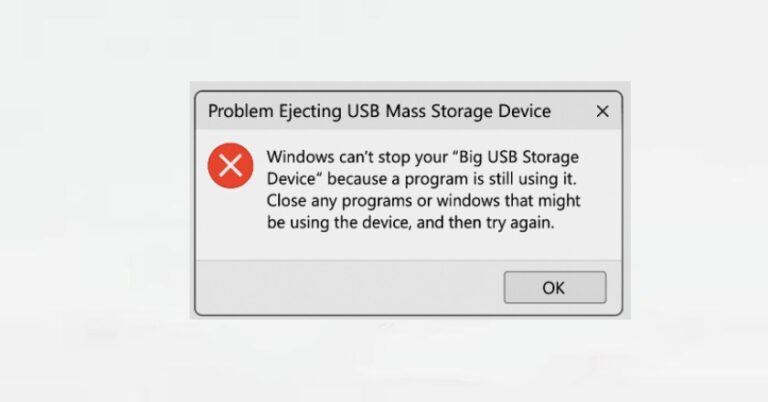
Having trouble safely removing your USB drive? If you’re seeing messages like “Problem ejecting USB mass storage device” or Windows says the drive is still in use, you’re not the only one. Improper ejection can lead to data corruption, so it’s important to handle it right. This guide walks you through 12 proven fixes to safely eject your USB or external hard drive — from closing background processes to using built-in tools like Disk Management or Command Prompt. We’ll also show you how to check if it’s really safe to remove the device when Windows doesn’t respond. Already pulled it out unsafely? Don’t panic — we’ve got steps to recover your files and check for damage. Whether it’s a flash drive, SD card, or external SSD, these solutions will help you disconnect it the right way and avoid future problems. Keep reading to protect your files and safely eject your device every time.
Why “Problem Ejecting USB Mass Storage Device” Error Happen?
Ever tried to remove your USB drive and got a message like:
- “This device is currently in use.”
- “Windows can’t stop ‘Generic volume’ — the device is in use.”
- Or the frustrating “Problem ejecting USB mass storage device” error?
These messages mean something on your system is still accessing your USB drive in the background — even if it looks like everything is closed. Here’s what might be causing it:
- A file or folder from the USB is still open — even in the background.
- Programs like antivirus software or cloud sync tools (e.g., OneDrive or Dropbox) might be scanning or indexing the drive.
- File Explorer may still be previewing files from the USB, or a background Windows service is accessing it.
WAY1: Close All Files and Programs Using Your USB Drive
One of the most common reasons you can’t safely eject a USB drive is that some file or program is still using it—even if it’s not obvious. To make sure everything is fully closed before ejecting, follow these steps carefully:
Step 1: Save all your work on the USB drive and your computer to avoid losing any data.
Step 2: Double-check that no files from the USB drive (documents, videos, etc.) are open—even those minimized or hidden.
Step 3: Exit any programs that might be accessing the USB, like Word, media players, backup tools, or cloud sync apps.
Step 4: Take a quick look at your taskbar and system tray for apps still running in the background, and close any related to the USB.
Step 5: Open Task Manager by pressing Ctrl + Shift + Esc, then go to the Processes tab to view all running processes.
Step 6: Carefully look for any processes linked to the USB or file-related apps; right-click and select End Task only on those you recognize, avoiding unfamiliar or system processes.
Once you’ve closed all these, try safely ejecting your USB drive again—you’ll likely succeed this time!
WAY2. Safely Remove USB Device Using Built-In Windows Features
Windows offers a built-in “Safely Remove Hardware” feature to ensure your USB drive is properly unmounted before unplugging, preventing data loss and file corruption. You can access this feature in two main ways: through the taskbar icon or via File Explorer. Both methods work similarly but use different interfaces.
Step 1: Click the “Show hidden icons” arrow in the bottom-right corner of your taskbar to reveal system tray icons.
Step 2: Right-click the “Safely Remove Hardware and Eject Media” icon (it looks like a USB plug with a checkmark).
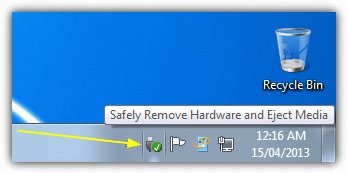
Step 3: From the menu, select the USB drive you want to eject.
Step 4: Click “Eject.”
Step 5: Wait for the notification that says “Safe to remove hardware.”
Step 6: Once you see this confirmation, unplug your USB device safely.
If you still see the “USB device is in use” error, don’t worry — keep going with the next fixes in this guide. Also read How to Create a Windows 10 Recovery USB Download For Another PC — helpful if your USB is meant for system recovery.
WAY3. Uninstall USB Device via Device Manager
If standard safe eject methods fail or your USB device is stubbornly in use, advanced system management tools like Device Manager and Disk Management can help forcibly release the USB device for safe removal. These methods are recommended for advanced users or special situations.
Step 1: Right-click This PC on your desktop or in File Explorer.
Step 2: Select Device Manager from the menu.
Step 3: In Device Manager, expand the Disk drives or Universal Serial Bus controllers section.
Step 4: Locate your USB device, right-click it, and select Uninstall device.
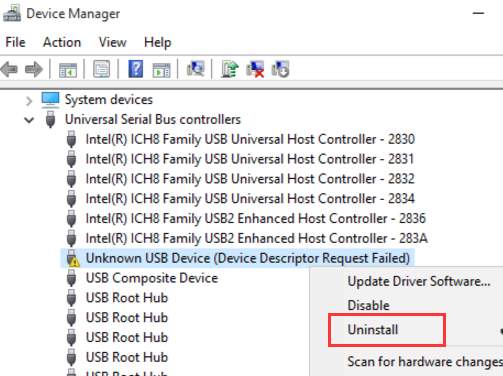
Step 5: Confirm the uninstallation without checking the option to delete driver software.
Step 6: After the device is uninstalled, unplug your USB drive safely.
These methods are useful when the USB device cannot be safely ejected by regular means, such as through the taskbar icon or File Explorer. Exercise caution: only use these if you are comfortable managing system devices.
WAY4. Run a Virus Scan with Windows Defender
If your USB drive won’t eject properly, malware or security software might be causing the issue. Follow these options with detailed steps to scan for viruses and temporarily disable security programs if needed.
Step 1: Click the Start button, type Windows Security, and press Enter.
Step 2: Select Virus & threat protection. Click Scan options.
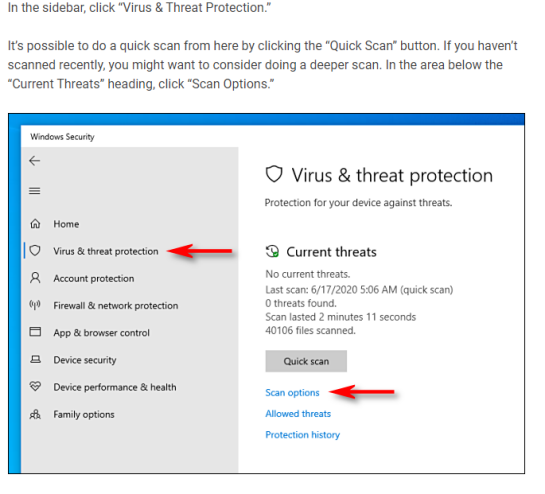
Step 3: Choose your preferred scan type: Quick Scan, Full Scan, or Custom Scan.
Step 4: Click Scan now to start scanning.
Step 5: Wait for the scan to complete.
Step 6: Review the results and follow any instructions to remove detected threats.
Disabling security software makes your PC vulnerable—only do this briefly and always turn it back on promptly. If you need help recovering deleted files from your USB drive, see our guide on How to Recover Files from USB for Free: Reddit Tips.
WAY5. USB Device Troubleshooting
Using the Hardware and Device Troubleshooter on your Windows computer can help fix USB issues and fix the “Big USB Storage Device Throwing Problem” error. Try these steps:
Step 1: Unplug your USB device and connect it to a different USB port to rule out port issues.
Step 2: Check your USB drive for any visible physical damage or loose connections.
Step 3: Open Device Manager, locate your USB device, and update its drivers to the latest version.
Step 4: A quick reboot can reset device connections and resolve temporary glitches.
Step 5: Plug your USB drive into a different PC to test if the problem is with the device or your computer.
These steps will help you identify and fix common USB-related problems preventing safe ejection.
WAY6. Restart Your Computer to Reset System State
Sometimes apps or background processes tied to your user session can keep your USB drive busy, blocking safe ejection. Resetting your system state by logging out or restarting your computer often clears these temporary locks and glitches.
Step 1: Save any open files and close all programs to prevent data loss.
Step 2: Restart your computer to clear temporary software glitches interfering with USB operations.
Step 3: Restarting resets the hardware connection between your PC and the USB device, helping Windows recognize it properly.
Step 4: It also resolves system conflicts that may block safe removal of the device.
Step 5: Once your PC restarts, try safely ejecting your USB drive again.
Tip: Start with logging out and back in as a quicker fix. If that doesn’t work, proceed with a full system restart.
Try logging out and back in first for a quick fix; if that doesn’t resolve the issue, go ahead and restart your computer. For more tips, check out Create Windows 11 Recovery USB: 3 Effective Ways
WAY7. Format Your USB Drive to FAT32 Instead of NTFS
If your USB drive is formatted with NTFS, switching it to FAT32 might resolve the “problem ejecting USB storage device” error—but remember, formatting will erase all data, so back up your files first. Follow these steps carefully:
Step 1: Open This PC and locate your USB drive.
Step 2: Right-click the USB drive and select Format from the menu.

Step 3: In the Format window, choose FAT32 as the file system.
Step 4: Uncheck the Quick Format option for a thorough format (optional but recommended).
Step 5: Click Start to begin formatting your USB drive.
Formatting to FAT32 can improve compatibility and may fix ejection issues, but make sure to back up important files beforehand.
Recover Files If You’ve Already Unplugged Your USB Drive Unsafely
Unplugging a USB drive without safely ejecting it can lead to data corruption or loss. But don’t worry—there are ways to recover your files even if your USB drive is damaged.
Why Use WinfrGUI?
WinfrGUI is a powerful yet beginner-friendly data recovery tool designed to help users recover lost data without needing technical expertise. Whether your files were deleted accidentally, lost due to formatting, or corrupted after improper USB removal, WinfrGUI offers a reliable solution. It supports a wide range of storage devices, including USB flash drives, SD cards, external hard drives (HDDs), solid-state drives (SSDs), and more. With an intuitive interface and smart scanning features, you can recover files quickly and safely. WinfrGUI allows you to:
- Recover deleted, lost, or corrupted files with just a few clicks
- Preview files before recovery so you know exactly what you’re restoring
- Pause and resume scans at any time without losing progress
How to Using WinfrGUI
Step 1: Plug in your USB device, open the WinfrGUI software, and click Start to begin scanning.
Step 2: Once the scan finishes, you’ll see a list of recoverable files; preview them and select the ones you want to restore.
Step 3: Click Recover and save your files to a different location—never back onto the damaged USB drive to avoid overwriting data.
Final Thoughts
Now you know 7 effective and safe ways to eject your USB drive without risking data loss, even when faced with the common “Problem ejecting USB mass storage device” error. Always remember to use the Safely Remove Hardware option whenever possible—it’s the best way to ensure your device is properly unmounted before unplugging. If you ever accidentally remove your USB drive without ejecting it, or encounter corrupted files afterward, having a reliable recovery tool like WinfrGUI can save the day. WinfrGUI is user-friendly and powerful, helping you restore deleted, lost, or damaged files quickly from USB drives and other storage devices. Keeping this tool ready means you’ll be prepared for unexpected problems. Following these tips and tools will protect your data, extend the life of your USB devices, and give you peace of mind every time you connect or disconnect your drives.
🔗 Also Read: How to Recover Deleted USB Files After Formatting the Drive