How to Remove Passwords from Word Documents
Microsoft Word offers powerful features for creating professional documents, including password protection for added security. However, constantly entering a password can become inconvenient, especially for non-sensitive files. There’s also the risk of forgetting or losing passwords. In this guide, we’ll show you how to remove passwords from Word documents quickly and easily.
Two Main Ways of Password Protection
Before deleting a password from a Word document, it is important to understand how the exe is locked. Microsoft provides two methods of password protection: full document lock and limit fixing.
Way1. Lock full document
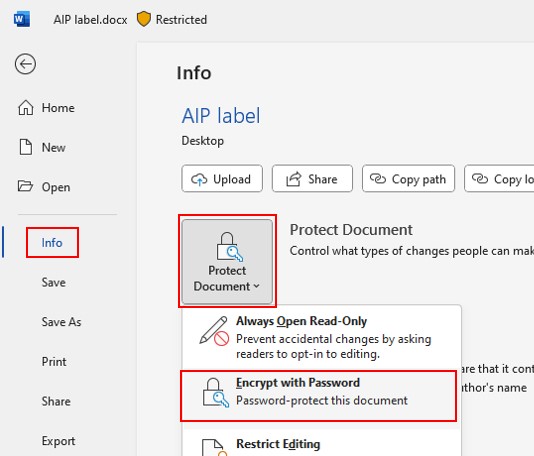
To prevent unauthorized access, you can encrypt your word document with a password. Just go to:
File > Information > Document Protection > Password Encryption
After setting the password, anyone attempting to open the document will be asked to enter the code. It is important to choose a strong and memorable password as there are no recovery or deletion options in it if you forget it.
Way2. Blocks editing
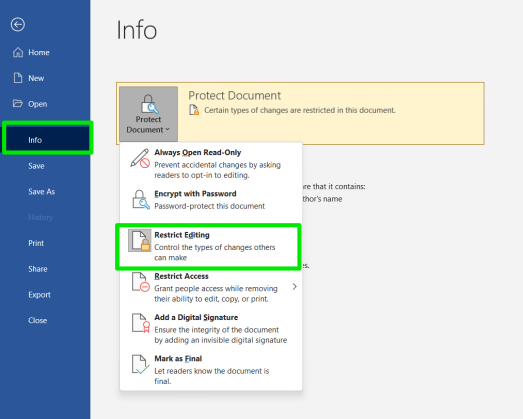
If you want to limit the ability to edit your document, you can use the Edit Limits feature.
Step 1: Go to File > Information > Document Protection > Except Edit. The Limit Edit Panel will appear on the right.
Step 2: Select “Allow this type of editing only in document” and “No changes (read only)” from the drop-down. Say “Yes, Start Enforcing Protection” .
Step 3: “Start Protection Enforcement”. Under Protection Methods, enter “Password”. Click OK.
Step 4: Save and reopen Word. When editing the document, a password is required. When you know the code, remove password protection.
Situation 1. When You Know the Password
Deleting protection is easy if you know the password.
Method 1. Removing the password of a full locked word Document
Step 1: Open Word and enter your password.
Step 2: Click File > Information >Protect Document >Encrypt with Password.
Step 3: Delete and OK the password.
Method 2. Removing the word Password of editing restriction
Step 1: Open the password-protected Word document you want to edit.
Step 2: Go to the Review tab, click on Protect, then select Restrict Editing or Stop Protection
Step 3: When prompted, enter the editing restriction password to disable protection and allow full editing of the document.
Situation 2. Unknown Password Protection
If you forget your password and have important data in the file, there are numerous options.
Method 1: Save word to RTF
Step 1: The first step is to use either Notepad or TextEdit to convert your Word file to.rtf format.
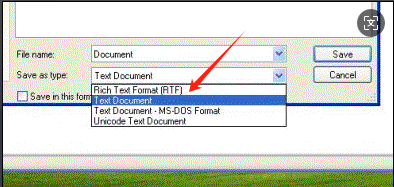
Step 2: Using the Find and Replace tool, change the word “passwordhash” in the.rtf file to “nopassword.”
Step 3: Select Review > Disable Protection from the menu in Microsoft Word.
Step 4: Remove the protection from the word document by unchecking all of the boxes and resetting the format to.docx in the pop-up window.
Method 2: Use WordPad to save word documents.
While WordPad may not have all the features of Microsoft word, it can also help to remove passwords from word documents.
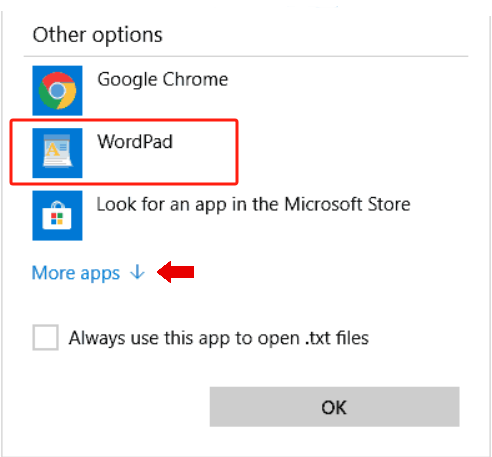
Step 1: Right-click the password-protected Word file, choose Open with, then select WordPad from the list of programs
Step 2: Once the document opens in WordPad, go to File and select Save As to save a new copy, which will be password-free and fully editable.
Method 3: Using Google docs to unprotect word documents
Step 1: Open your web browser, sign in to your Google account, and go to docs.google.com.
Step 2: Click the folder icon or File > Open > Upload to upload your password-protected Word document.
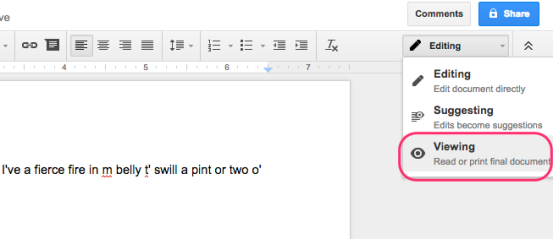
Step 3: After the upload, Google Docs will convert and open the file without requiring a password, allowing you to view and edit it.
Step 4: Download or save the file from Google Docs as a new, unprotected Word document.
Method 4: Save your word document as a new file
This method is useful when you forget your password and files are accessible in read-only mode.
Step 1: Click the Read Only button or notification when opening the file.
Step 2: Use File > Save As to save the document under a new name, creating an unprotected, editable copy.
Situation 3. Locked Document, Unknown Password
You can use any of these methods to unlock a locked word document without the password:
Method 1: Remove word doc password
If you’re locked out of a password-protected Word document, don’t panic—there are 3 reliable tools that can help you remove or recover the password. Here’s how to go about it:
Option 1. PassFab for Word (Windows):
PassFab for Word is a beginner-friendly tool designed specifically for dealing with locked Word documents.It offers three password recovery modes:
- Brute-force with Mask Attack: Speeds up the process if you remember part of the password (e.g., length or known characters).
- Dictionary Attack: Use a built-in or custom dictionary of common passwords.
- Brute-force Attack: Try all possible combinations (best for short, simple passwords).
Option 2. Passper for Word (Windows & macOS):
Passper Word Password Recovery works similarly to PassFab, offering multiple attack methods and supporting different versions of Microsoft Word. It’s known for a clean interface and decent success rate, especially with simpler passwords.
Option 3. Recover Unlocked Versions with WinfrGUI:
If the file was lost or corrupted, try recovering a previous, unprotected version using WinfrGUI—a free, user-friendly recovery tool that can retrieve earlier copies before the password was added.
Method 2: Rename password-protected Word files
Although slower, this strategy may be effective when others cannot.
Step 1: Rename your Word document’s extension from .docx to .zip to access its compressed contents.
Step 2: Open the .zip file using any ZIP tool like 7-Zip or WinRAR to view the internal files.
Step 3: Inside the ZIP archive, locate and delete the settings.xml file, usually found in the word folder, which stores password settings.
Step 4: Close the ZIP tool and rename the file extension back from .zip to .docx, then open it in Word to find the password protection removed.
Method 3: Use VBA code to reduce your word document protection.
Please take note that this procedure is solely applicable to.doc files and necessitates the conversion of file types.
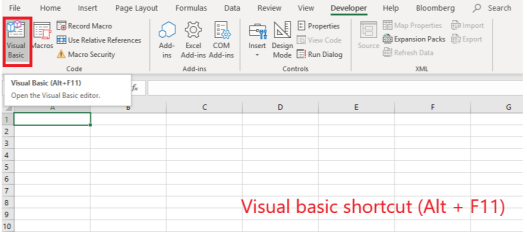
Step 1: Open the Word document that you wish to remove the protection from.
Step 2: You will enter the Visual Basic editor by pressing ALT+F11.
Step 3: Right-click on the file in the Edit window, and then select Modules from the menu that appears.
Step 4: Insert the VBA code into the module by just copying and pasting it.
Step 5: Click “Run” and “Okay” in a new window to go to the fifth step.
Step 6: There will be a removal of the word file protection in the sixth step.
Method 4: Use word document online password remover
Online password remover is useful when documents need encryption to open.
Step 1: Search for “Delete Word Online Password” and choose a trusted site.
Step 2: Upload your Word file to your website
Step 3: The online password remover will decrypt the file and give it the code.
Conclusion
Microsoft Word provides multiple methods to remove passwords from word documents, but it’s essential to follow ethical and legal guidelines. If you don’t have permission or the document isn’t yours, attempting to bypass security measures could lead to legal consequences. Always ensure you have the right to access and modify the file. By following the proper steps, you can securely manage your Word documents without unnecessary password restrictions.
🔗 Also Read: 4 Proven Ways to Microsoft Word Unsaved Document Recovery