
How to Turn On Autosave In MS Word

I still remember the frustration of losing hours of work because I forgot to save my Word document. That’s why discovering Microsoft Word’s AutoSave feature was a total game changer for me. AutoSave automatically saves your document at regular intervals, so you don’t have to worry about losing progress if something unexpected happens. In this article, I’ll walk you through how AutoSave works, why it’s so useful, and how you can easily enable or disable it to fit your workflow.
What Is Microsoft Word AutoSave?
Microsoft Word’s AutoSave—available with Microsoft 365—is a powerful feature designed to protect your work by saving it automatically every few seconds. It works seamlessly not only with Word but also with PowerPoint and Excel. By default, AutoSave is enabled for files stored in supported cloud services like OneDrive, OneDrive for Business, or SharePoint Online, ensuring your documents are continuously backed up online. If you prefer saving files locally without an internet connection, Microsoft Word uses a related but different feature called AutoRecover. AutoRecover saves backup copies every 10 minutes to temporary files on your device, providing some protection even when AutoSave is unavailable.
Together, AutoSave and AutoRecover help minimize data loss, each serving distinct roles depending on where and how your files are stored.
Where Does Word Automatically Save Files and How to Change the Location?
Before we look at how to enable or disable AutoSave, it’s useful to understand where Word stores its backup files. AutoRecover temporary files are saved in specific system folders, separate from your original documents.
On Windows, these files are usually stored in: C:\Users\<YourUsername>\AppData\Roaming\Microsoft\Word
On Mac, the default path is:
/Users/<YourUsername>/Library/Containers/com.microsoft.Word/Data/Library/Preferences/AutoRecovery
These temporary files typically start with names like ~wrfxxxx.tmp or ~wraXXXX.tmp, making them easier to identify.
If you want to change the AutoRecover file location, here’s how:
- Enable Microsoft Word from the Start menu or from Office 365
- Go to the File tab and select Options.
- Click the Save tab.
- In the ‘Save Document’ section of the dialog, enter the desired path for the AutoRecover file under ‘AutoRecover File Location’.
- Confirm your changes by clicking OK.
For Mac users, the AutoRecover file repositioning process is slightly different:
- Open Microsoft Word and go to ‘Preferences’.
- In the ‘Personal Settings’ bar, select the ‘File Location’ option.
- Move to Auto Recover Files > Edit
- Call to the location where you want to save the AutoRecover file.
- Click Select or Open to complete your selection.
How to Turn On or Off Automatic Saving in Word
The AutoSave feature is easy to toggle, but its availability depends on where your file is stored.
Quick toggle for the current document:
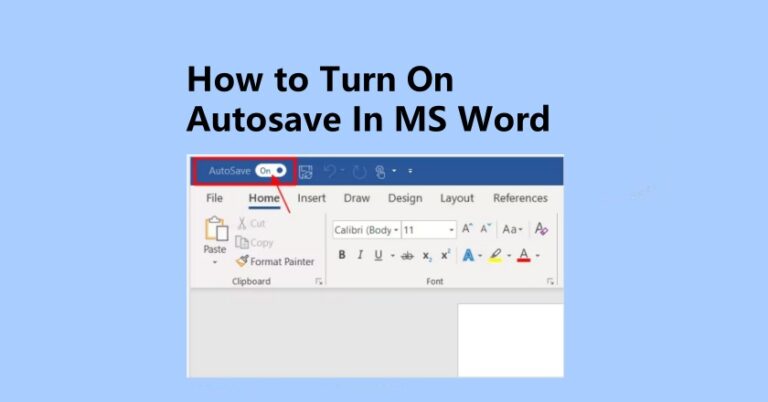
At the top-left corner of the Word window, near the Quick Access Toolbar, you’ll see the AutoSave switch. You can click this to turn AutoSave on or off for the current document only. This toggle only appears for files saved on supported cloud services (OneDrive, SharePoint). For documents saved locally on your PC, the AutoSave toggle will not be visible.
For default AutoSave settings across Word:
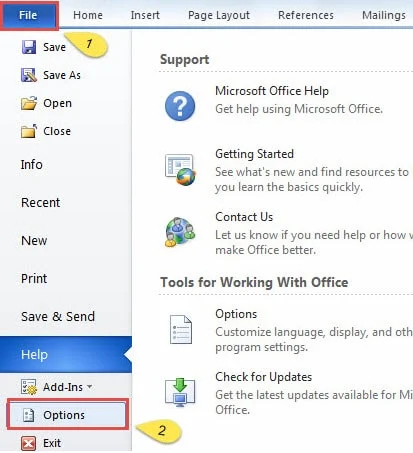
Step 1: Open Microsoft Word and click the File tab in the upper-left corner.
Step 2: From the menu, select Options to open the Word Options dialog box. In the left sidebar, click Save.
Step 3: Under the Save documents section, find the checkbox labeled:“AutoSave OneDrive and SharePoint Online files by default on Word.”
Step 4: Check this box to enable AutoSave by default for cloud files, or uncheck it to disable AutoSave by default.
Step 5: Click OK to save your settings and close the dialog box.
Important notes:
- AutoSave only works for documents stored on supported cloud services (OneDrive, SharePoint).
- Local files require manual saving or rely on AutoRecover, which saves backup copies every few minutes.
- Disabling AutoSave does not disable AutoRecover—your work is still periodically saved to temporary files to help prevent data loss.
By customizing these options, you can strike the right balance between automatic protection and control over your Word documents.
How to Restore Unsaved Word Documents Using AutoSave
If you accidentally close Word without saving, don’t panic. You can often recover your work by following these steps:
Step 1: Open Microsoft Word from your Taskbar or Office 365 app.
Step 2: Click on File in the top-left corner. Select Info from the sidebar.
Step 3: Click on Manage Document, then choose Recover Unsaved Documents from the dropdown menu.
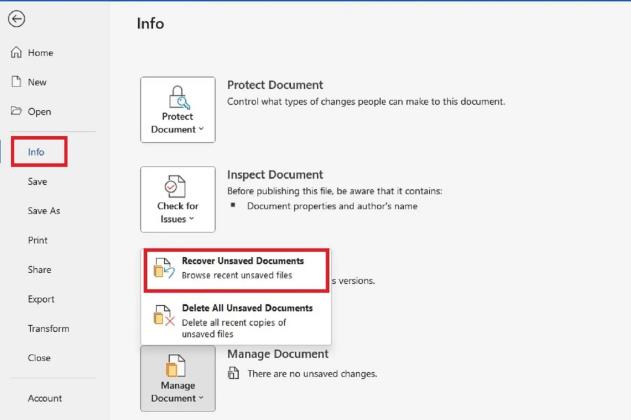
Step 4: A new window will open displaying a list of unsaved documents Word has saved temporarily.
Step 5: Browse through the list, select the file you want to recover, and click Open.
Step 6: Once the document opens, immediately click File > Save As to save it to a safe location on your computer or OneDrive.
Bonus: If you can’t find your file through Word’s recovery tool, manually check the AutoSave folder at: C:\Users\<YourUsername>\AppData\Roaming\Microsoft\Word. Look for files starting with ~ or labeled as unsaved documents.
Additional Recovery Option: Use WinfrGUI (Free & Beginner-Friendly)
If Word’s built-in recovery tools don’t bring back your unsaved document, don’t worry—there’s still hope. You can try WinfrGUI, a free and user-friendly recovery tool designed for Windows 10 and 11. It’s based on Microsoft’s official file recovery engine and works well for recovering deleted, unsaved, or even corrupted Word files. Here’s how to recover your file with WinfrGUI:
Step 1: Download WinfrGUI on your Windows computer. Select the drive where your Word file was lost (e.g., C: or D:).
Step 2: Choose a Quick Scan (for recently deleted files) or Deep Scan (for more thorough recovery).
Step 3: Use the filter to search for .docx or .doc files, or browse through the folder path to locate unsaved Word documents.
Step 4: Preview the files found and select the one you need.
Step 5: Click Recover, and save the file to a different drive or folder to avoid overwriting.
WinfrGUI is a great fallback when other options don’t work—it’s 100% free and doesn’t require any technical skills. Just point, click, and recover.y if the built-in recovery fails.
How to Open Autosave in MS Word: FAQ
Q1: Does AutoSave only work with OneDrive?
Yes, AutoSave requires files to be stored on supported cloud services like OneDrive or SharePoint. Local files rely on AutoRecover for backup.
Q2: Is AutoRecover the same as AutoSave?
No. AutoSave continuously saves your document to the cloud in near real-time, while AutoRecover saves local temporary backups at set intervals (default 10 minutes).
Q3: How often does AutoRecover save?
By default, every 10 minutes. You can adjust this interval under File > Options > Save.
Q4: How to recover unsaved Word documents?
Use Word’s Recover Unsaved Documents option or check the AutoRecover folder manually. For more advanced recovery, consider tools like WinfrGUI.
Conclusion
Microsoft Word’s AutoSave and AutoRecover features are powerful safeguards against unexpected data loss. By understanding how they work—and knowing when to rely on each—you can avoid the frustration of losing hours of work. Whether you’re working in the cloud or saving locally, setting up these features properly ensures your documents stay protected, even when the unexpected happens.
🔗 Also Read: Where Does Word Save Temp Files
 MyRecover
 FoneTool
