3 Techniques for Creating a Windows 11 Bootable USB
Creating a Windows 11 bootable USB is an essential step for installing or reinstalling the operating system on a PC. Whether you’re upgrading, performing a clean install, or troubleshooting system issues, having a bootable USB drive ensures a smooth and efficient setup. In this guide, we’ll explore three reliable techniques to create a bootable USB for Windows 11, making the process easy for beginners and advanced users alike.
Build a Windows 11 Bootable USB in 3 Ways
Whether you are starting a reinstallation or are looking for a reliable recovery option. Having a Windows 11 boot USB is an inexpensive tool. In this tutorial, we will explore three different ways to create one. Each method has its own advantages and features. Suitable for different preferences and skill levels. No matter whether you give importance to simplicity, configuration or technical complexity. These methods allow you to confidently build a boot USB that fits your needs.
Before we go deeper into the method, here’s what you need:
- Computer running: You will use this computer to build a Windows 11 boot USB.
- USB drive: Make sure you have a USB drive with enough storage space (at least 8 GB) to support Windows 11 installation files.
Method 1. Create a bootable Windows 11 USB with a media generator
The first method involves using the Microsoft Utility Media Generator, which allows you to upgrade your current PC to Windows 11 or create a USB/DVD installer for Windows 11 on another PC. This tool is especially useful in case your computer is malfunctioning.
Here’s how you can use it:
Step-by-Step Guide
1. Visit the Official Windows 11 Download Page:
- Go to Microsoft’s Windows 11 download page
- Download the Media Creation Tool.
2. Run the Tool:
- Launch the Media Creation Tool.
- Accept the license terms presented.
3. Select the Media Creation Option:
- Choose “Create installation media (USB flash drive, DVD, or ISO file) for another PC.”
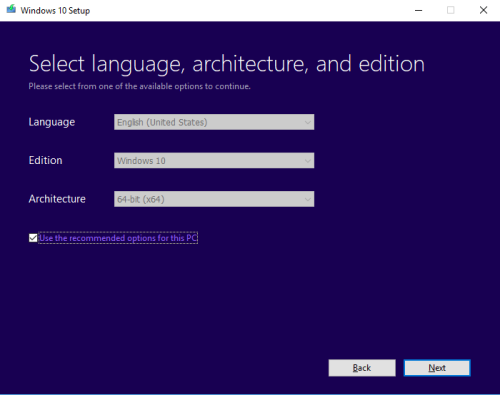
4. Choose Language, Edition, and Architecture:
- Select your preferred language, the appropriate Windows 11 edition, and the correct architecture (64-bit or 32-bit) for your system.
5. Insert a USB Drive:
- Plug in a USB drive with at least 8GB of storage.
- Allow the tool to download the necessary files and create the bootable media on the USB drive.
Pros & Cons
- ✔️Simple and user-friendly.
- ✔️Official support from Microsoft.
- ✔️Fewer compatibility issues.
- ❌Requires a stable Internet connection.
- ❌The download process can be slower due to the large ISO file size.
Also Read: 6 Methods to Recover Files From Broken USB Drive
Method 2. Build Windows 11 Bootable USB with Rufus
The second approach involves using Rufus, an off-source utility that allows you to create and format bootable flash drives. RUFUS is well known for its speed and compatibility with many ISOs.
Here’s how you can use Rufus to build Windows 11 Bootable USB:
Step-by-Step Guide
1. Download Rufus:
- Head to Rufus’s official website and download the latest version.
2. Download the Windows 11 ISO File:
- Visit Microsoft’s Windows 11 download page to get the ISO file.
3. Plug in Your USB Drive and Launch Rufus:
- Insert a USB drive (8GB minimum) and open Rufus.
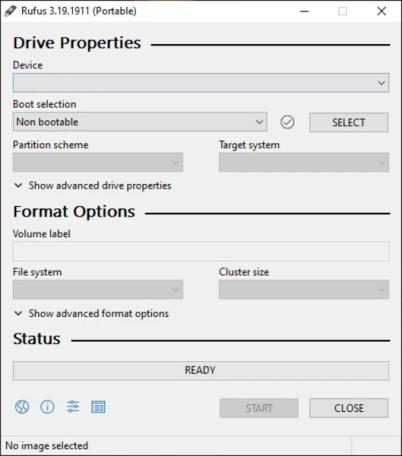
4. Select the USB Device and ISO:
- In Rufus, choose your USB drive under the “Device” drop-down.
- Under “Boot Selection,” click “SELECT” and choose the downloaded Windows 11 ISO.
5. Set the Partition Scheme:
- Choose GPT for UEFI-based systems or MBR for Legacy BIOS systems.
6. Start the Process:
- Click “Start” and allow Rufus to create the bootable USB drive.
Pros & Cons
- ✔️Faster process and more customizable options.
- ✔️Handles various ISO file sizes effectively.
- ❌Slightly more technical compared to the official tool.
- ❌Requires manually downloading the ISO if you’re not using Rufus’s built-in download feature.
Also Read: 5 Methods to Recover Deleted Files USB Drive
Method 3. Build Windows 11 Bootable USB with Command Prompt
The last method uses Command Prompt. Windows’ standard command line program. The command instructions may help if your machine is in safe mode if the GUI interface is broken.
Here’s how you can create a Windows 11 Bootable USB using the instructions:
Step-by-Step Guide
1. Open Command Prompt as Administrator:
- Press Win+S, type “cmd”, and select Run as Administrator (or press Win+X and choose Command Prompt/PowerShell as Admin).
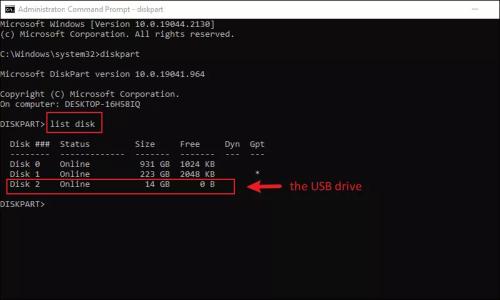
2. Run Diskpart and List Connected Disks:
- In the Command Prompt, type
diskpartand hit Enter. - Then type
list diskto view all connected drives and identify your USB drive.
3. Clean and Format the USB Drive:
Execute the following commands one at a time:
cleancreate partition primaryselect partition 1format fs=ntfs quick(or useformat fs=fat32 quickif FAT32 is required)activeassign
4. Mount the Windows 11 ISO and Copy Files:
- Mount the ISO by double-clicking it in File Explorer (or use PowerShell’s
Mount-DiskImagecommand). - Copy all files from the mounted ISO to the USB drive using Robocopy (e.g.,
robocopy E:\ F:\ /E) or simply drag-and-drop the contents in File Explorer.
Pros & Cons:
- ✔️Provides full control over every step.
- ✔️No need for third-party software.
- ❌More complex and error-prone for beginners.
- ❌Requires careful attention to command-line instructions to avoid mistakes.
Also Read: 4 Methods to USB Flash Data Recovery [Free]
How to Recover Data If Windows 11 Failed to Boot
If your Windows 11 computer fails to boot and you lose important files, don’t worry. You can use WinfrGUI. The user-friendly tool to recover lost and deleted files in just a few steps. This tool supports more than 1000 data types and formats and can recover data from various situations, following the following step instructions:
- Enable WinfrGUI on your Windows 10 or 11 PC
- Select “Hard drive and location” on the left.
- Select the hard drive at the bottom of the “Hard Disk Drives” section, or select “Desktop” in the “Quick Access” bar.
- Click “Start” to start the scan process.
- This tool scans the selected location and displays it in real time on the screen. You can use a filter to minimize the result.
- Once the scan is complete, you can view the recovered files and click on “Recover” to find them.
Conclusion
A Windows 11 bootable USB is a crucial tool for installing or repairing your operating system. By using any of the three techniques outlined in this guide, you can create a bootable USB with ease and confidence. Whether you prefer Microsoft’s official tool, or the manual command-line method, each approach provides a reliable way to prepare your USB drive for Windows 11 installation. However, if you encounter data loss during the reinstallation process of Windows 11, it is recommended that you use WinfrGUI to recover your important data in three simple steps. Do not hesitate to try!