Windows Update Error 0x80070643? 7 Proven Ways to Fix It
If you’re getting the dreaded Windows Update error 0x80070643 while trying to update your system, you’re not alone. This error commonly appears when you’re attempting to install a security update, .NET Framework update, or even a Windows Defender update. It can be frustrating, especially when it interrupts your system’s performance and security. In this article, we’ll walk you through seven proven solutions to resolve Windows Update error 0x80070643. Whether you’re a beginner or an experienced user, these fixes should help you get back on track and install updates without any issues.
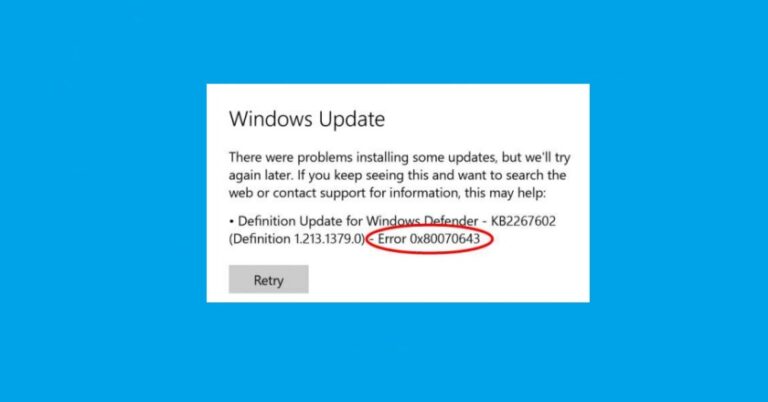
What Is Windows Update Error 0x80070643?
Windows Update error 0x80070643 is a common issue users face when trying to install an update. This error typically occurs due to issues with system files, the .NET Framework, or security software interfering with the update process. More specifically, this error can arise during:
- .NET Framework updates
- Windows Defender updates
- Cumulative updates for Windows 10 or 11
When Windows update fails, it can prevent your system from receiving crucial patches or security fixes, leaving your computer vulnerable to threats. Therefore, it’s essential to resolve the issue as soon as possible to ensure your system remains secure and performs optimally.
Causes of Windows Update Error 0x80070643

Before jumping into the fixes, it’s important to understand what causes this error. Here are the most common culprits:
- Corrupted System Files: Over time, files related to your Windows update can become corrupted, leading to failed updates.
- Issues with the .NET Framework: The .NET Framework is essential for many Windows applications, and errors here can prevent successful updates.
- Problematic Windows Defender Definitions: If the update is related to Windows Defender, a conflict can sometimes cause the error.
- Incomplete or Interrupted Updates: If a previous update was interrupted or did not complete properly, it could trigger this error in subsequent updates.
- Antivirus Software Interference: Sometimes, antivirus or security software can block updates from installing properly.
- Permission or Service-Related Issues: Certain permissions or services not running correctly could also interfere with the update process.
7 Proven Ways to Fix Windows Update Error 0x80070643
1. Run the Windows Update Troubleshooter
Microsoft provides a built-in tool called the Windows Update Troubleshooter that can automatically detect and fix common update problems, including error 0x80070643. Here’s how to use it:
Step 1. Open Settings by pressing Win + I.
Step 2. Navigate to Update & Security > Troubleshoot.
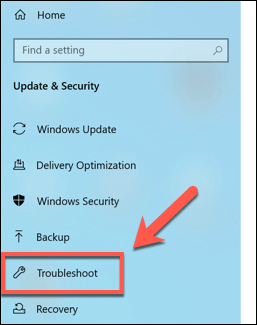
Step 3. Click Additional troubleshooters.
Step 4. Select Windows Update and click Run the troubleshooter.
Step 5. Follow the on-screen prompts to let the tool automatically fix issues.
This is often the quickest way to resolve update-related errors, as it addresses common system conflicts and issues that may be preventing updates from installing.
2. Restart Windows Update Services Manually
Sometimes, simply restarting Windows Update services can fix the error. To do this, you’ll need to use Command Prompt or PowerShell. Here’s how to do it:
Step 1. Press Win + X and select Command Prompt (Admin) or Windows PowerShell (Admin).
Step 2. In the command window, enter the following lines one by one and press Enter after each:
net stop wuauserv
net stop bits
net start wuauserv
net start bits
These commands stop and restart the Windows Update and Background Intelligent Transfer Service (BITS)—both of which are essential for downloading and installing updates. Restarting these services gives Windows a clean slate to retry the update and often clears stuck or stalled processes behind error 0x80070643.
3. Repair or Reinstall the .NET Framework
The .NET Framework is a core component used by many Windows applications. If it’s corrupted or outdated, it can trigger update issues like error 0x80070643—especially during system or security patch installations. To repair or reinstall .NET Framework:
Step 1. Open Control Panel > Programs > Programs and Features.
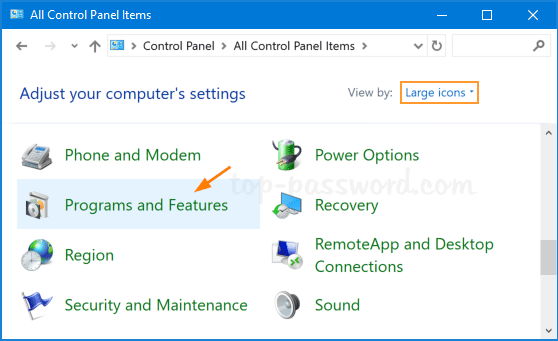
Step 2. Locate Microsoft .NET Framework in the list.
Step 3. If available, click Repair.
Step 4. If repair isn’t an option or doesn’t solve the issue, uninstall the current version.
Step 4. Download and install the latest version of the .NET Framework from the official Microsoft .NET website.
Once repaired or reinstalled, restart your computer and try updating Windows again. This often resolves update failures linked to .NET issues.
4. Use SFC and DISM to Fix Corrupted System Files
Corrupted or missing system files are a common cause of Windows Update errors like 0x80070643. In some cases, they can even trigger more serious system crashes, such as the System Thread Exception Not Handled error in Windows 10/11.
Run System File Checker (SFC)
SFC scans your system for damaged or missing system files and restores them using a cached copy. How to run SFC:
Step 1. Right-click the Start menu and choose Windows Terminal (Admin) or Command Prompt (Admin).
Step 2. Type the following command and press Enter: bash sfc /scannow
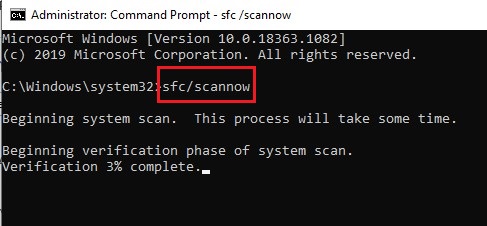
Step 3. Wait for the scan to finish (this may take 5–10 minutes).
Step 4. If any issues are found, Windows will attempt to fix them automatically.
Run DISM to Repair the Windows Image
If SFC doesn’t resolve the problem, DISM can help by repairing the underlying Windows image used during system operations. How to run DISM:
Step 1. Open Command Prompt or PowerShell as administrator.
Step 2. Run this command: swift DISM /Online /Cleanup-Image /RestoreHealth
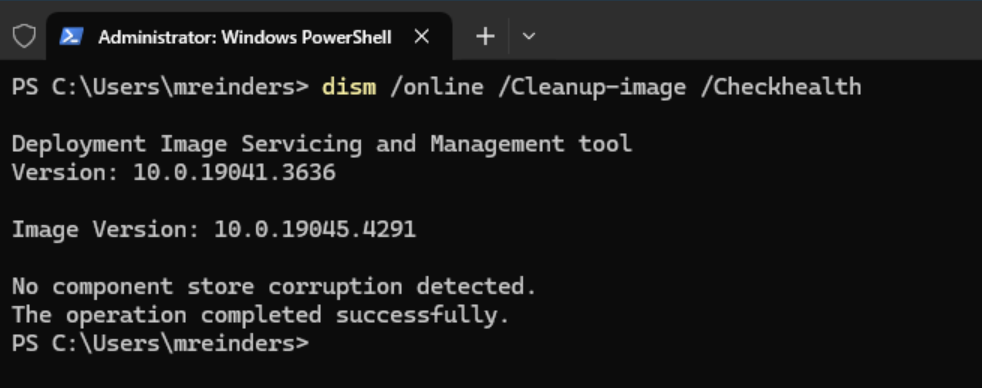
Step 3. Let the tool complete its process—it may take up to 20 minutes depending on your system performance.
After running both tools, restart your PC and try updating again. Many users have reported that these scans successfully fixed the root cause of error 0x80070643.
Recover Lost Files with WinfrGUI After a Failed Update
If your system was damaged during the update process—or you had to run commands that affected your drive structure—you might notice missing documents, photos, or personal files afterward. WinfrGUI is a free, user-friendly utility that builds on Microsoft’s official Windows File Recovery tool. Instead of relying on command-line input, it offers a clean, graphical interface that makes file recovery accessible even to non-technical users.
Why use WinfrGUI?
- ✅ No command-line skills needed
- ✅ Recover files from formatted, corrupted, or damaged drives
- ✅ Supports recovery of documents, images, videos, and more
- ✅ 100% free and lightweight
- ✅ Compatible with Windows 10 & 11
Whether a failed update wiped your work documents or a DISM repair caused unexpected data loss, WinfrGUI can help you quickly scan your drive and recover important files with just a few clicks. You can download WinfrGUI for free and start the recovery process right away.
5. Manually Install the Failed Update
Sometimes, you may need to manually install the update that’s failing to install automatically. You can do this by downloading the update from the Microsoft Update Catalog. Here’s how:
Step 1. Go to the Microsoft Update Catalog website.
Step 2. Search for the update using the update code (e.g., KBxxxxxxx).
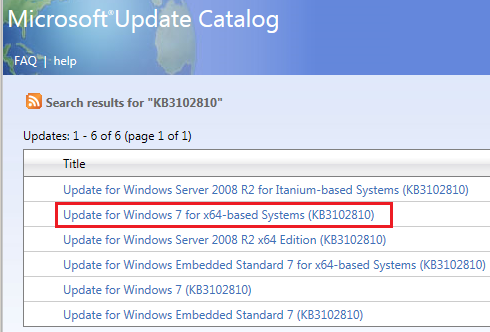
Step 3. Download the correct version of the update for your system.
Step 4. Install the update manually and restart your computer.
This is especially useful if the update is stuck and hasn’t installed automatically.
6. Temporarily Disable Third-Party Antivirus Software
Some antivirus software, especially third-party security programs, may interfere with Windows Update and cause error 0x80070643. To troubleshoot, you can try temporarily disabling your antivirus software while you run the update. Steps to disable antivirus:
Step 1. Open your antivirus program.
Step 2. Look for an option to disable or turn off real-time protection.
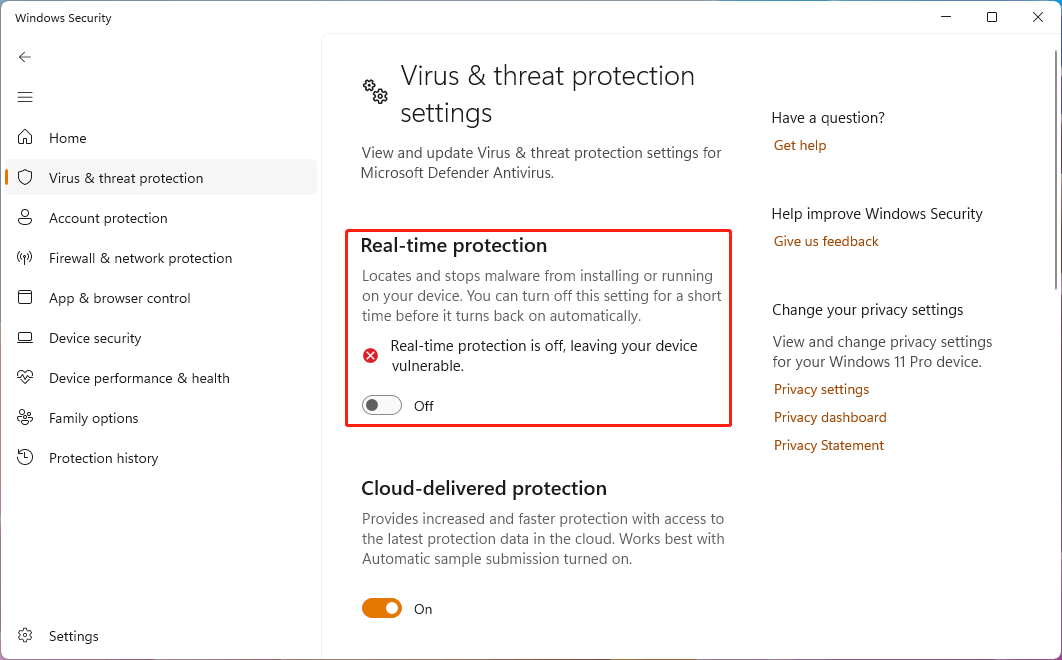
Step 3. Try installing the update again.
Step 4. Once the update is complete, don’t forget to re-enable your antivirus software.
If the update installs successfully after disabling your antivirus, consider adding Windows Update as an exception in your antivirus settings.
7. Reset Windows Update Components
If the above steps don’t work, resetting the Windows Update components is a more advanced method to fix stubborn update issues. Follow these steps:
Step 1. Open Command Prompt or PowerShell as administrator.
Step 2. Type the following commands one at a time and press Enter after each:
net stop wuauserv
net stop cryptSvc
net stop bits
net stop msiserver
ren C:\Windows\SoftwareDistribution SoftwareDistribution.old
ren C:\Windows\System32\catroot2 catroot2.old
net start wuauserv
net start cryptSvc
net start bits
net start msiserver
Step 3. These commands stop and restart key update services, as well as rename folders that might contain corrupted update files. After resetting the components, try updating again.
Conclusion
Facing Windows Update error 0x80070643 can be frustrating, but with these seven proven fixes, you should be able to resolve the issue quickly. Whether you try the built-in troubleshooters, repair system files, or manually install the update, there’s a solution for every user. If you continue to experience problems, don’t hesitate to use System Restore or a file recovery tool like WinfrGUI to safeguard your important files before taking more drastic actions. If one of these solutions worked for you, let us know in the comments below! Feel free to reach out for more troubleshooting tips or ask for further assistance.
🔗 Also Read: Recovery Partition Missing Windows 10? Simple Fixes [2025]