How to Recover Shift Deleted Files in Windows 10 Quickly and Safely

Have you ever accidentally pressed Shift + Delete on your precious files, only to realize they’re now permanently gone? 😱 Don’t worry—before you panic, know this: how to recover Shift deleted files is possible! Even though files deleted this way bypass the Recycle Bin, they aren’t gone forever. In fact, there are several methods you can use to recover them in Windows 10—quickly and safely. This guide will show you exactly what to do, from built-in tools like File History to more advanced techniques, so you can get your files back in no time!
What Happens When You Use Shift + Delete?
───────────────────────────────────────────
Stage │ Recovery Chance
───────────────────────────────────────────
Marked Deleted │ █████████████████████ 100%
Data on Drive │ ████████████████ 80%
Waiting Overwrite │ ███████████ 50%
───────────────────────────────────────────
- When you press Shift + Delete, Windows immediately marks the file as deleted, but the actual data is still stored on your drive, waiting to be overwritten.
- This is why the file is still recoverable, even though it doesn’t appear in the Recycle Bin.
- The sooner you act, the better your chances of successful recovery!
Pre-Recovery Checklist
Before diving into the recovery process, there are a few important steps to ensure the best possible outcome.
These steps will help you avoid further data loss and maximize your chances of success. Here’s what you need to do:
Step 1: Avoid saving new files to the same drive where the deleted file was stored.
Step 2: Check cloud backups or external drives for copies of the file.
Step 3: Determine if your drive uses NTFS or FAT, as some recovery tools work better with specific file systems.
With these preparatory steps completed, you’re ready to move on to the recovery methods.
Method 1: Restore Previous Versions (File History)
One of the simplest ways to recover Shift-deleted files is through File History, a built-in feature in Windows 10 that automatically backs up your files. If you’ve set it up beforehand, this method is quick and easy. Steps to Use File History:
Step 1: Open File Explorer and go to the folder where you originally saved the file.
Step 2: Right-click the folder and select “Restore previous versions.”
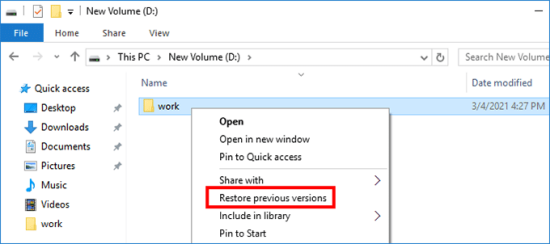
Step 3: Review the list of available versions and select the one you’d like to restore.
Step 4: Click Restore to recover the file to its original location.
File History must be enabled before the file was deleted in order for this method to work. If it wasn’t set up beforehand, don’t worry—we’ve still got other recovery options you can try. Also Related How to Recover Deleted Files from Recycle Bin After Emptying It in Windows 11
Method 2: Using Windows File Recovery Tool (WinFR)
If File History wasn’t enabled, you can use Windows File Recovery (WinFR), a powerful tool that allows you to recover Shift-deleted files from NTFS and FAT file systems. This method is a bit more advanced but still easy to follow. Steps to Use Windows File Recovery (WinFR):
Step 1: Install Windows File Recovery from the Microsoft Store.
Step 2: Open Command Prompt with administrator rights (right-click and select Run as administrator).
Step 3: Enter the following command to recover your file (replace the file path accordingly):
winfr C: D: /n \path\to\file.xlsx
This command scans the C: drive and recovers the specified file to the D: drive.
If you’re not comfortable with the command line, there’s a simple solution: WinfrGUI, a graphical interface for WinFR that makes the process even easier. Now, let’s explore another option if WinFR doesn’t work for you.
Method 3: Recover From Temporary Files
If you were working on a file before it was lost, Excel’s AutoSave and AutoRecover features might have saved a version of it. These options are especially useful for recovering unsaved or lost work. Steps to Recover From Temporary Files:
Step 1: Open File Explorer and go to the Temp folder by typing %Temp% in the address bar.
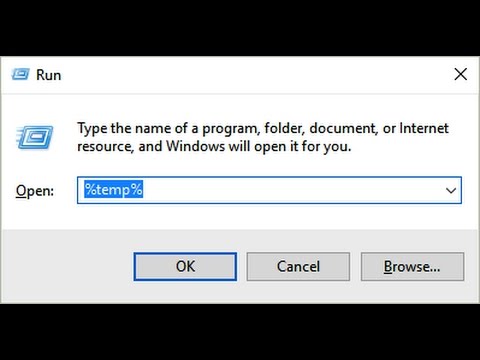
Step 2: Search for files with the .xlsx or .xlsb extension.
Step 3: Open the file to see if it’s the one you need, then save it to a safe location.
If this method still don’t yield the results you need, there’s one more approach we can explore.
Advanced Option: Using Command Prompt (CMD)
For those who are comfortable with command-line tools, you can try using CMD with specific commands like attrib. This method is more technical, but it can still be very effective when other methods fail. Steps to Use Command Prompt:
Step 1: Open Command Prompt as an administrator.
Step 2: Type the following command and press Enter to search for all .xlsx files on the C: drive:
attrib -h -r -s /s /d C:\*.xlsx
Step 3: If you locate your deleted file, copy or move it to a safe folder to prevent further loss.
This method is a bit more advanced, but it’s worth trying if the standard options haven’t worked. Now that your file is recovered, it’s a good time to look at how you can prevent data loss in the future with some simple tips. Also Related click How to Recover Permanently Deleted Files Windows 10 Using CMD
Troubleshooting FAQ: After Recovering Your Files
Q1. How do I make sure my recovered files aren’t damaged?
After recovery, open each file—especially documents, images, and videos—to check for corruption or incomplete data.
Q2. Where should I store recovered files to keep them safe?
It’s best to save recovered files to a different drive, an external hard drive, or a trusted cloud storage service to avoid overwriting or future loss.
Q3. Should I scan recovered files for viruses?
Yes. Always run a full antivirus scan on recovered files to ensure they’re clean and free of malware or hidden threats.
Q4. How can I automatically back up important files in the future?
Enable File History in Windows. It regularly saves versions of your files and lets you restore previous copies if something gets deleted or corrupted.
Q5. What’s the safest way to back up my data?
Use a combination of cloud storage (like OneDrive or Google Drive) and external drives for regular backups.
Q6. How can I avoid accidentally deleting important files?
Turn on delete confirmation prompts in Windows and avoid using Shift + Delete unless you’re absolutely sure. You can also organize critical files into clearly labeled folders to reduce mistakes.
Conclusion
In summary, learning how to recover Shift deleted files in Windows 10 quickly and safely doesn’t have to be complicated. With methods like File History, Windows File Recovery, and AutoRecover, you can recover your valuable files without hassle. Remember to back up your data regularly to minimize the risk of losing files in the future. The next time you accidentally hit Shift + Delete, you’ll know exactly how to get your data back!
🔗 Also Read: Can CCleaner Recover Deleted Files? 2025 Guide