How to Recover a Folder You Accidentally Removed from Home Screen

Accidentally removing a folder from your home screen or hard drive can feel like a disaster, especially when it holds sensitive or crucial data. The good news is that in most cases, your files aren’t permanently gone right away. In this comprehensive guide, we will demonstrate five distinct methods and provide a detailed 6-step recovery process to help you recover a folder you accidentally removed from your home screen, along with any other deleted folders from your computer, external drives, or cloud storage. This is a crucial action to safeguard the sensitive data stored on your personal computer.
Method 1: The Quick Fixes — Check Temporary Storage and Shortcuts
Before diving into advanced recovery tools, try these immediate, quick fixes. They work for the majority of recent, simple deletions.
#1. The Recycle Bin / Trash
The first and easiest place to check is your computer’s Recycle Bin (Windows) or Trash (macOS). How to Recover:
Step1: Double-click the Recycle Bin icon on your desktop.
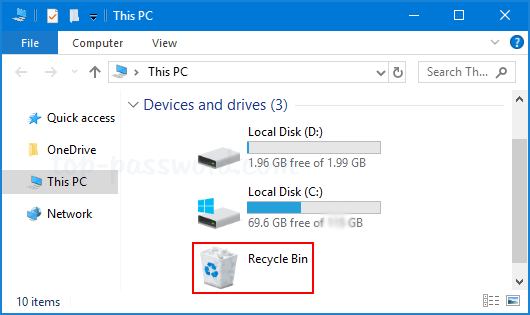
Step2: Locate the deleted folder by name, date deleted, or size.
Step3: Right-click on the folder and select “Restore” (Windows) or “Put Back” (macOS). The folder will instantly return to its original location.
#2. The Undo Shortcut (Ctrl+Z or Command+Z)
If you just deleted the folder and haven’t performed many other actions, the universal “Undo” command can reverse your last action. How to Recover:
Step1: Immediately press Ctrl + Z (on Windows) or Command + Z (on Mac).
Step2: This shortcut will often cancel the most recent delete action, bringing the folder back instantly.
Important Note: This shortcut only applies to the most recent activity. You must use it immediately after deleting the folder accidentally.
#3. Benefit from Cloud Storage (If Applicable)
If the deleted folder was synced with a cloud service like Google Drive, Dropbox, or OneDrive, it’s likely still there. How to Recover:
Step1: Log in to your cloud storage account via a web browser.
Step2: Navigate to the cloud’s specific “Trash” or “Deleted Files” section (sometimes called the “Recycle Bin”).
Step3: Find your folder, select it, and choose the “Restore” option.
Real-time Updates: These systems are updated in real-time, but they also typically keep deleted files for a set period (e.g., 30 days) before permanent removal. You may even be able to access previously saved versions of your files within the cloud system.
Method 2: Recover Deleted Folders Using Windows Built-in Tools
Windows offers powerful, built-in features that can restore files and folders from a previous saved state. This is especially helpful if you accidentally removed a folder from your home screen and didn’t realize it until much later.
#1. Restore Previous Versions
This feature is available if you have File History or System Protection enabled on your Windows PC. It allows you to restore a folder to a state it was in before you deleted the files. Recover steps are as follows:
Step 1. Navigate to Location: Go to the folder location where the deleted folder used to be (e.g., the Desktop or the parent directory).
Step 2. Access Properties: Right-click on the parent folder (or the empty space in the directory) and select “Properties.”

Step 3. View Backups: Click the “Previous Versions” tab. A list will appear showing available backups, complete with the date and time they were saved.
Step 4. Select Version: Select the version of the folder that existed before you deleted your files.
Step 5. Restore or Copy: Click “Restore” to recover the deleted files to the original location, or click “Copy…” to save the recovered files to a different, safe location.
Caution: Recovering from a previous version will replace all newer files in that folder. It is important to keep your current files in a separate location before proceeding with restoration.
#2. Recover with File History
The File History feature is a dedicated backup utility in Windows that can be set up to regularly save copies of files stored in your Libraries, Desktop, Contacts, and Favorites folders to an external or network drive. How to Recover (Using File History):
Step 1. Search “Recover” in the Windows Start menu.
Step 2. Select “Restore your files with File History” from the list of results.
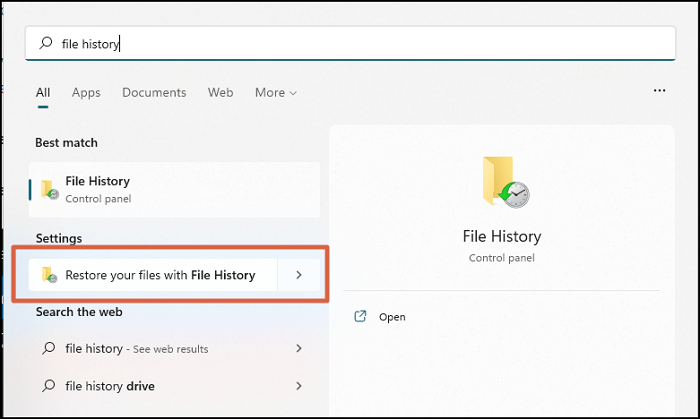
Step 3. Open File History: The File History window will appear, allowing you to browse backups saved over time.
Step 4. Browse Versions: Use the left and right arrows to navigate through the different file history versions until you find the folder you wish to restore.
Step 5. Restore Files: Click the green “Restore” button (a circular arrow icon) when you locate the correct version.
Enabling File History: If your “Files History” window is empty, it may not be enabled yet. You can activate it later for future protection, but it won’t help with the current loss.
Method 3: Using Dedicated Data Recovery Software
If the methods above fail—meaning the folder has been permanently deleted from the Recycle Bin or no backup was enabled—the file data may still exist on your hard drive until it’s overwritten by new data. A dedicated data recovery tool is your best bet for deep scanning and recovery. This step is critical if you accidentally removed a folder from your home screen and can’t find it anywhere else.
The Recommended Solution: WinfrGUI
We recommend WinfrGUI (a free graphical interface for the powerful Microsoft command-line tool, Windows File Recovery). A simple graphical interface eliminates the need for sophisticated instructions and settings, making file recovery simple for everyone.
Why WinfrGUI Stands Out:
- Easy to Use: You can recover deleted folders in Windows with just a few clicks. You don’t need to know complex command-line instructions.
- Free and Secure: Enjoy the peace of mind that comes with using WinfrGUI, knowing it’s free and safe to use. It can recover various types of files, including videos, documents, pictures, and more, at no cost.
- Compatibility: WinfrGUI supports Windows 10 version 19041.0 or higher and works smoothly with NTFS, FAT, exFAT, and ReFS file systems. Whether you’re using an internal hard drive, USB drive, or an external storage device, WinfrGUI will protect you against removing mistakes, power outages, system failures, and hard drive damage.
How to Recover with WinfrGUI:
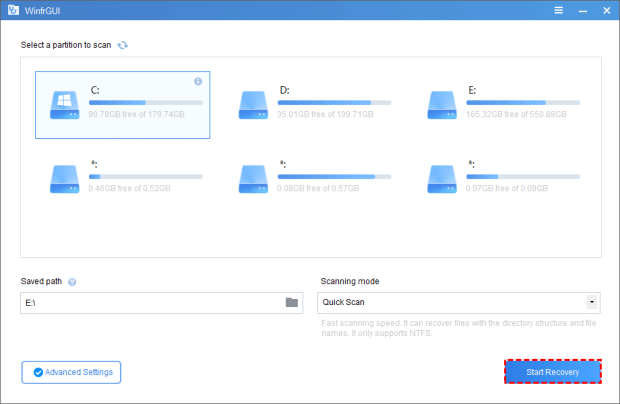
Step1: Download WinfrGUI Free and install it on a drive different from the one you are recovering from, to avoid overwriting the missing data.
Step2: Start WinfrGUI and select the source folder/partition you want to scan to find missing files (e.g., your C: drive).
Step3: Select a secure location on your PC (a different drive is best) to save the recovered data.
Step4: Click “Start Recovery” and wait for the scan to complete.
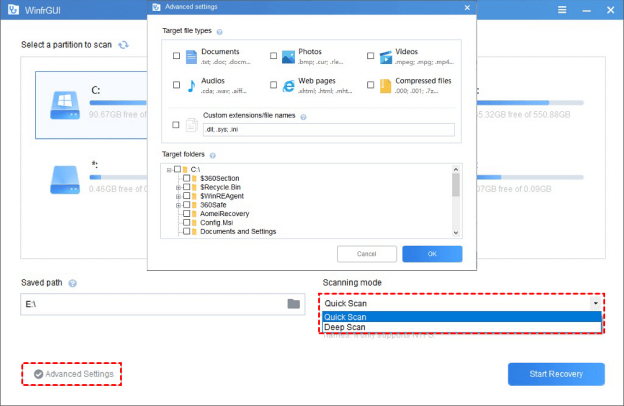
Step5: Review the files found: WinfrGUI provides tools for filtering specific file types and searching for specific folder names.
Your 6-Step Action Plan for Folder Recovery
When a deletion occurs, follow these steps sequentially to maximize your chances of a successful and complete recovery.
Step 1: Stop Using the Affected Drive Immediately
- Crucial Action: The moment you realize a folder is missing, stop using the computer/drive where the folder was located. Every new file saved or system update performed risks overwriting the data space where your deleted folder resides, making recovery impossible.
Step 2: Locate Deleted Directories (Check Temporary Storage)
- The first place to look is always the “Recycle Bin” or “Trash” (as covered in Method 1).
- Log in to your PC or cloud system to access files. Remember that some cloud storage solutions use various authentication methods for security; proceed with the authorized approach.
Step 3: Search for Backup Copies
- Deleted folders are sometimes preserved in a backup. Check your system’s automatic backups, cloud storage trash, or external device drives.
- Find a backup of device drives: Your device’s operating system may automatically schedule backups for all your data (like Windows Backup and Restore), or you might have enabled and scheduled the daily switching manually. Make sure you have a previously saved copy of your folder.
Step 4: Use Built-in Recovery Tools
- If the folder isn’t in the Recycle Bin/Trash, use your operating system’s powerful tools: Restore Previous Versions or File History (as covered in Method 2). This is a reliable way to get back an accidentally removed folder from your home screen.
Step 5: Deploy a Recovery Tool
- In cases where folders are difficult to find or only partially recovered (Step 4 failed), you must use a data recovery tool like WinfrGUI (as covered in Method 3). These tools ensure that your folder recovery, which may have been saved or edited incompletely by the system process, is done completely. Search for the well-known data recovery tool online and follow their instructions after opening the program.
Step 6: Backup and Save for the Future
- After successfully retrieving the lost folders, the final and most important step is to backup your computer to protect your information and files for future access.
- The Best Practice: Regularly back up your system and files. It simplifies recovery and prevents future data loss. Backup and save your information in the cloud, on an external storage device, or on other accessible storage systems.
Data Loss Prevention: 6 Troubleshooting FAQs
Data recovery is a solution, but proactive backup is the real prevention. Here are quick answers to common questions about securing your files and avoiding future data loss:
Q1: What is the most important rule for preventing future data loss?
The “3-2-1 Backup Rule.” Maintain 3 copies of data, on 2 different media types, with 1 copy stored offsite (cloud/remote drive).
Q2: How can I ensure my backups run without me remembering?
Automate Backups. Use Windows File History or third-party software to schedule automated, incremental backups.
Q3: Where should I store my backup copies?
Use a combination of local storage (external drive) and off-site cloud storage (Google Drive, OneDrive, etc.).
Q4: I use an external hard drive for backup. What should I do to ensure it works?
Practice External Drive Discipline. Regularly connect the drive and verify the backup software completes the process successfully.
Q5: If I use cloud storage, do I still need a local backup?
Yes. Cloud is offsite, but a local backup allows for much faster retrieval of large files.
Q6: If I restore a file, should I immediately back it up again?
Yes. Immediately perform a new backup to ensure your newly recovered, complete data is protected.
Conclusion
The stress of having accidentally removed a folder from your home screen is something almost every computer user experiences. The crucial takeaway is that deleted data is rarely gone forever immediately. By following the immediate steps—checking the Recycle Bin and using Ctrl+Z—you can solve most simple deletions. For more complex losses, the power of File History and dedicated data recovery software like WinfrGUI provides a robust safety net. Ultimately, while recovery methods are essential, the best defense is a good offense: a reliable, automated backup strategy. Taking a few moments now to set up your backups will save you hours of anxiety and potential data loss down the road.
🔗 More Tutorials: